February 2015 – A Month of Photos From the Red Double Wide

I know the weather was crazy in some places during February but here we mostly enjoyed breezy sunshine and temps in the 50’s during the day.  It got me dreaming about gardens and baby animals.  Hope you are getting to enjoy some sunshine too wherever you are, even if there is snow on the ground!

Here are some photos of our February.

DSCN4493 (640x480)

DSCN4453 (640x479)

The ladies started laying a few eggs again.

DSCN4495 (640x480)

This is his “I really want to chase that chicken” look.

DSCN4506 (640x480)

This is the view I enjoy when I go for a walk.

DSCN4529 (640x480)

The dogs obviously found something way more interesting to do than walk with me.

DSCN4533 (480x640)

DSCN4526 (640x480)

Oh look, the red double wide…..fancy that!

DSCN4303 (640x471)

This is my favorite chicken, so sweet!

DSCN4540 (640x480)

The official pooper scoopers!  As you can see one is scooping poop and the other is pretending that she was not just singing into the end of a long stick. HAHA gottcha!

DSCN4504 (480x640)

Jo and Digger repurposed this old cabinet into a “cat house”.  Now the dogs can’t eat the cat food.  It’s kinda funny to watch them try though!!

DSCN4395 (640x474)

In the classroom, we celebrated Valentines Day and studied Polar Bears.

DSCN4421 (640x480)

I wish I had his worries!!

Have a wonderful March everyone!!

DSCN4464 (640x480)

DSCN4459 (640x480)

DSCN4456 (480x640)

This post was shared at: The HomeAcre Hop

Tater Cakes

tater cakes

This all started on a Monday night when I was cooking a chicken for dinner.  The perfect side for a home grown, roasted chicken is mashed potatoes….or “mashies” as my girls like to call them.  I started out with a 5 pound bag of potatoes and started peeling and chopping.  While I was busy with that, the girls were struggling with some math home work and Digger was in the shop with Uncle Tom and a couple others.  As I was peeling and chopping and explaining how to figure out how many hours it would take a train to go 2,435 miles at 40 miles an hour…..Jade drove in the driveway.  At that moment I realized there are five men outside and it’s almost dinner time…… What if Digger brings ALL of them in to eat with us??  I decided 5 pounds of potatoes wasn’t going to cut it, so I grabbed another 5 pound bag. (intending to use 5 or 6 more taters)  Somewhere between the next three story problems, the puppy peeing on the floor, and instructing Little Chef to make a salad….my brain left and my hands kept peeling and chopping.  Before I knew it I had 10 pounds of potatoes in the pot nicely peeled and ready to boil.  So, I boiled them…then mashed and mashed and mashed…..that was a LOT of mashies!  Shortly after that, all the extra people that where hanging out in the shop went home.  Yep, ten pounds of mashed potatoes and five people.  That’s how I discovered the wonderful world of Tater Cakes.  It’s the perfect way to use up 7 pounds of mashed potatoes!  It still took us three days to finish them off, but no one complained a bit. 🙂

These are so fun to make and so versatile.  There are many extras you can add in and on them and they are great for breakfast, lunch, dinner, a snack, brunch, second breakfast, supper, second lunch, second dinner…..(yes, Hobbits and I have lots in common)  My point is, tater cakes taste great anytime of the day, or night.

Umm,… just so you know, I don’t have hairy toes.  In case you were picturing me eating 10 times a day with hairy toes.  Just stop picturing the hairy toe part.  Okay, now that I have clarified that, we can move on to the recipe.

Start with your left over mashies and add flour, eggs, salt, pepper, and finely chopped onion.

DSCN4399 (640x480)

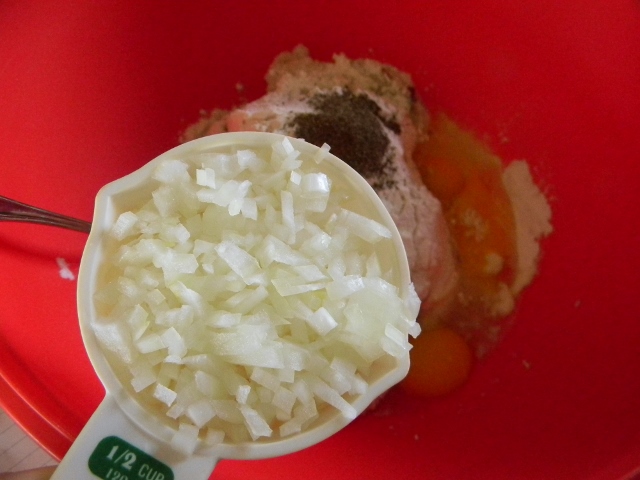
This is where you can add in any “extras”  like cheese, bacon, peppers, whatever sounds good.

DSCN4405 (640x480)

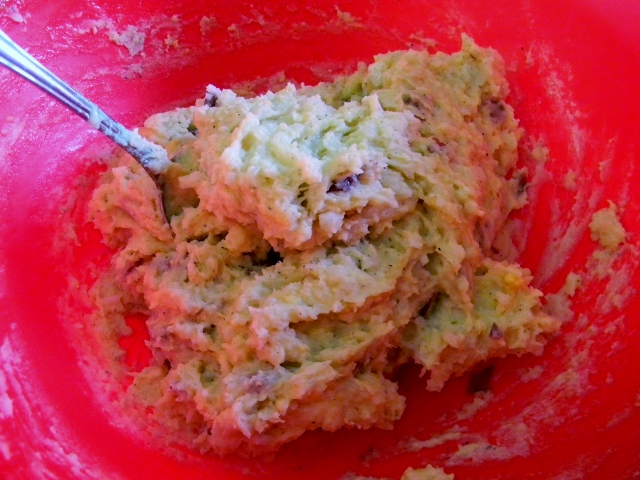
The consistency will totally depend on the mashed potatoes you added.  If it is to sticky add more flour and if it’s to dry add another egg.

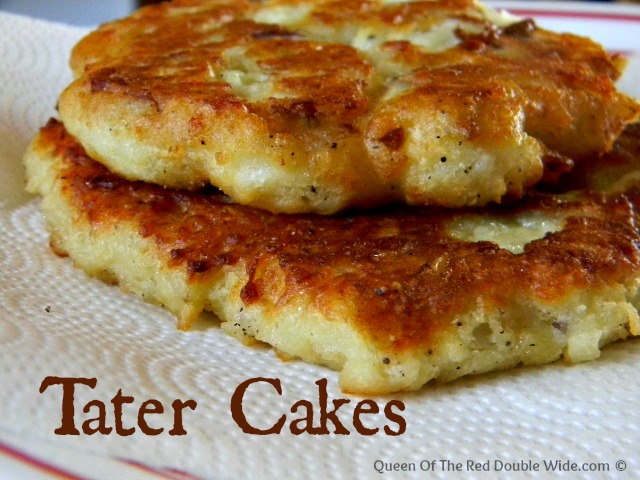
Take about half a cup of your mixture and form it into a patty and fry it in a bit of olive oil or butter until golden brown.  I make one and give it a taste to see if it needs more salt or pepper.  My homemade seasoning salt works great on these.

These could be served with ketchup or gravy or ranch dip or sour cream or just plain!

DSCN4417 (640x480)

Oh yummmmm, I’m going to accidently on purpose make way to many mashies from now on. 🙂

5.0 from 4 reviews
Tater Cakes
 
Author:
Ingredients
  • 4 cups of leftover mashed potatoes
  • 1 cup all purpose flour (maybe more)
  • 2 to 3 eggs
  • ½ cup finely chopped onions (green onions work too)
  • salt and pepper to taste
  • 1 to 2 cups of "extras" like cheese, bacon, peppers, etc. (optional)
  • olive oil or butter
  • toppings like: ranch dressing, gravy, ketchup, sour cream, salsa, etc. (optional)
Instructions
  1. In a big bowl mix together the mashed potatoes, flour, 2 eggs, onions, a little salt and pepper and any extras you want to add in. Heat a skillet with a little olive oil on medium heat. Take about ½ a cup of your mixture and make a patty. It should be easy to form and not to sticky. If it's to dry add another egg and if it's to sticky add a little more flour. Fry your "patty" in the hot oil until golden brown on both sides. I always make one and then taste it to see how much more salt and pepper to add. Add the toppings that suit you and enjoy!

This Post was shared at: The HomeAcre HopWeekend Potluck


Chocolate Peanut Butter No Bake Cookies

Chocolate Peanut Butter No Bake Cookies

The other day Mary asked me what my favorite cookie is.  Without much thought at all, I answered “Chocolate No Bake Cookies”.  Then I wondered why the heck I don’t make these more often.  Then I remembered how I can’t stop eating them and it’s probably good I don’t make them very often.  Then I got the ingredients out and whipped up a batch. 🙂

Start by heating up butter, milk, cocoa powder, and sugar in a saucepan on medium heat. (stirring constantly)  Bring it to a boil and keep stirring for 3 minutes.  Remove from the heat, add vanilla & peanut butter and stir until all the peanut butter has melted and is completely incorporated.  Then pour into a big bowl with the oatmeal.

making Choc Cookies

Stir together.

cookies

Then plop a spoon full at a time onto wax paper and let them cool.  It will take 20 to 30 minutes.

DSCN4203 (480x640)

These are sooo stinken easy to make!!  It’s the perfect cookie to make with your kids.  That’s probably why most people have fond childhood memories of these delicious, easy cookies.  🙂

5.0 from 1 reviews
Chocolate Peanut Butter No Bake Cookies
 
Author:
Ingredients
  • ½ cup butter
  • ½ cup milk
  • ¼ cup cocoa powder
  • 2 cups sugar
  • 1 teaspoon vanilla
  • ½ cup peanut butter
  • 3 cups of oatmeal
Instructions
  1. Heat the butter, milk, cocoa powder and sugar in a sauce pan on medium heat. Bring to a boil while stirring constantly. Let it boil for 3 minutes while continuing to stir. Remove from the heat and add vanilla and peanut butter stir until peanut butter is melted and incorporated. Then pour into a big bowl with the oatmeal and stir. Drop a spoon full at a time onto waxed paper. Let cool for 20 to 30 minutes.


Tip: Doing a little prep work before you start making these cookies is a good idea.  I lay out my waxed paper and measure out the peanut butter and oatmeal ahead of time.  Once you take your chocolate mixture off the heat you want to hurry and finish before your mixture gets to cool.  If it cools to much you will end up with chocolate granola instead of cookies.  Chocolate granola is tasty but a little frustrating when you were looking forward to cookies. 🙂

Easy no bake cookies


This post was shared at: The HomeAcre Hop The Weekend PotluckSimple Saturdays Blog Hop


My Favorite Dinner Rolls

I LOVE homemade dinner rolls.  I usually only make them around the holidays, but this Christmas I made them and have been on a roll ever since.  Haha…anyway…I’ve made these rolls several times recently and they are sooooo good.  Soft, light, and buttery.

Homemade Dinner Rolls

This recipe will make 24 rolls, so if you can’t eat that many in a couple days they also freeze well too.

Step 1: Dissolve 1 tablespoon of yeast in 1 cup of warm tap water (105 to 110 degrees) with 2 tablespoons of sugar. Let it sit for about 10 min.  It should get bubbly, that means your yeast is working.

yeast

Step 2: In a microwave safe bowl put 1/4 cup of butter (cut into small pieces) 1/4 cup of sugar and 3/4 cup of milk and microwave for 1 to 2 minutes.  The butter should be mostly melted.

butter milk sugar

Step 3: Place the melted butter, sugar and milk mixture in a mixing blow.  Add salt, 1 cup of whole wheat flour, the egg and stir well.

DSCN3959 (640x480)

Step 4: Add the yeast to the mixing bowl and stir well.  Keep stirring and add a couple more cups of flour.  This is were I change the paddle to the dough hook on my mixer.  Keep mixing while you add the last two cups of flour.  Let the dough hook knead the dough until it comes together and pulls away from the sides of the bowl.

kneading the dough

Step 5: Scrape the dough off the dough hook and plop the dough out on a floured surface.  Knead it just a few times to bring it all together and form a nice ball.  Place the dough back in the mixing bowl.  Cover the bowl with plastic wrap and leave it in a warm place to rise.  I put mine in a warm bowl of water to speed up the rising.  It took about a half hour.  If I don’t put it in the water it takes about an hour.

dough

Step 6: Punch the dough down and put it on a well floured surface, knead it a few times to push out all the air bubbles. Then divide the dough in half.  Take the first half and roll it out into a circle.

DSCN4127 (640x480)

Spread butter (about 2 tablespoons) over your dough circle then use a pizza cutter to cut the dough into four equal pieces, then cut those pieces into 3 slices each.  You will then have 12 triangles.

cu into 12

Take each triangle and roll them up starting with the wide end.  Place them on a greased jelly roll pan.  Repeat the process with the other half of the dough.  You will end up with 24 crescent shaped rolls.

24 rolls

Step 7: Cover the pan of rolls with plastic wrap and set in a warm place to rise (about 1 hour).

DSCN4139 (480x640)

Step 8: Bake in a 350 degree oven for 10 to 15 minutes.  When they are golden brown take them out of the oven and run a stick of butter over the top……yummm.

DSCN4149 (640x480)


5.0 from 1 reviews
My Favorite Dinner Rolls
 
Author:
Ingredients
  • 1 tablespoon of yeast (one packet will work too)
  • 1 cup of warm water (105 to 110 degrees)
  • ¼ cup plus 2 tablespoons sugar
  • ½ cup of butter divided in half (plus some for brushing on your finished warm rolls)
  • ¾ cup of milk
  • 1 egg
  • ½ tablespoon salt
  • 1 cup whole wheat flour
  • 4 to 4½ cups all purpose flour
Instructions
  1. Step 1: Dissolve 1 tablespoon of yeast in 1 cup of warm tap water (105 to 110 degrees) with 2 tablespoons of sugar. Let it sit for about 10 minutes.
  2. Step 2: In a microwave safe bowl put ¼ cup of butter (cut into small pieces) ¼ cup of sugar and ¾ cups of milk. Microwave for 1 to 2 minutes until the butter is mostly melted.
  3. Step 3: Place the melted butter, sugar and milk mixture into a mixing bowl and add the salt, egg and cup of whole wheat flour. Stir well.
  4. Step 4: Add the yeast mixture to the mixing bowl and stir well. (change to a dough hook on the mixer) Now add the flour stirring will between each cup until the dough pulls away from the edges of the mixer and sticks to the dough hook. This will happen somewhere around 4 cups of flour.
  5. Step 5: Scrape the dough off the dough hook and plop it onto a well floured surface. Knead it just a couple times to make a nice, smooth ball. Place it back into the mixing bowl and cover with plastic wrap. Place it in a warm place to let it rise.
  6. Step 6: After your ball of dough has doubled in size, (30 to 60 min) punch it down and place it on a well floured surface. Knead a few time to push out all the air bubbles. Divide the dough in half and roll 1 half out into a circle. Spread about 2 tablespoons of butter over your circle. Using a pizza cutter cut your circle into 4 equal pieces then cut each piece into three triangles. You will have 12 triangles. Roll each triangle up starting at the wide end and place them on a greased jelly roll pan. Repeat with the other half of your dough. You will end up with 24 rolls.
  7. Step 7: Cover your pan of rolls with plastic wrap and set in a warm place to rise. (about 1 hour)
  8. Step 8: When they have about doubled in size bake them in a 350 degree oven for 10 to 15 minutes. When they are golden brown, take them out of the oven and run a stick of butter over the top.

Note: You don’t have to use a mixer they can be mixed up by hand.  I use the mixer to save time, and lets face it, I’m not that buff.

This recipe was adapted from: How Does She.com

This post was shared at: The HomeAcre HopThrifty Thursday Clever Chicks Blog HopThe Weekend Potluck Simple Saturdays Blog Hop


January 2015 – A Month Of Photos From The Red Double Wide

January has come to an end and I’m hoping the fog has too. 🙂  We only had a couple days that the sun came out and we enjoyed them VERY much.  Here’s a few photos I took during January.

Fluffy Cat

This is Peach, Jo declares that she is “the fluffiest cat in the world”.

Mt. Adams

Mt. Adams on one of the sunny days.

Cinnamon Rolls

Mary made these yummy rolls!!

elk shed

Jo found this elk shed out behind the house!  I’ve only seen elk around here once so we thought this was pretty cool.

Snowman

We had a snowman theme in my classroom throughout January. 🙂

zombie response

If any of you have any zombie issues….I know who to call!

Hope your February is off to a WONDERFUL start. 🙂


Free Printable Build A Snowman Craft

Happy winter!

DSCN3887 (480x640)

I’ve been working on a snowman activity packet for my preschool and kindergarten students.  This is one of the crafts from the packet!  Hope you and your little ones each enjoy making a unique snowman. 🙂

Click on the link below to open the pdf file and print your snowman template.

Free Build A Snowman Craft

I will add a link to my snowman activity packet as soon as I get it finished.  🙂

Okay, I finished my snowman activities packet.  There are four fun activities in this packet that include: counting, number and letter recognition, and number word recognition.  My pre-k, kindergarten, and even 1st grade students have been loving these. Here is the link to my TPT store.

This post was shared at: Freebie Friday

December 2014 – A Month Of Photos From The Red Doublewide

December started with a thick layer of ice.

rose bush ice


ice


Marshmallow


pine tree ice


pine cone ice

The girls sang and were “wise men” in the school program.

My girls

Of course we spent LOTS of time cooking and baking this month, and even more time eating!

Christmas goodies

My hubby totally nailed my Christmas gift this year.  Usually we agree not to get anything for each other.  He’s not the best shopper, and even worse at keeping a secret.  But this year with the help of a friend (Thanks Mike!)  he got EXACTLY what I’ve been wanting for a LONG time.  Right down to the correct size and color!!

DSCN3913 (640x480)

Isn’t it beautiful!  I’ve been using it everyday. 🙂

Now that Christmas is behind us I have been concentrating on school projects for January.  This year I’ve decided on a snowman theme for winter.

DSCN3887 (480x640)

Hope you all had a very blessed Christmas and everyone at the red doublewide wishes all of you a productive new year full of love, peace, and lots of bacon!

Easy Crab and Bacon Dip

Crab and bacon dip

It’s party season, and parties mean TONS of finger food!  This is one of my all time favorite dips!  It’s great for parties and has become a New Years tradition at our house.  The best part is it’s super easy to throw together and you can make it ahead of time and refrigerate until the party starts.  It doesn’t get much better than bacon, crab, and cream cheese…….yummmm!

Ingredients

Start by cooking the bacon, slicing the onions and chopping up the crab.  While the bacon is cooling beat the softened cream cheese and sour cream in a blender until light and fluffy. Stir in the pepper and horseradish.  Then fold in the bacon bits, crab and onions with a spatula.  I’m sure you could use real crab, but I’m to cheap frugal to buy the real stuff and my family enjoys the imitation crab just fine.  If you don’t have any horseradish on hand you can substitute mustard but horseradish is the best. (in my opinion)  At this point it needs to sit for a bit to let the flavors blend, a hour in the fridge should do the trick or you could even make it the day before.  Just before serving give it a little taste and add salt or pepper if needed.  I added a little garlic salt to this batch. 🙂


Easy Crab and Bacon Dip
 
Author:
Ingredients
  • 1 (8oz)block of cream cheese softened
  • ½ cup of sour cream
  • ⅛ teaspoon ground pepper
  • 2 teaspoons horseradish
  • 4 slices of bacon, cooked and crumbled
  • 1 cup of chopped imitation crab (or a 6oz can of crab meat)
  • 2 green onions sliced
Instructions
  1. Start by cooking the bacon, slicing the onions and chopping the imitation crab (if you use a can of crab meat drain it and remove the cartilage). In a blender whip the sour cream and softened cream cheese until soft and fluffy. Mix in the pepper and horseradish. Then fold in the bacon, crab, and onions with a spatula. Refrigerate for at least an hour before serving.

Crab dip

This post was shared at: The Homemaking Party

Sep Oct & Nov 2014 – Photos From The Red Double Wide

So I got a little behind…..ok REALLY behind on posting ANYTHING!!  Life just got away from me for a couple of months.  I didn’t even take many pictures, but I figured I’d share a few from what I did get over the last three months and let everyone know that we’re still alive and well. 🙂

Sky

Jade got a puppy and Jo is in love….This is the most spoiled dog I know!

Jo and baby Gunner

Mary went to work with Digger and saw Sasquatch. 🙂  (She took this one).

Big Foot

I have always had a rule about picking pumpkins….”If you can pack it you can have it.”

Pumpkin Patch

They might be getting to big for that rule.  They managed to get their 38 and 41 pound pumpkins home safely.

Big Pumpkins

I’ve been trying to spend a few hours every Saturday cooking for the freezer.  I love having homemade extras in the freezer for breakfast and lunches.

cooking for the freezer

Gunner grew LOTS in the last couple months.

DSCN3495 (640x480)

We got our first snow really early and the weather has been pretty crazy.  We’ve already missed 3 days of school due to ice storms.  Hope you are all staying warm, safe and enjoying this holiday season so far!

August 2014 – A Month Of Photos From The Red Double Wide

Where did August go?!?!  We start school in a couple of days!  I have to admit I’m pretty excited, I think the girls are too but they won’t admit it. 😉

Hope you enjoy a few photos from the past month.

Jo bday cake

Jo turned 10 in August, she loves to decorate her own cake.

Dragonfly

blueberries

The blackberries from the farmers market were deeeeelicious!

Smiles

We enjoyed more hot weather and Mr. Busy spent a lot of time in the water.

Bantie egg

All three of the bantam hens started laying eggs……so little and cute!

Showing Chickens

The fair was tons of fun!  I’m so proud of my girls they did a great job with their chickens and everything else they entered at the fair!!

At the fair

DSCN3046 (480x640)

All blues and 3 reserve champions. 🙂

DSCN3059 (640x480)

The fruit stands around here are full of wonderful stuff!  The only draw back to all the fresh fruit are the fruit flies that come with it. 🙁

Thanks for stopping by the Red Double Wide!!


Related Posts Plugin for WordPress, Blogger...