Happy last day of November everyone. 🙂 The count down to Christmas is on, so I promised the girls we could get the Christmas decorations out this weekend (this time of year always sneaks up on me!)
I don’t have many outdoor pictures for November. It’s been down in the twenties most days leaving me less than thrilled to spend much time outside.
This is Diggers supply of fire wood for his shop. It is slowly getting moved into the barn…very slowly….. Apparently the teenager in the house doesn’t want to be outside either.
He would much rather be working on a skateboard in the warm shop.
The ladies checking out their clean nesting boxes. They are such curious critters.
If you follow my Facebook page, then you already know I finally cooked one of our home grown chickens! It was delicious!
My little chef helped out in the kitchen getting ready for Thanksgiving. She made these beautiful dinner rolls….they were melt in your mouth good! We will be making these over and over and will definitely share the recipe soon.
Yes, it was totally me that stole the roll out of the center of the pan. It was a little less than perfect and needed to go……into my belly. 😉
I shared in my post about my contributions to Thanksgiving dinner that I had never made pumpkin pie before. This is Jo helping make our first pumpkin pies EVER. I got a few helpful emails from readers and Diggers Aunt. After taking all the great advice into account, they turned out super yummy. My only complaint is the crust was a little tough. Pretty sure I know what to do differently next time. 🙂
Hope you all had a blessed Thanksgiving and are having fun preparing for Christmas. Thanks for visiting the red double wide!
Grace has been encouraging me to share some of what I do around here for awhile now, and it’s gettin’ on toward the time of year when I can. Hopefully for some of you this might lend some insight on the other side of homesteading. (Don’t worry ladies, the Queen still has plenty of recipes and the like on the way.)
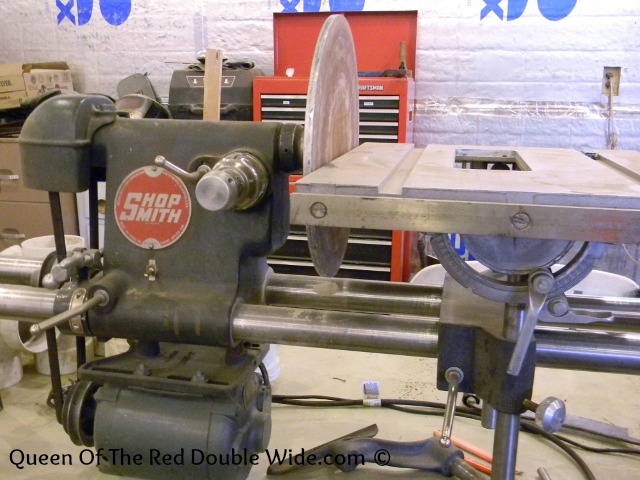
The “Gumption Trap” post created some curiosity about the disk poured from melted beer cans I’m turning on the lathe. The disk itself is simply an attachment for the shopsmith that I’ll glue sandpaper to. I already have one, but I’m stuck with the grit that’s on it, so the idea is to have several of these disks allowing me a range of sanding grit I can easily swap out for different needs.
Oh sure, I could probably find them on the internet with some pursuit, but I know I’d never spend the money, and besides, where’s the fun in that? I already have the means to make my own, and the reason I have these means is the story I’d like to share.
It all started with a CRASH! I emphasized here for good reason as I can attest to the damage. Oh, and apparently this was followed shortly by a second CRASH! (a failed attempt to correct the first crash). At the time, little brother was here helping me insulate my shop (he did most of it), which of course meant that everything needed to be moved away from the walls, including the machine lathe that was about to be in the way. It was late in the season so digging was slow, but I did have to work that day. Because of this, I described to him that the lathe was very top heavy and the weight favored one end. (meaning it’s really difficult to move). I detailed the effort it had taken to place the lathe where it was against the wall, and then guessed at the time I’d be back to help him with it. I left shortly after for the doings’ that needed done assuming the point had been made.
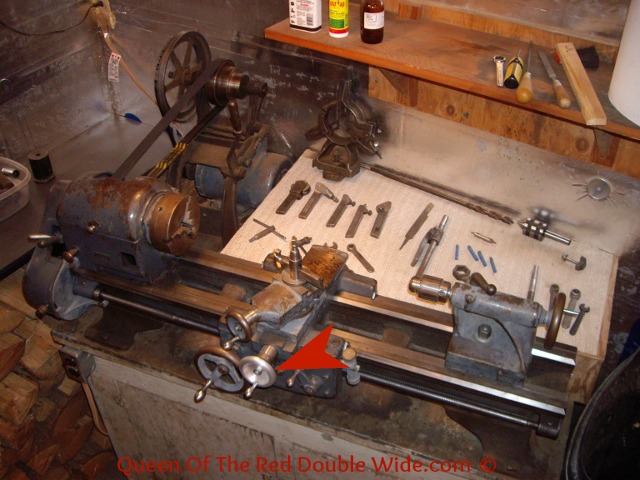
This is the 1951 machine lathe. The red arrow indicates a new replacement knob, again made from beer cans.
Chris is twenty something, ambitious, and strong. I suppose I shouldn’t have been surprised when he called a few hours after I’d left… The conversation began with a long “Ummm”,… followed by a VERY pregnant pause. You can imagine the sinking feeling this caused in me, and it didn’t improve much as he reluctantly described the events that prompted the call. I didn’t mind hearing that my carving desk had been partially crushed, but the then as of yet undetermined damage to a machine lathe I didn’t even own concerned me somewhat. I consoled him as best I could with a “No biggie, these things happen”, and commenced to finish the project I was working on so I could get home to evaluate what obligations I may need to fill.
By the time I got home, Chris had already found and ordered the cast apron that held the travel gears. This fairly impressed me by the fact that in a few short hours (and having no experience with machine tools) he’d managed to identify, find, and purchase online such a fundamental component to an antique lathe. This was heartening. Further disassembly however found a left handed jack screw nut in several pieces. Discovering just how rare and precious this little nugget of machined cast steel was in the market place encouraged me to consider alternatives. I just couldn’t see spending more for parts than the initial cost of the machine.
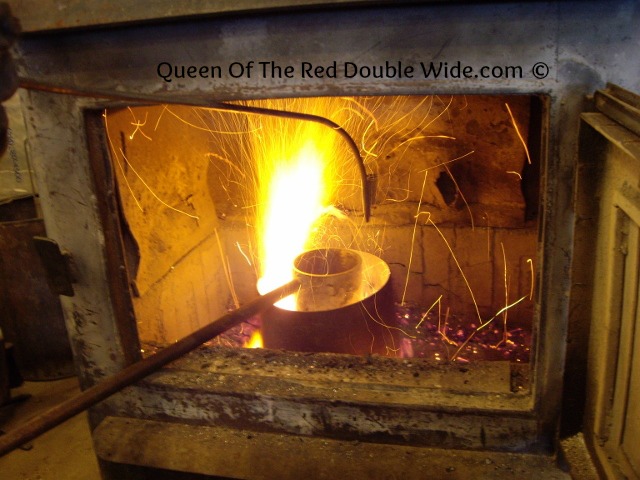
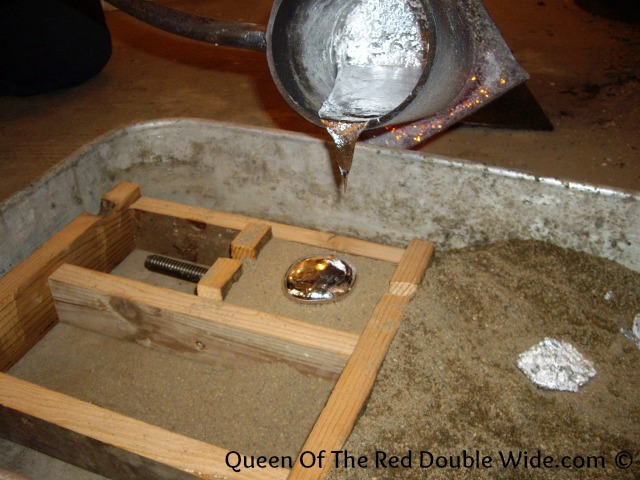
Ultimately, the unique nature of this particular part lead us to one simple question. Can we make our own? The specific tolerances of the threads were critical, so the only chance I could imagine for duplicating the original was to pour molten metal around the screw. (For some reason Chris looked skeptical). We would need a forge, a crucible, and casting sand tamped inside a form to hold the shape of the new nut. I had NONE of these things, and having had no prior experience in the subject, I barely even understood the basic principals of casting metals. Well,… it sounded like fun at the time.
Chris and I scavenged through my scrap piles of steel and lumber, and after a couple of hours cutting, welding, chin scratching, and some very crude woodwork felt ready to make a REALLY hot fire in my wood stove. (Was this a good idea? Well,… No. Not really.) We chunked up a fair pile of firewood small enough to drop between the crucible and a steel ring I’d hoped would contain the heat enough to avoid damage to my wood stove. (the idea was sound, but the application could have used some refinement.) This process took several grueling hours of feeding the fuel and metering the compressed air by hand. I suppose this would be a good time to share a personal quirk little brother has. Chris has an acute, and at times potentially hazardous fascination with fire. (I’ve quite literally uttered these words in my shop: “Please don’t throw shotgun shells in the fire…”) In this case however, it proved to remove me from a majority of the discomfort (think hot, sweaty, stinky…) kneeling on the floor in front of the wood stove trying to maintain the greatest temperature possible. Let’s just say I was happy to keep myself busy with the form and sand.
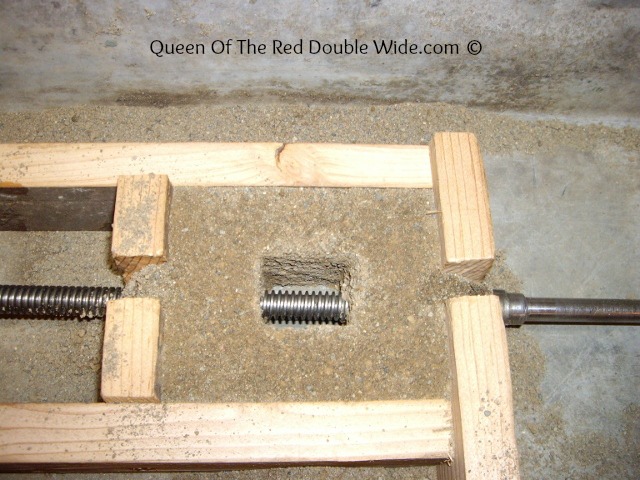
Not having a casting medium, I mixed play sand with some clean clay soil I dug out of the bank just outside my shop. I played with the mix and moisture until it felt about right and fashioned the form. Hindsight compels me to advise against this approach. The clay baked hard around the piece, and the course sand left a terrible finish,… but it worked. Later I learned how relatively inexpensive casting sand is, and I intend to buy some… Someday.
Originally I thought we could melt brass for the purpose, understanding of course that brass has a much lower melting point than the stainless steel the jack screw was made of, but that was a dismal failure. We did get it to melt (as well as most of the liner in my poor wood stove), but we couldn’t figure out how to remove the impurities.
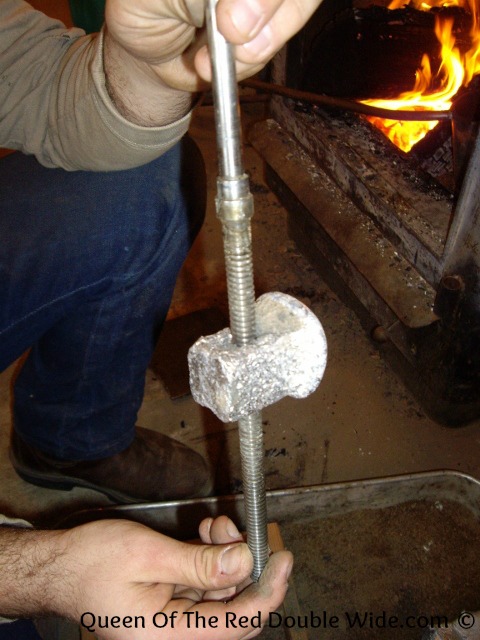
The next morning we decided to try melting aluminum. It’s much softer than brass which concerned me, but a whole lot easier to melt. (I’ve been collecting beer cans in one corner of the barn for years,… so I figured “what the heck.”) I was gambling on the aluminum shrinking away from the jack screw as it cooled so we could simply thread it off. It worked! Quite well as a matter of fact… Some cutting, filing, and a single hole drilled and threaded was all it took before reassembly.
I’d be lying if I said it worked like new when we were done, but hey, it didn’t work anything like new before it was dropped. After countless hours of use without fail, I’d consider it a success. Last winter I completely rebuilt that poor old lathe by the way (as you see it in the above picture). My intention was to simply replace the old, leather flat belt with a much superior serpentine belt common in most (okay, maybe all) vehicles these days. As it turned out, the extent of disassembly required to accomplish this task convinced me to go ahead with some major restoration, and I’m sure glad I did. A couple of weeks cleaning, filing, polishing, and lubricating the surprisingly vast array of parts and pieces that wound up spread all over my work bench proved to genuinely improve the poor old girls’ function. (For those who might care; I found plain old car wax to be an excellent preservative and dry lubricant for the exposed machined surfaces that need to be as frictionless as possible.) I enjoy having this resource, especially in good repair, and I use it far more than I ever would have imagined. Sure hope the owner doesn’t want it back anytime soon…
Okay granted,… Most homesteaders will never have a practical need to melt and pour any kind of metal for any reason whatsoever. I get that… I also get the fact that not everyone trying to develop and maintain a homestead would even begin to consider this kind of approach to such a random problem; but think about it guys… Fire intensified with forced air, molten metal flowing into a shape of our own design, and a chance to prove a legitimate alternative to accepted norms in our culture through redneck ingenuity. What could be better? Oh! And not to mention it provides a genuinely logical argument for our wives that greater dedication toward unburdening all those beer cans will help supplement a much needed resource. (I actually tried this on Grace. Somehow she didn’t seem convinced). For me, this sort of thing basically sums up the spirit of today’s homesteader.
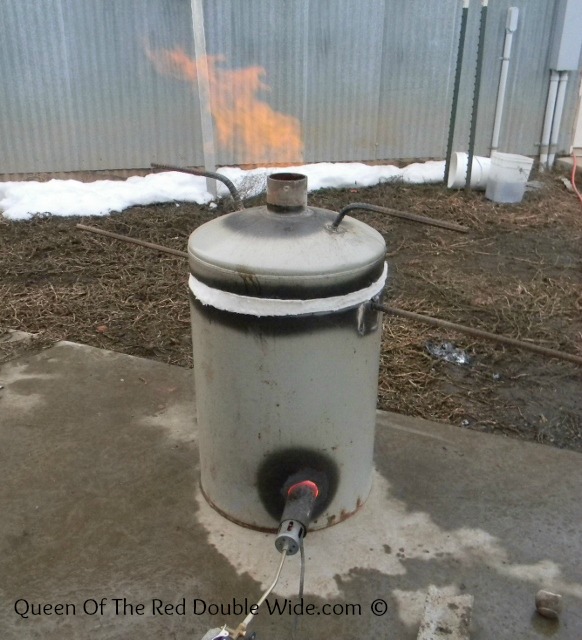
I suppose I should add that the following fall we (Chris’ helped) rebuilt the inside of my wood stove. The heavy tin liner was compromised during this adventure, and I don’t recommend others should attempt these temperatures in their own stoves. (My stovepipe is 8″ well casing. That means it won’t melt! I would not have attempted this project otherwise). It worked for the experiment you’ve just read, but we’ve since built (again with Chris’ help) a good sized forge. Youtube has many good posts on the subject. It really didn’t take long, and everything it’s made from was scavenged. (with the exception of the ceramic wool liner I spent $60.00 on). I have some good pics of the build, and I’d be happy to share how the project went if anyone is interested.
I have a confession to make……I don’t like turkey. There,… I said it. Let me be clear though, I don’t HATE turkey, I just don’t favor it. I can eat it, especially in a casserole or on a sandwich. But when it comes to Thanksgiving dinner, I want a big fat plate full of stuffing, a couple servings of salad, and then some more stuffing. Of course this is all after I have grazed on the veggie trays, fruit trays, deviled eggs, olives, and array of other “appetizers” that will be laying out on the counter before the turkey gets done. Needless to say by the time dinner is over I will be miserable and useless…..but I don’t think I’m alone here.
So, here are my non turkey contributions to Thanksgiving dinner this year. 🙂
Last week I shared a recipe for homemade thousand island dressing and promised to share my grandma’s special green salad to serve with it.
Just add some baby shrimp, a little crab meat, and some sliced olives to your greens.
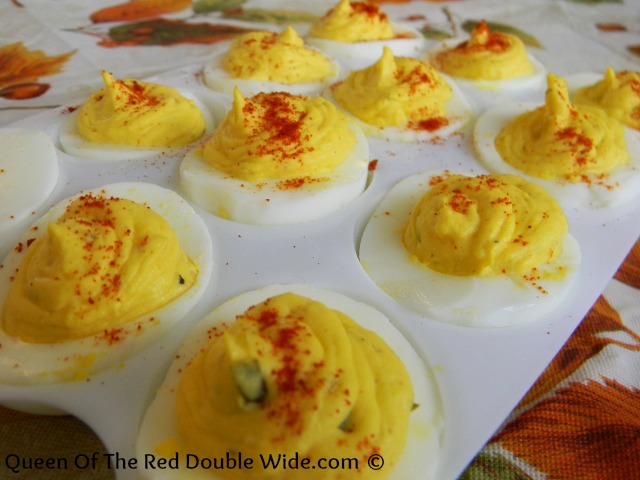
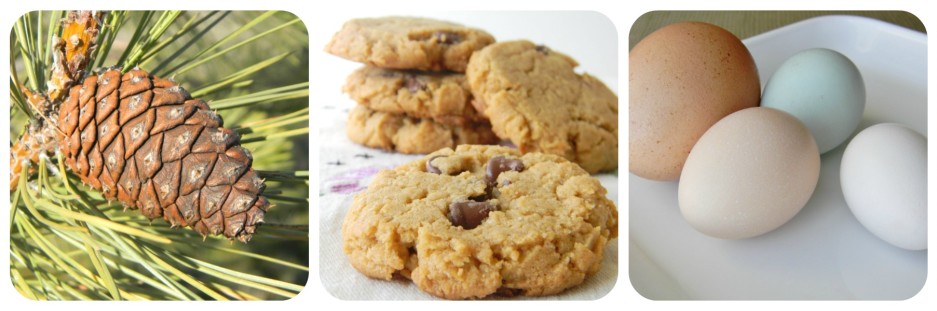
At most family functions I bring the deviled eggs. Not because mine are exceptional or better than others, it’s simply because I HAVE TOO MANY EGGS! (Well,… and mine are fresh!) So that’s my second addition to Thanksgiving dinner.
Note: If you also have nice fresh eggs and have a difficult time peeling them, click here to read my little “trick” on how to cook and easily peel farm fresh eggs. 🙂
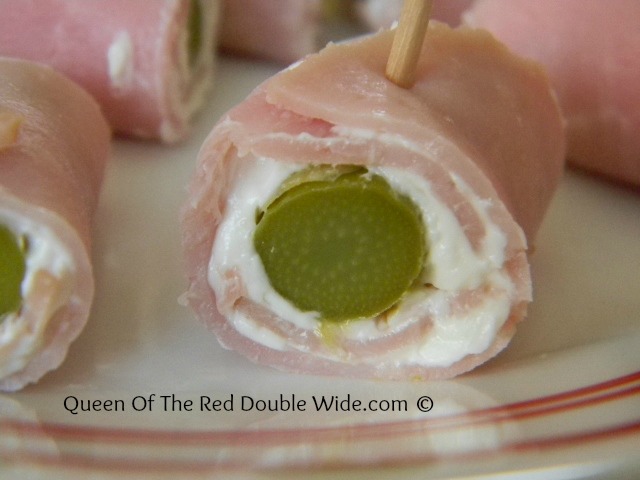
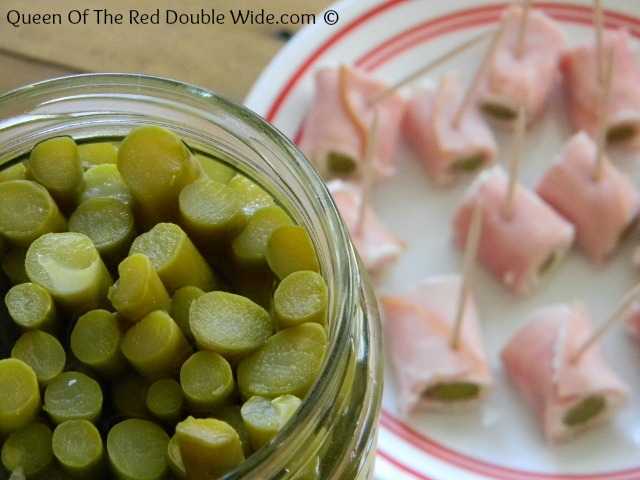
My next contribution is an easy appetizer…maybe my favorite appetizer. I call them asparagus wraps.
They are simply softened cream cheese spread on a thin slice of ham wrapped around pickled asparagus….and they are DELICIOUS!
Last Thanksgiving I ran out of time and instead of making these ahead of time I took the supplies and made them after I got to my parents. They disappeared just as fast as I could make them.
Now for my next confession…..I’ve never made pumpkin pie. Actually I’ve only ever made one pie in my entire life and that was an apple pie. It was about ten years ago and it turned out kinda weird?? So this Thanksgiving I have decided to try my first ever pumpkin pie! I’ll be sure to take pictures and let you know how it turns out.
I am sooooo thankful that my parents now have a large, conveniently located house that is perfect for large family gatherings. This has not always been the case, and Thanksgiving dinners took place at our house. I think squished and crazy would be the best words to describe those gatherings. As I shared, turkey is not my favorite meal and therefore cooking one is not my idea of fun. The last Thanksgiving we hosted, I spent my morning rushing around cleaning, opening doors and windows to fan the smoke out from the ran over turkey drippings. Oh, and meanwhile Digger was in the bathroom with a small blow torch trying to melt the spilled wax out of the sink (but that’s a story for another post). I am much happier to make my additions to dinner at home, pack them in a cooler, and leave my messy house. Then I can enjoy a wonderful meal with our awesome (and large) family at my parents house….and I’m sure my moms home grown turkey will be wonderful…under tons of stuffing and gravy!
What are your contributions to Thanksgiving dinner? Do you have the privilege of hosting and cooking the turkey? If so, my prayers are with you. 😉
“Oh give thanks to the Lord, for he is good, for His steadfast love endures forever.” Psalms 107:1
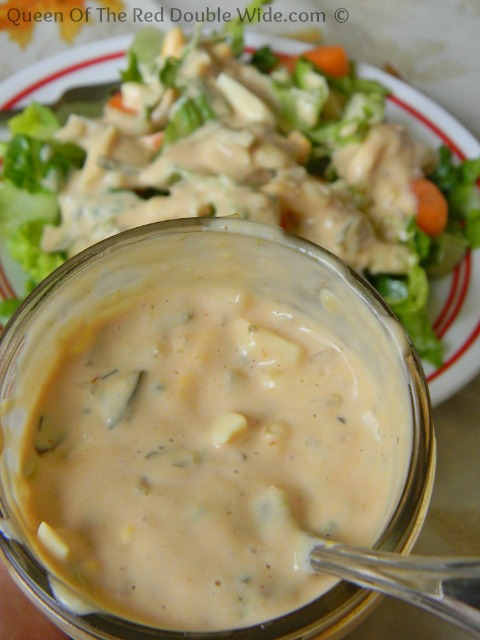
It’s November (just in case you weren’t aware), and when I start thinking about Thanksgiving dinner, I start thinking about this salad dressing. It’s a recipe I got from my grandma many moons ago. It’s so simple, DELICIOUS, and paired with my grandma’s special green salad, I wouldn’t want to have a Thanksgiving dinner without it!
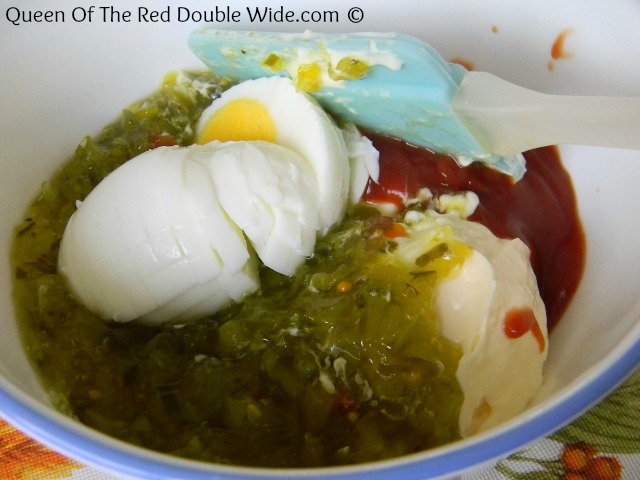
All you need is mayo, chili sauce or ketchup, sweet relish, and one hard boiled egg.
I used organic ketchup and I found a sweet relish that didn’t have corn syrup. Stir everything together and that’s it!
Now you’re wondering what my grandma’s special green salad is….that will be coming next week! 🙂 Have you started thinking about Thanksgiving dinner yet?
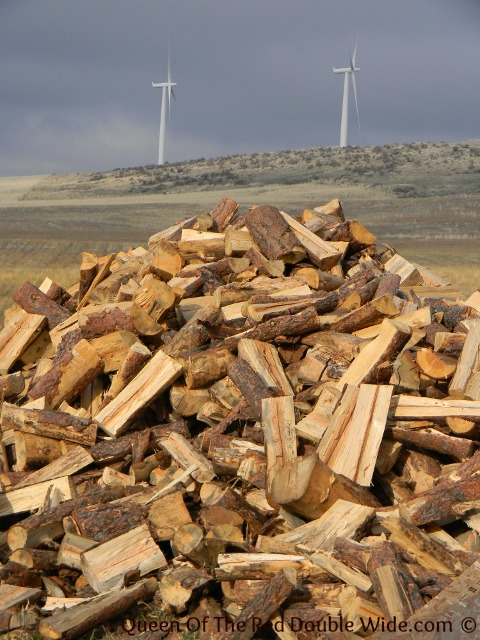 This is Diggers supply of fire wood for his shop. It is slowly getting moved into the barn…very slowly….. Apparently the teenager in the house doesn’t want to be outside either.
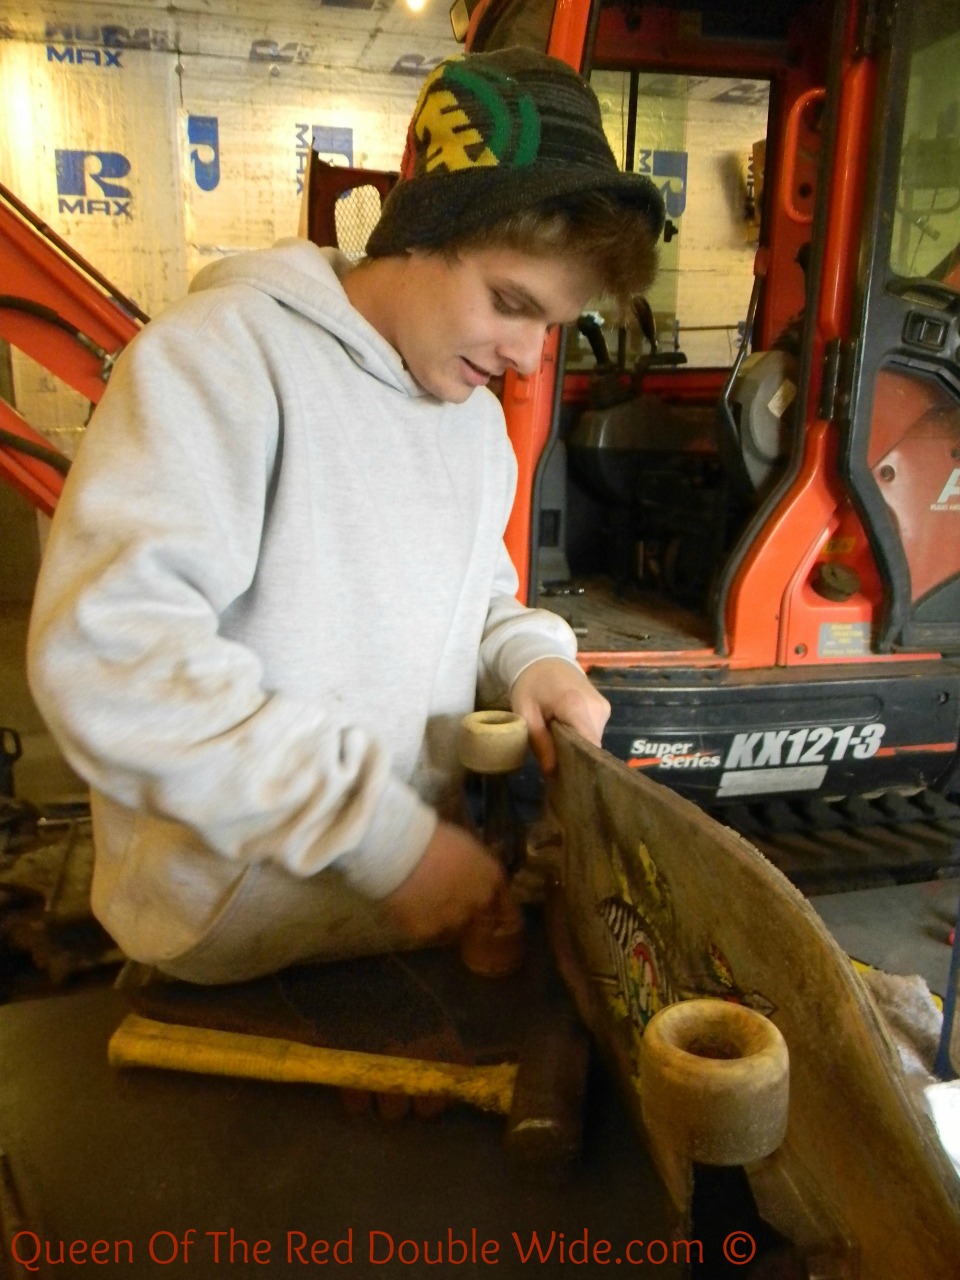 He would much rather be working on a skateboard in the warm shop.
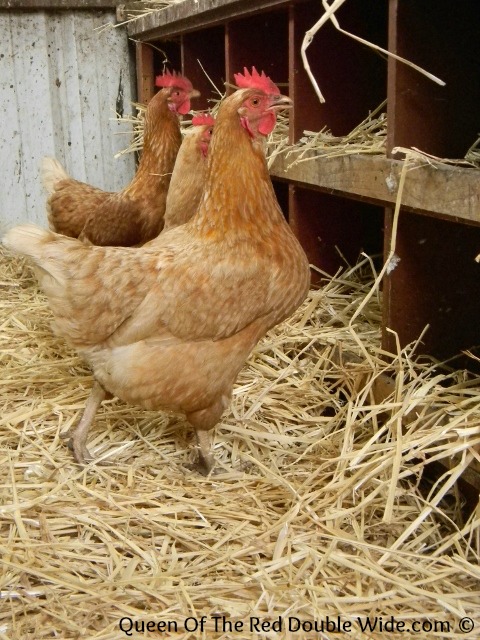 The ladies checking out their clean nesting boxes. They are such curious critters.
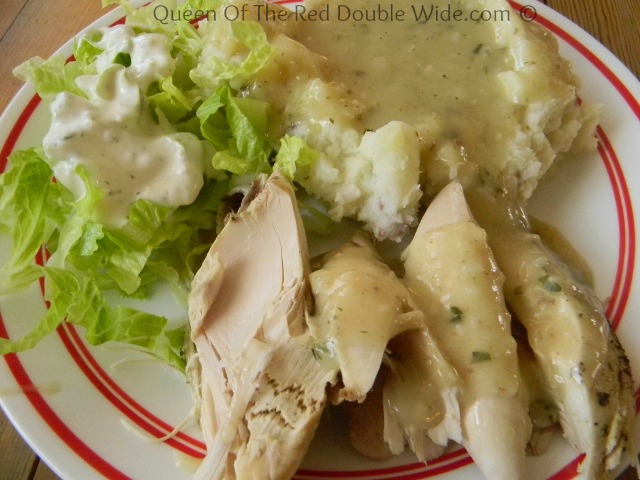 If you follow my Facebook page, then you already know I finally cooked one of our home grown chickens! It was delicious!
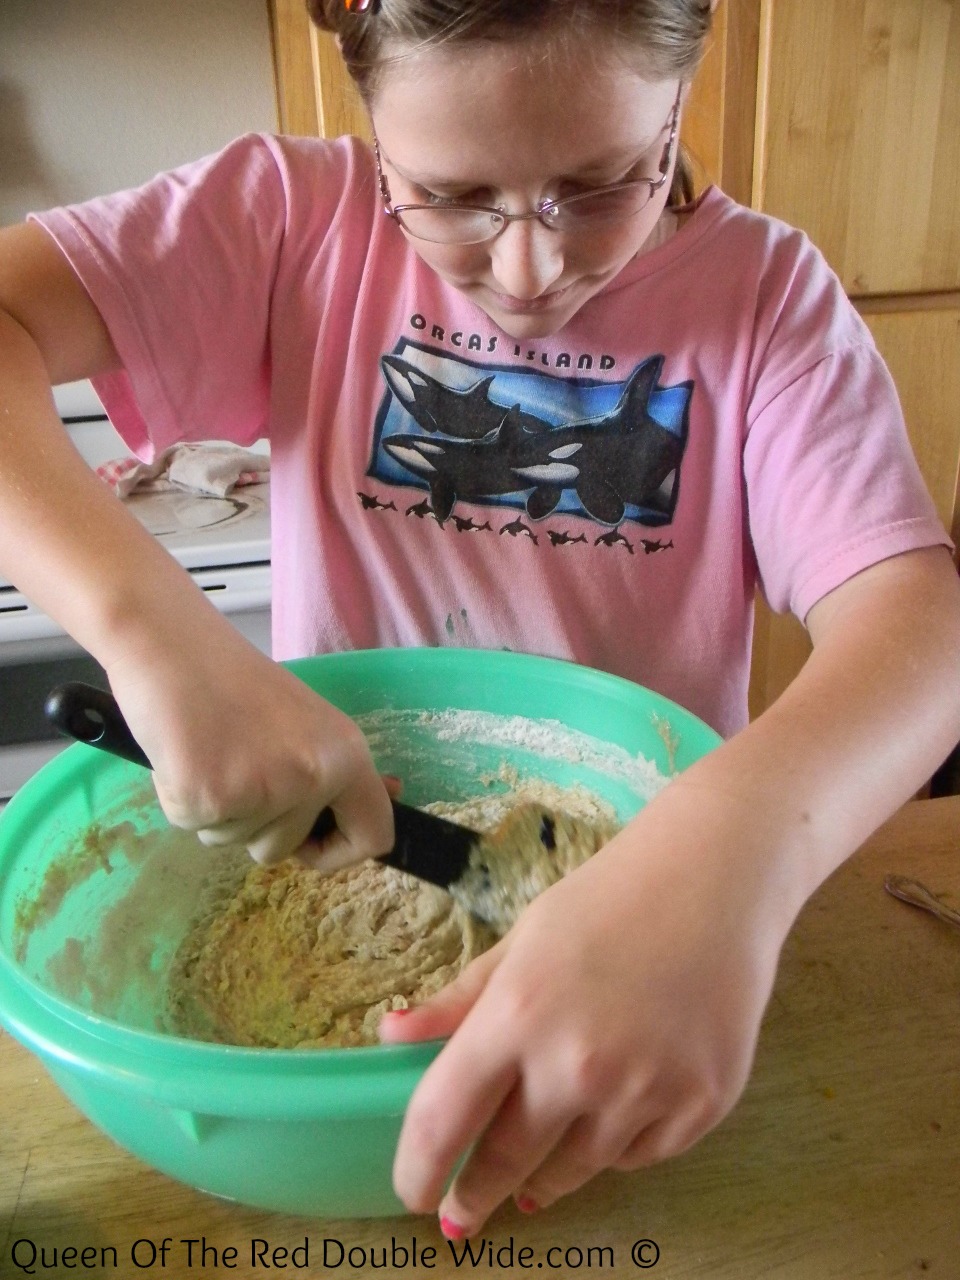 My little chef helped out in the kitchen getting ready for Thanksgiving. She made these beautiful dinner rolls….they were melt in your mouth good! We will be making these over and over and will definitely share the recipe soon.
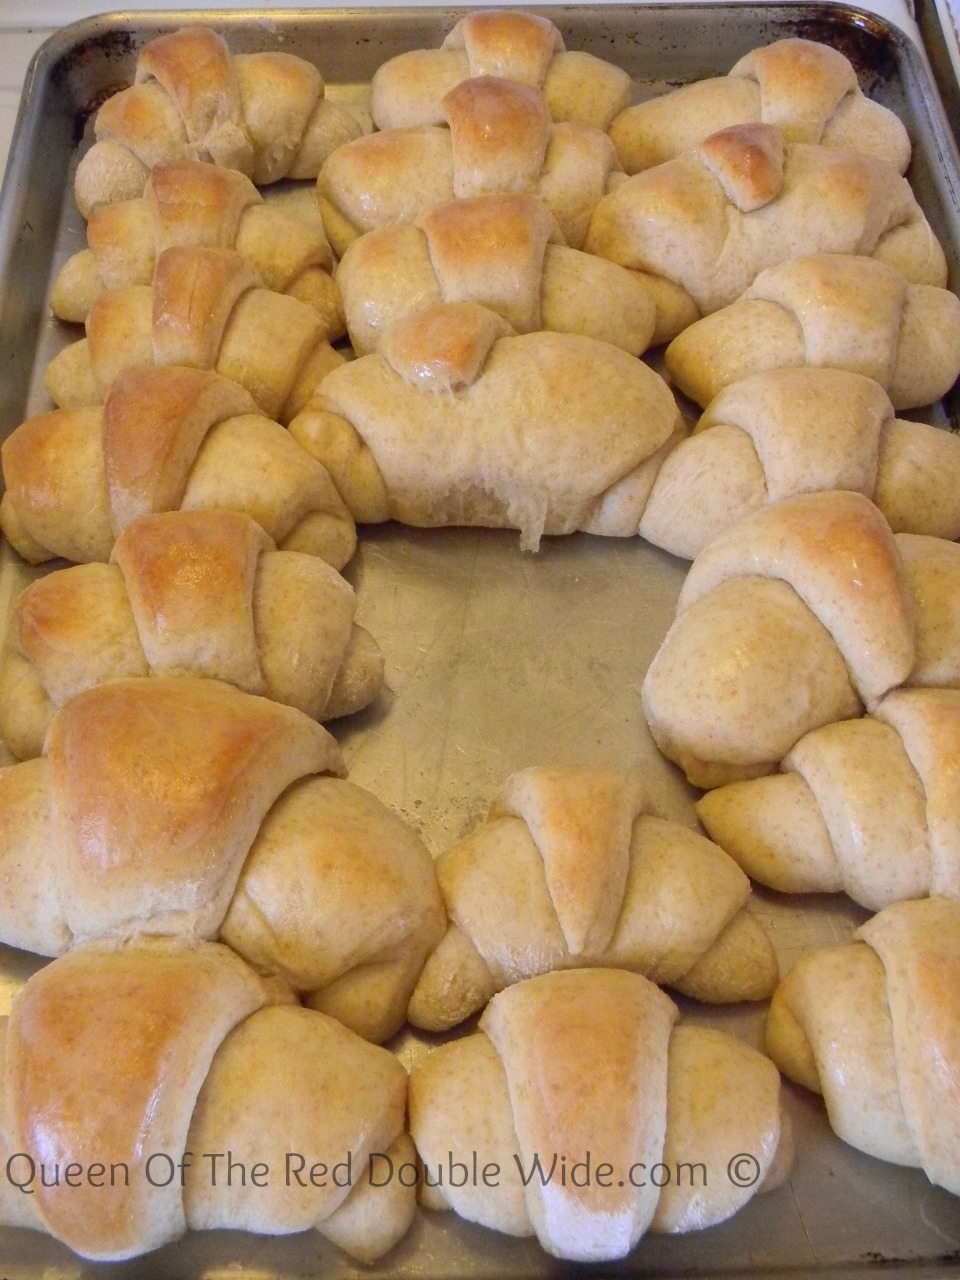 Yes, it was totally me that stole the roll out of the center of the pan. It was a little less than perfect and needed to go……into my belly. 😉
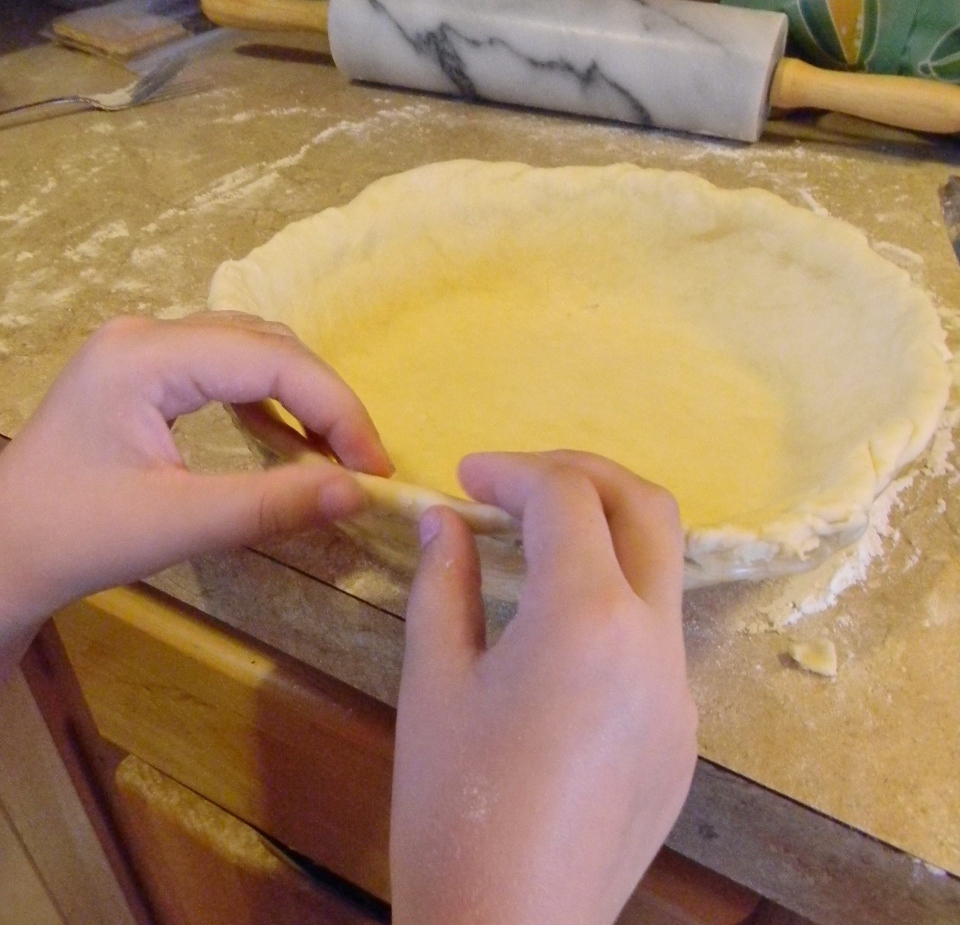 I shared in my post about my contributions to Thanksgiving dinner that I had never made pumpkin pie before. This is Jo helping make our first pumpkin pies EVER. I got a few helpful emails from readers and Diggers Aunt. After taking all the great advice into account, they turned out super yummy. My only complaint is the crust was a little tough. Pretty sure I know what to do differently next time. 🙂