This post has been moved to our new blog. Sufficient Acres.com
Click here or on the picture for the recipe!


This post has been moved to our new blog. Sufficient Acres.com
Click here or on the picture for the recipe!

With the exception of our barn cat incident, we have had an uneventful chicken raising experience, up until a couple weeks ago……
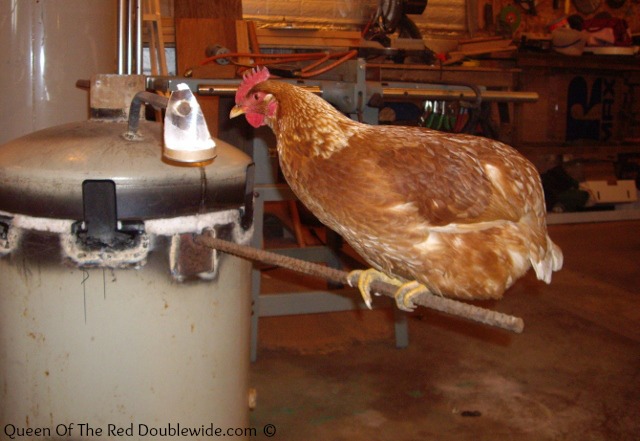
It was dark and VERY cold the night I went out to shut up the coop and realized a chicken was missing. I called for her and looked around with a flash light, but there was not much I could do at that point. So thinking she had found a nice place in the barn to spend the night I shut up the coop and went in. The next morning I fully expected her to be standing at the coop door wanting in,… but she wasn’t… After collecting eggs I started searching, and after about 20 minutes (beginning to worry I’d only find feathers) there she was! She was stuck behind some chain link gates that were leaning against a rock wall, alert but making no sound. Just quietly hanging there with one wing above her head and her feet dangling off the ground. I couldn’t get her out by myself, so Digger came out and lifted the gates up while I pried her wing out of the gate. I immediately started inspecting her injuries when my husband politely asked me to move out from between the rock wall and the stack of gates he was balancing for her retrieval.
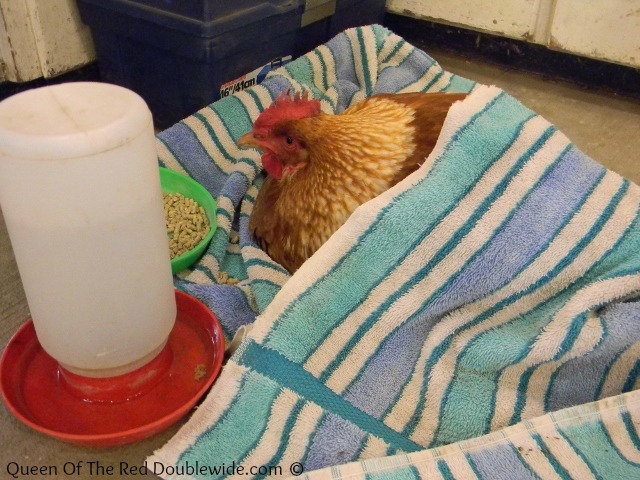
Day One: Chicken Hospital
She was very cold but alert. One of her legs wasn’t working so she couldn’t stand at all, and the one wing seemed tender. We took her into Diggers shop and set up a “chicken hospital”, and she immediately started eating and drinking. As cold as she’d been I figured when she warmed up she would bounce right back. But that was not the case.
 Later that day in the nice warm shop, she wasn’t looking so good. We tried to get her to walk by tempting her with scratch. She really wanted it and would try to stand, but would just flop over, and then give up. In spite of all this, she LAID AN EGG that afternoon!?
Day Two: Discussions
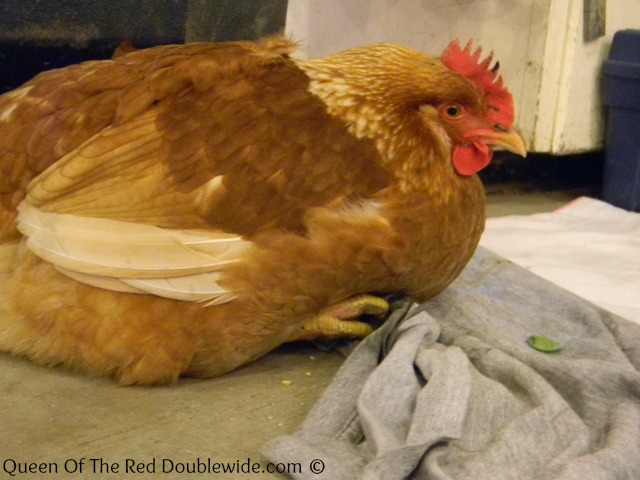
She still wasn’t looking good the next morning….maybe worse. She was now sitting on the floor with one leg strait out in front of her and the other stretched out behind her. It looked painful and she was not even trying to get up. Digger and I had a few discussions that day that sounded about like this:
Digger: “Do you want me to wring her neck?”
Me: “Well, I don’t know……..let’s see how she’s doing later today”
Digger: “Just let me know, I’m not sure I like having a chicken in my shop”
A few hours later…….
Me: “She doesn’t look so good, maybe we should put her out of her misery”
Digger: “She’s still alert and she doesn’t look like she’s giving up, maybe we should give her a couple days?”
It went back and forth like this all day.
Day Three: Stinky Chicken
By day three she was not so affectionately being called “Stinky”. This was Diggers idea…. (He was the one stuck working in the shop with her.) Lets just say the name suited her well! She spent most of the day sleeping, yet seemed alert and very interested in whatever nibbles were presented to her. Despite not being able to move, she managed to lay another egg, but still wasn’t looking so good. The discussions continued until that evening when Digger paused to tell her she was going to be soup if she didn’t buck up soon, (the smell was getting to him). As if on cue, she pulled her legs up under her body and tried to stand. I guess she didn’t want to be soup.
Day Four: No Chicken Soup
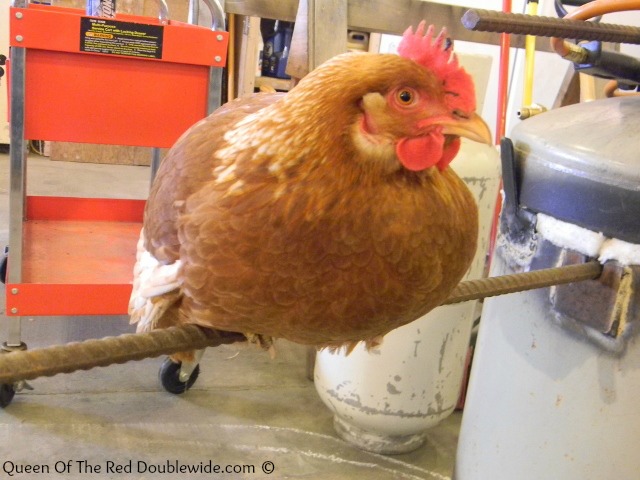
A good day! She kept her legs under her and even took a couple steps. Digger managed to get her to roost for a couple of minutes on the handle of his forge. It was hard for her to grip and balance, but she managed it. It was amazing how amiable she was to all our fussing and fiddling with her. I was finally convinced that she was going to make it, so I put my soup recipes away. 😀
Day Five
She was now standing up and taking very slow, careful steps, but still sleeping most of the day. Digger did the math and realized the replacement value of all her eggs should she die would be well over $200.00, but was still anxious (to put it mildly) to get her healthy and OUT of his shop!
Day Six
Slowly getting better, walking a little more. When it got dark out she started looking up for a roost. (It’s a wonder how she knew it was getting dark with the shop lights on for hours after sunset, and only two small windows she couldn’t even see.) She hopped up on a little tool box wanting to get higher but had to settle there for the night. It was nice to see her trying to act like a chicken again.
Knowing she couldn’t go back with the other girls until she could balance on a roost all night, we kept encouraging her rehabilitation. Digger would place her on the handle of his forge several times a day, and even shaped a tin to hang from a higher handle that she could only reach from the “roost”. She became very determined to stay up there when a pinch of scratch was dropped in the tin.
 Day Seven
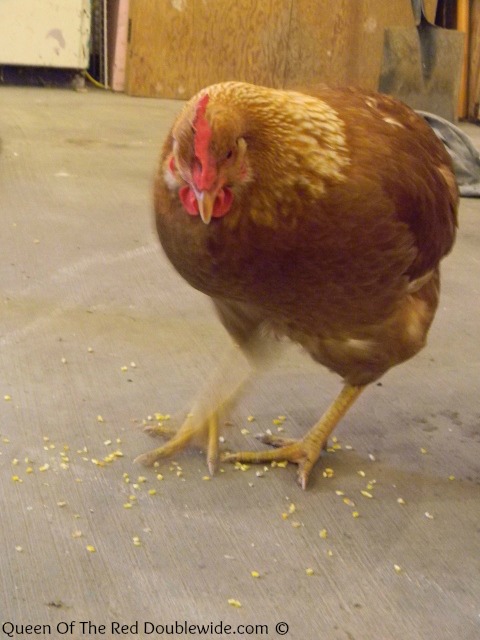
It was a nice day out so we took her outside to get some fresh air!! The other hens seemed happy to see her. She hobbled around and nibbled at grass but was soon worn out.
Day Eight
Spent most of the day outside. She couldn’t keep up with the rest of the girls but was VERY happy to be outside. 😀 It’s absolutely unbelievable how fast she is healing!!
Day Nine
It snowed out and she was not fond of the idea of being outside. So she spent the day hanging out with Digger and playing around in the shop. Well, maybe I should say “pooping around the shop”. The name Stinky is still very appropriate!
Day Ten
The sun was shining bright and I went to the shop first thing to see if she wanted to go out. She was waiting right by the door and quickly walked out with barely a limp!! She still couldn’t manage to get up on the roost that evening so we brought her in to the shop for ONE more night. Digger wasn’t to happy when she hopped up on the counter knocking a bunch of stuff on the floor and of course pooped on his bench! No more nights in the shop for Stinky. 😀
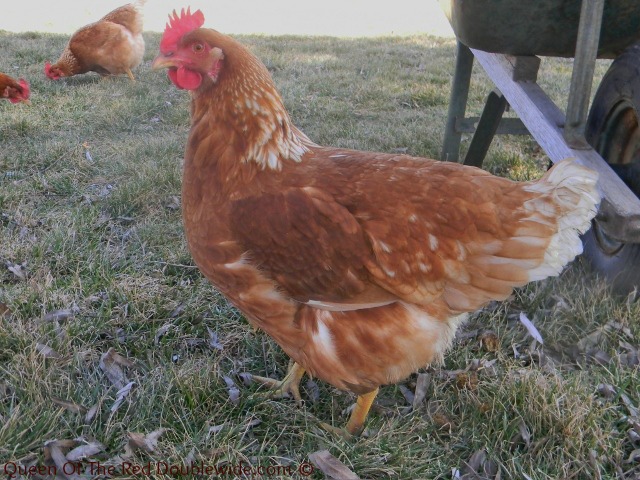
Day Eleven: Back With the Flock
Back with the flock and laying eggs!!
Digger now officially has his very own chicken….whether he likes it or not! She follows him around outside and if the shop doors are open, guess who walks right in and makes herself at home. 🙂 I’m so glad we didn’t put her in the crock pot!! Think of all those eggs she’s still going to lay, and the wonderful story we have to tell of a sweet, determined chicken named Stinky!

I attempted making hash browns several times after I got married, but they didn’t turn out so good. Gray, mushy, and gross would describe them very well. I gave up and started buying frozen hash browns. Then I read that you should bake the potatoes first and then grate them up and fry them. Why didn’t I think of that??
So now when we have baked potatoes for dinner I bake way more than we need and put the left overs in the fridge over night. In the morning I peel them, grate them, and fry them in olive oil or butter. Yummm! no more grey, mushy, hash browns!!
 Last week I bought a 50 pound box of huge baker potatoes for 10 dollars. 🙂
 I don’t think we can eat all these before they go bad so I decided to freeze my own hash browns. I figured this would be good practice for this fall when my garden gives me tons and tons of potatoes!! (hopefully)
After a little trial and error (and some potato therapy) I ended up with perfect frozen hash browns. 🙂
Here’s what to do:
Start with potatoes that are roughly the same size so they take the same amount of time to cook.
Wash them, poke them with a knife a couple times, (to avoid explosions) then place them directly on the rack in an oven that is preheated to 350 degrees.
These HUGE baker potatoes took 1 hour and 20 minutes to cook completely. Regular size potatoes will take from 45 to 60 minutes to cook. I found out by my third batch that if you under cook them a little they will grate MUCH easier, and ultimately found that cooking these big guys 55 minutes was about right.
When they are done, set them on the counter to cool. When they’re cool enough to handle put them in the refrigerator until cold. (over night works well) We tried to grate the first batch when they were still a little warm and ended up with mush. 🙁
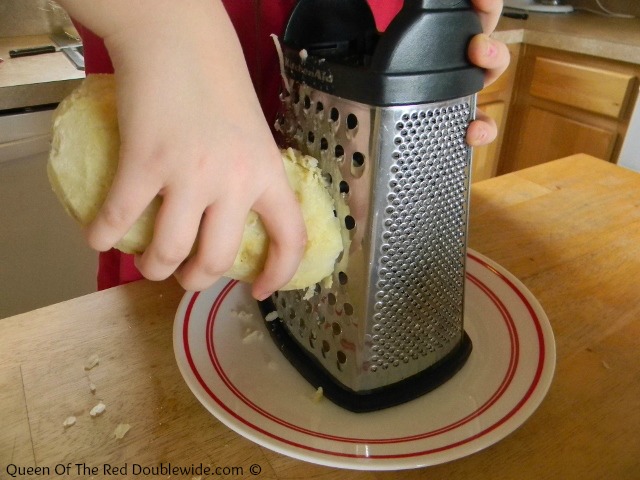
Now that you have cold, slightly under cooked baked potatoes, it’s time to peel.
 We grate them with a cheese grater.
 Now take your nicely grated potatoes and sprinkle them on a greased cookie sheet.
If you skip this step and put them directly into freezer bags you will end up with a solid brick of smashed potatoes. Don’t put to many on the tray or they will stick together as they freeze, and you want to be able to easily break them apart.
Note: If you’re having a bad day or feeling a little frustrated, then go ahead and pack them on the cookie sheet. When they’re frozen solid take them out of the freezer, get a big metal spatula, (hammer, pickaxe, or splitting maul are all acceptable) and goggles, then start hacking and hacking at the potatoes to break them up. After the hash browns are evenly dispersed in your hair and around the kitchen, take a deep breath…..potato therapy! (Disclosure – I am not a doctor or a therapist of any kind, I only share tips that work for me.)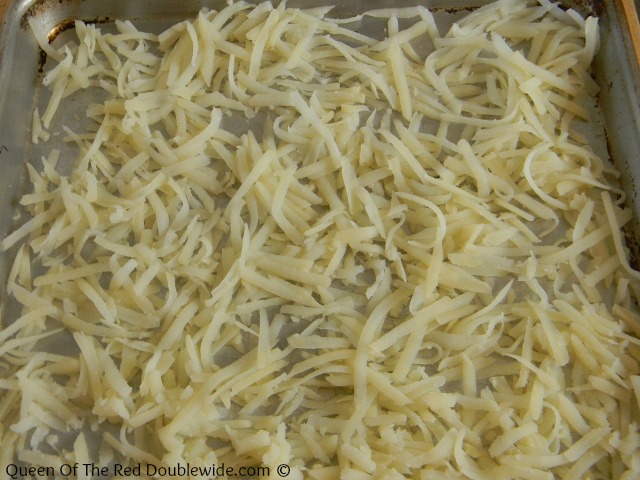 Place them in the freezer until frozen through. This takes about an hour and a half.
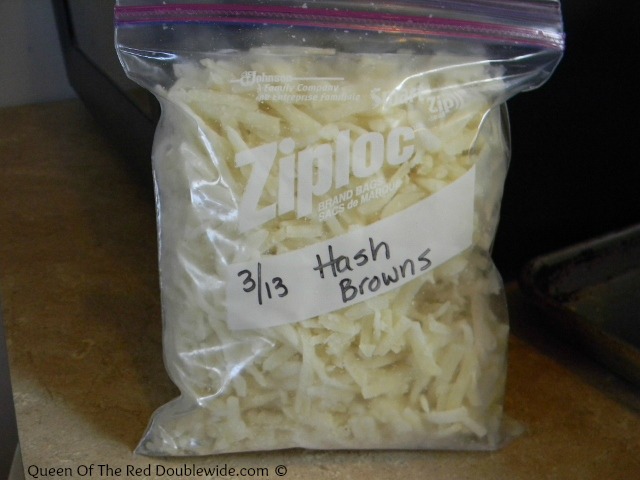
Break them apart, scoop them into a labeled freezer bag, and store in the freezer.
There you have it! Homemade frozen hash browns ready for breakfast or any recipe that calls for frozen hash browns! It sounds time consuming, but it’s mostly time spent doing other things (there’s always plenty to do) while the spuds are cooking/cooling/freezing etc…


This recipe is very versatile…you can make healthy breakfast muffins, or not quite so healthy dessert muffins. But either way they are nummy, nummy, nummy! Of course I made both kinds, (several times) just to make sure I got the recipe exactly right. Then a few more times to be absolutely sure I wasn’t sharing a recipe that was no good. Then I found myself digging through the bananas at the store to find more over ripe bananas, cause waiting for bananas to get a little over ripe just takes to long!! Did I mention these muffins are good?….really good!
Start by mixing together the dry ingredients: flour, baking soda, baking powder, cinnamon, and salt, and set it aside.
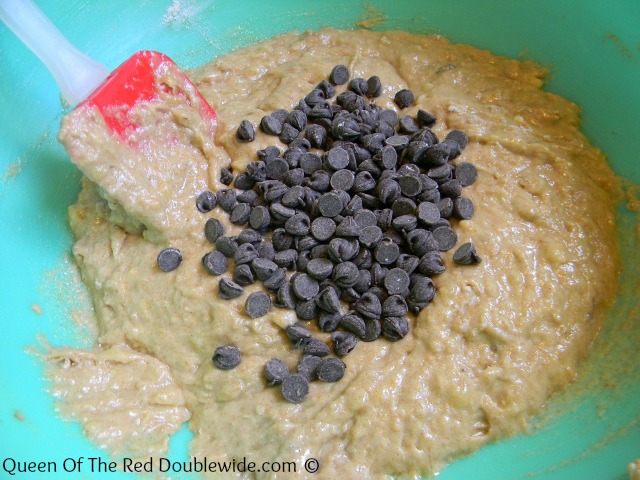
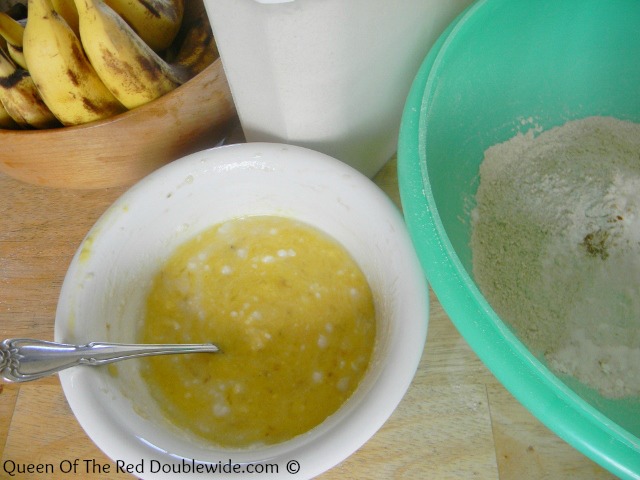 In a separate bowl smash the bananas then add honey, butter, egg, and milk. Stir well and then pour into dry ingredients and stir until moist, then fold in chocolate chips.
 Fill sprayed cupcake tins or you can use cupcake liners about 1/2 full and bake at 375 degrees for 15-20 minutes.
I made these this morning with whole wheat, coconut oil, rice milk and didn’t add any chocolate chips. They were a wonderful HEALTHY breakfast!
 They taste even better warm from the oven with “Honey Whipped Cream Cheese” smeared all over them!


We have been making lots of muffins and quick breads lately. What goes better with a nice warm muffin than cream cheese? Honey whipped cream cheese of course!!
This is a great recipe to let the kids help with, it’s very simple.
All you need is an eight ounce package of cream cheese, softened and 3 to 4 tablespoons of honey (depending on how sweet you want it). Whip the cream cheese in a mixing bowl (I used my KitchenAid). When it’s nice and smooth gradually add the honey. Keep whipping until it’s light and fluffy.
This is honey whipped cream cheese on a Chocolate Chip Banana Muffin.
If you don’t want a sweet whipped cream cheese just substitute milk instead of honey.
 This is Whipped Cream Cheese on Applesauce Raisin Quick Bread.
You can also use maple syrup instead of honey. Either way this spreadable cream cheese makes any breakfast bread even yummier! I was thinking of trying in on french toast next time?
This is a lot less expensive than a tub of whipped cream cheese at the store especially if you buy a generic brand package of cream cheese. 🙂


First of all I want to mention that this method is not just for farm fresh eggs. Store bought or strait from the coop, your end result will be beautiful hard boiled eggs!
Have you ever tried to peel a farm fresh hard boiled egg? I have, and it’s not a pretty sight. Unlike older, store bought eggs, no matter how hard you try the shell will not let go of the egg, leaving you with a lumpy, broken mess!! With my new egg laying machines and tons of fresh eggs the only thing I could think to do was hide a dozen eggs in the back of my fridge and wait for them to get old (the older the egg the easier it is to peel). This works as long as you know two weeks in advance when you are going to want a hard boiled egg. I don’t know about you, but when I want egg salad, I want it now, not two weeks from now!!
That was not my only problem with hard boiling eggs, I usually over boiled them and ended up with a green ring around the yolk….for some reason greenish colored, lumpy, deviled eggs are not very appetizing. So I started researching and experimenting, and experimenting, and experimenting…….and this method left me with sun colored yolks and EASILY peel-able eggs!

Start by placing a pot of water on the stove to boil. Make sure it’s enough water to cover the eggs. While your waiting for the water to boil take a (clean) thumb tack and poke a small hole in the fat end of each egg.
 Be careful, you want to make a hole but not push the tack all the way in. The goal here is to put a tiny hole in the shell where the air sack is and not poke through the membrane inside. When the water is at a hard boil, and you have a tiny hole in each egg, gently (VERY gently) place the eggs in the boiling water and set the timer for 15 minutes.
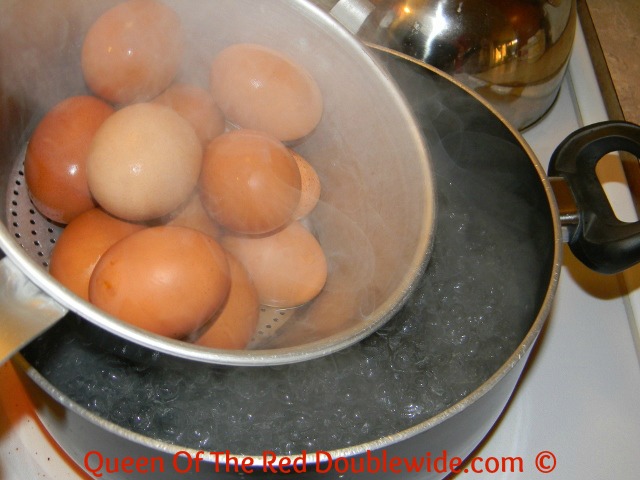 Keep them at a low boil for the entire time. If you pushed the tack in to far you will see streams of egg white floating in the water. It’s no big deal, that egg will just not be as pretty as the rest. After you do this a few times you will get the hang of it.
While they are boiling prepare a bowl of ice water in your sink. When the timer goes off immediately remove the pan and drain the boiling water. Then place the hot eggs into the ice water.
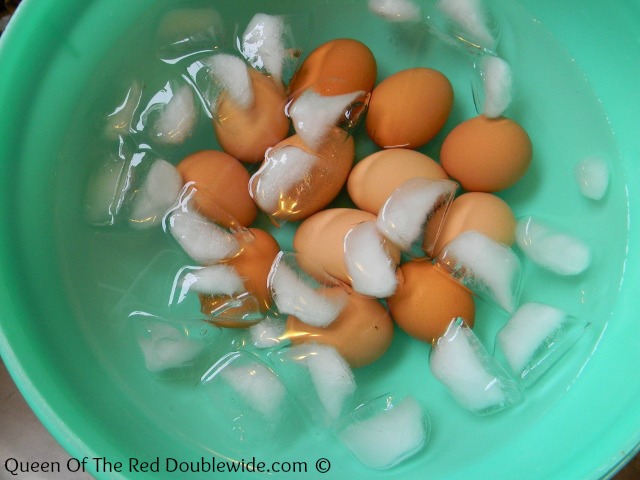 Wait about 15-20 minutes and take them out one at a time to peel.

These are eggs that were laid this morning….see how nicely they peeled.

This is an egg that I poked the tack in to far and some of the the egg white escaped. Not a good look for deviled eggs, but will still taste great in egg salad. 🙂
See how nice and pretty the yolk is!!
I’m so glad I can make deviled eggs whenever I want instead of having to plan ahead and hide them in the back of the fridge to get old. I hope this works as well for you as it has for me. The tack trick takes a little practice, but if all you have is fresh eggs to peel it’s definitely worth the effort.
I found this method at: Paths of Wrighteousness

Bacon, bacon, bacon, I love bacon!!
Oven roasted bacon is the best. The bacon cooks evenly and clean up is super easy. But the best part is you don’t have to stand over a sizzling pan while splatters of hot grease hit you in the face. 😀
All you need is a baking sheet lined with foil and BACON.
First place as much bacon as you can possibly fit onto the foil lined baking sheet….well maybe just as much as you need. But I put as much as I can fit…cause I can never have to much bacon!!
 Then put the pan in a cold oven. Turn the oven on to 375 degrees and set the timer to 20 minutes.
Now, instead of getting whacked in the eye ball with hot grease you get to do something fun….like the dishes, or fold the laundry that has been building up on the couch. Okay, maybe not so fun, but better than hot grease in the eye….right?
When the timer goes off, your kitchen will smell wonderful and the bacon should be done. If you like yours a little crispier leave it in for a couple more minutes.


This bread is easy, healthy, and delicious. I’ve been making a loaf about every other day…..
This recipe has been moved to our new blog. Please click here to take you to Applesauce Raisin Quick Bread at Sufficient Acres.com.

Sorry for the inconvenience while we slowly move posts to our new blog.
This recipe was adapted from: Heavenly Homemakers – Applesauce Bread

© 2013-2024 Queen Of The Red Doublewide All Rights Reserved -- Copyright notice by Blog Copyright