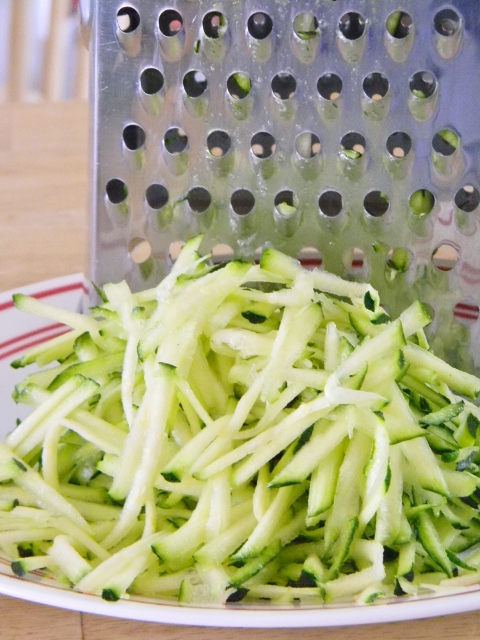
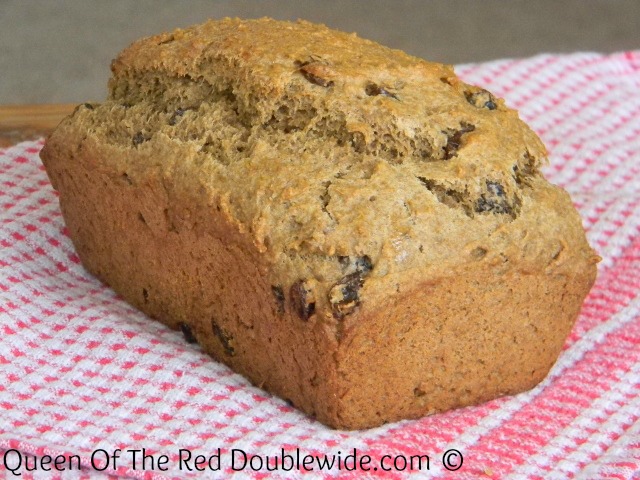
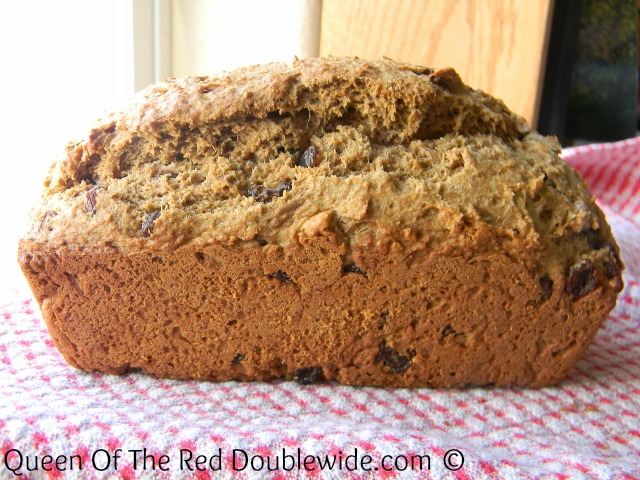
It’s that time of year again, the zucchini is pouring out of the garden. I love the abundance of this versatile veggie, and have many recipes to use them up. Zucchini bread has always been a good way to use it up, but this one is a super duper amazing way to use it! I’m going to freeze lots and lots of zucchini just so I can make this bread all year long. ;D
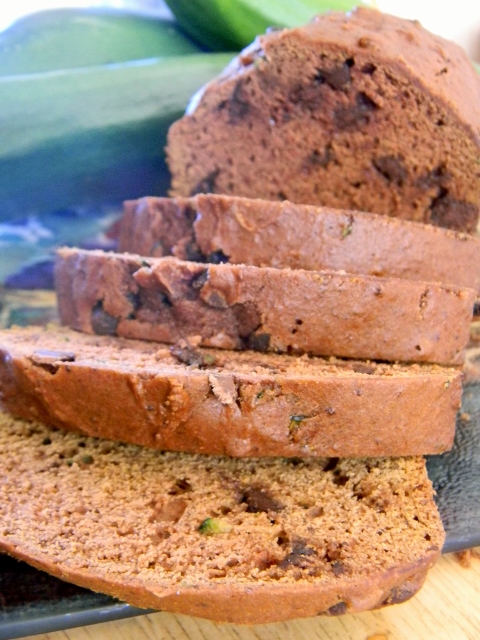
It’s so moist and smooth and sweet and wonderful and it all came about by accident. Mary is the one that first made this, hence the name: “Mary’s Super Moist Chocolate Zucchini Bread”. She had a recipe to follow, but we hadn’t been shopping for a while and didn’t have some of the ingredients, so she “improvised”. We were all pleasantly surprised with the results. 🙂
This is not only very tasty but healthier than most quick breads too!
Mary's Moist Chocolate Zucchini Bread (With NO Vegetable Oil)
Grease two loaf pans and preheat oven to 350 degrees.
Mix the first 5 ingredients until well combined.
Add the rest of the ingredients and mix well.
Divide the batter between the 2 loaf pans.
Bake at 350 degrees for 45 min then lower the temp to 300 degrees and bake an additional 15 minutes.
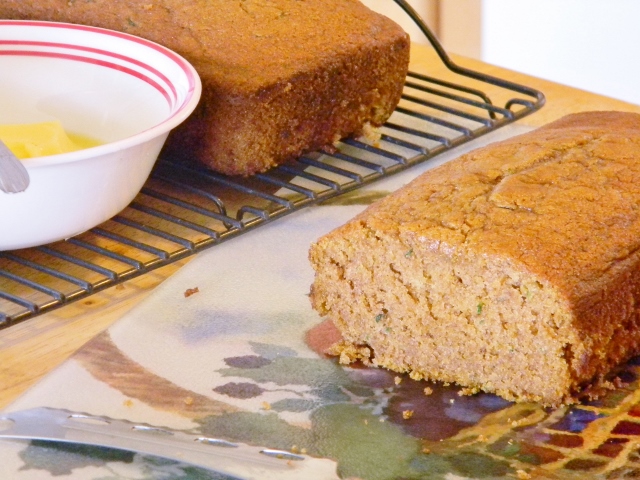
Remove from the loaf pans and cool completely before cutting.
3.3.3077
Another great thing about this bread is you have options! I love options. 🙂
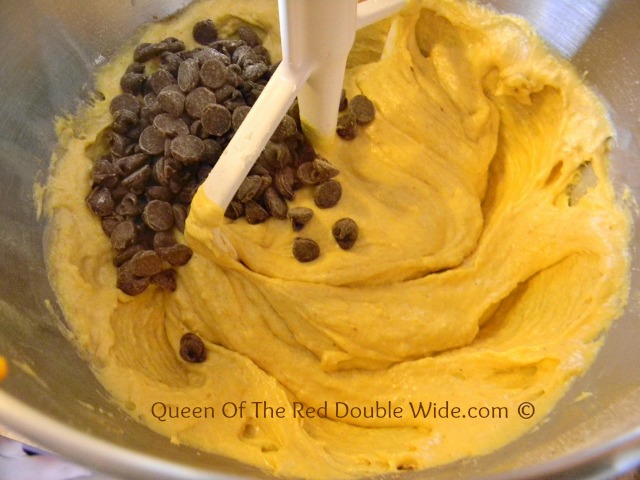
You can add a 3/4 of a cup of chocolate chips and have “Mary’s Super Moist Double Chocolate Zucchini Bread” (this is my girls favorite).
Or you could leave out the cocoa powder and have “Mary’s Super Moist Zucchini Bread” and it’s still, oh so good!!
Wait, there’s more!….We made three batches of this last week (6 loaves). Six loaves for four people is a bit much, so I froze 2 loaves and took them out yesterday for breakfast and took some to our Bible study. They froze VERY well and I think they might have even tasted better from the freezer!?!? WHAT?
I have noticed that while this bread is delicious still warm from the oven, it’s very crumbly if you don’t let it cool completely first. Its even easier to cut after being in a zip lock bag over night. But, it tastes great ANY time. 🙂
I LOVE homemade dinner rolls. I usually only make them around the holidays, but this Christmas I made them and have been on a roll ever since. Haha…anyway…I’ve made these rolls several times recently and they are sooooo good. Soft, light, and buttery.
This recipe will make 24 rolls, so if you can’t eat that many in a couple days they also freeze well too.
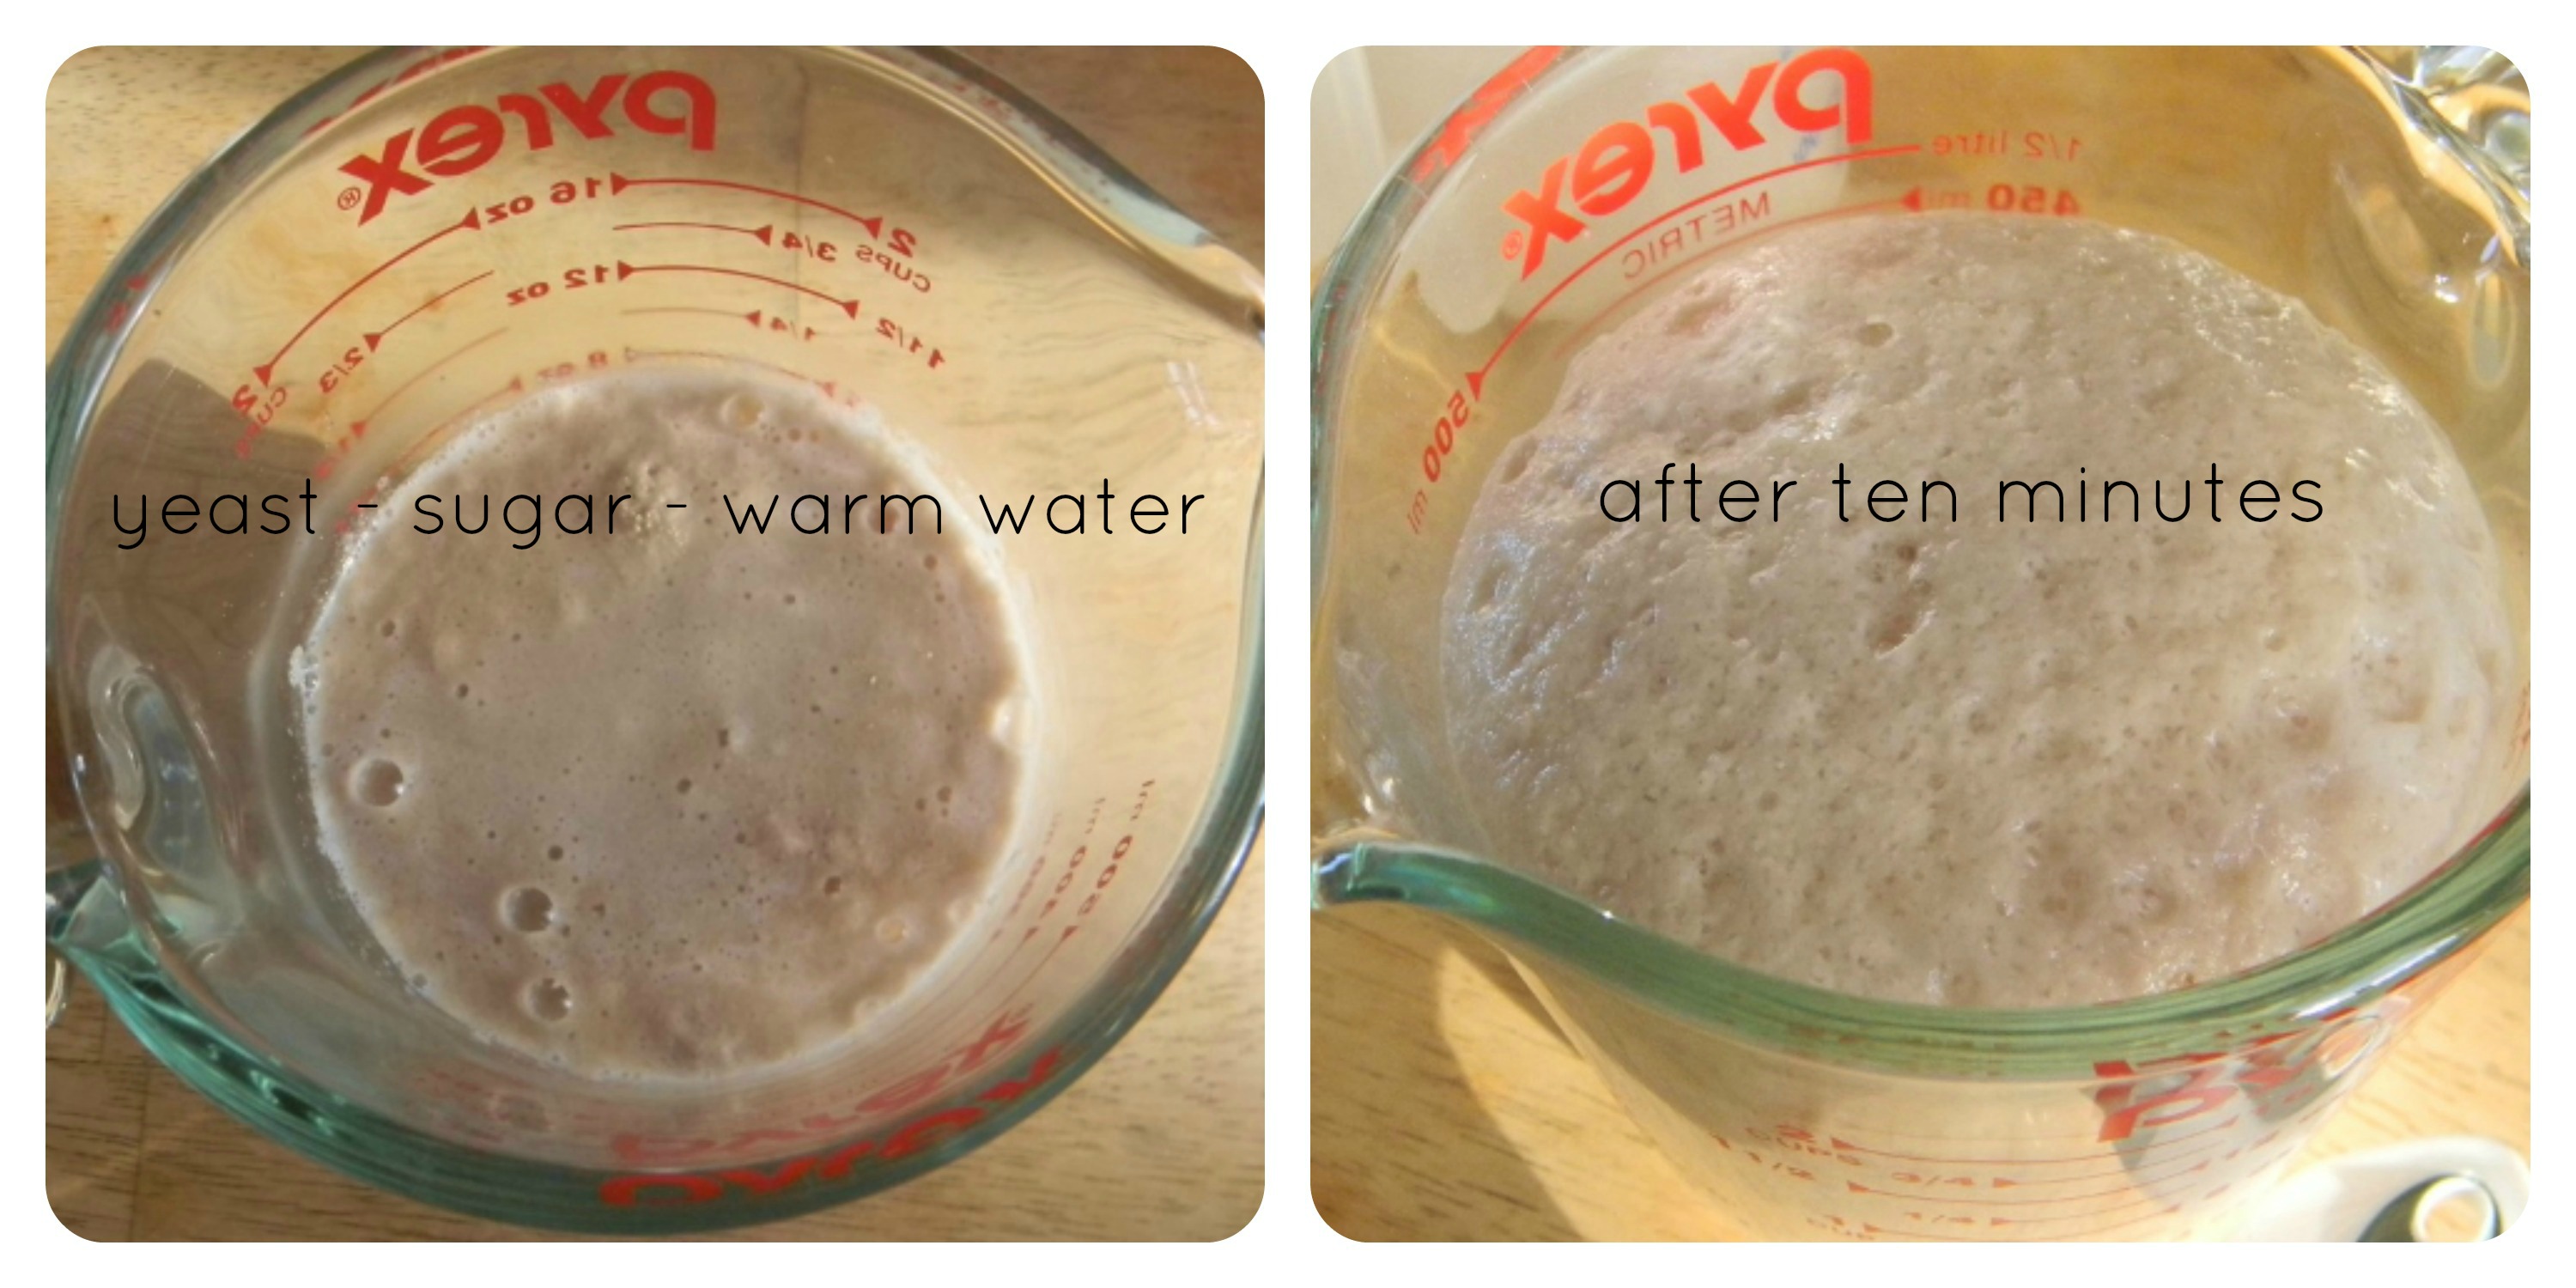
Step 1: Dissolve 1 tablespoon of yeast in 1 cup of warm tap water (105 to 110 degrees) with 2 tablespoons of sugar. Let it sit for about 10 min. It should get bubbly, that means your yeast is working.
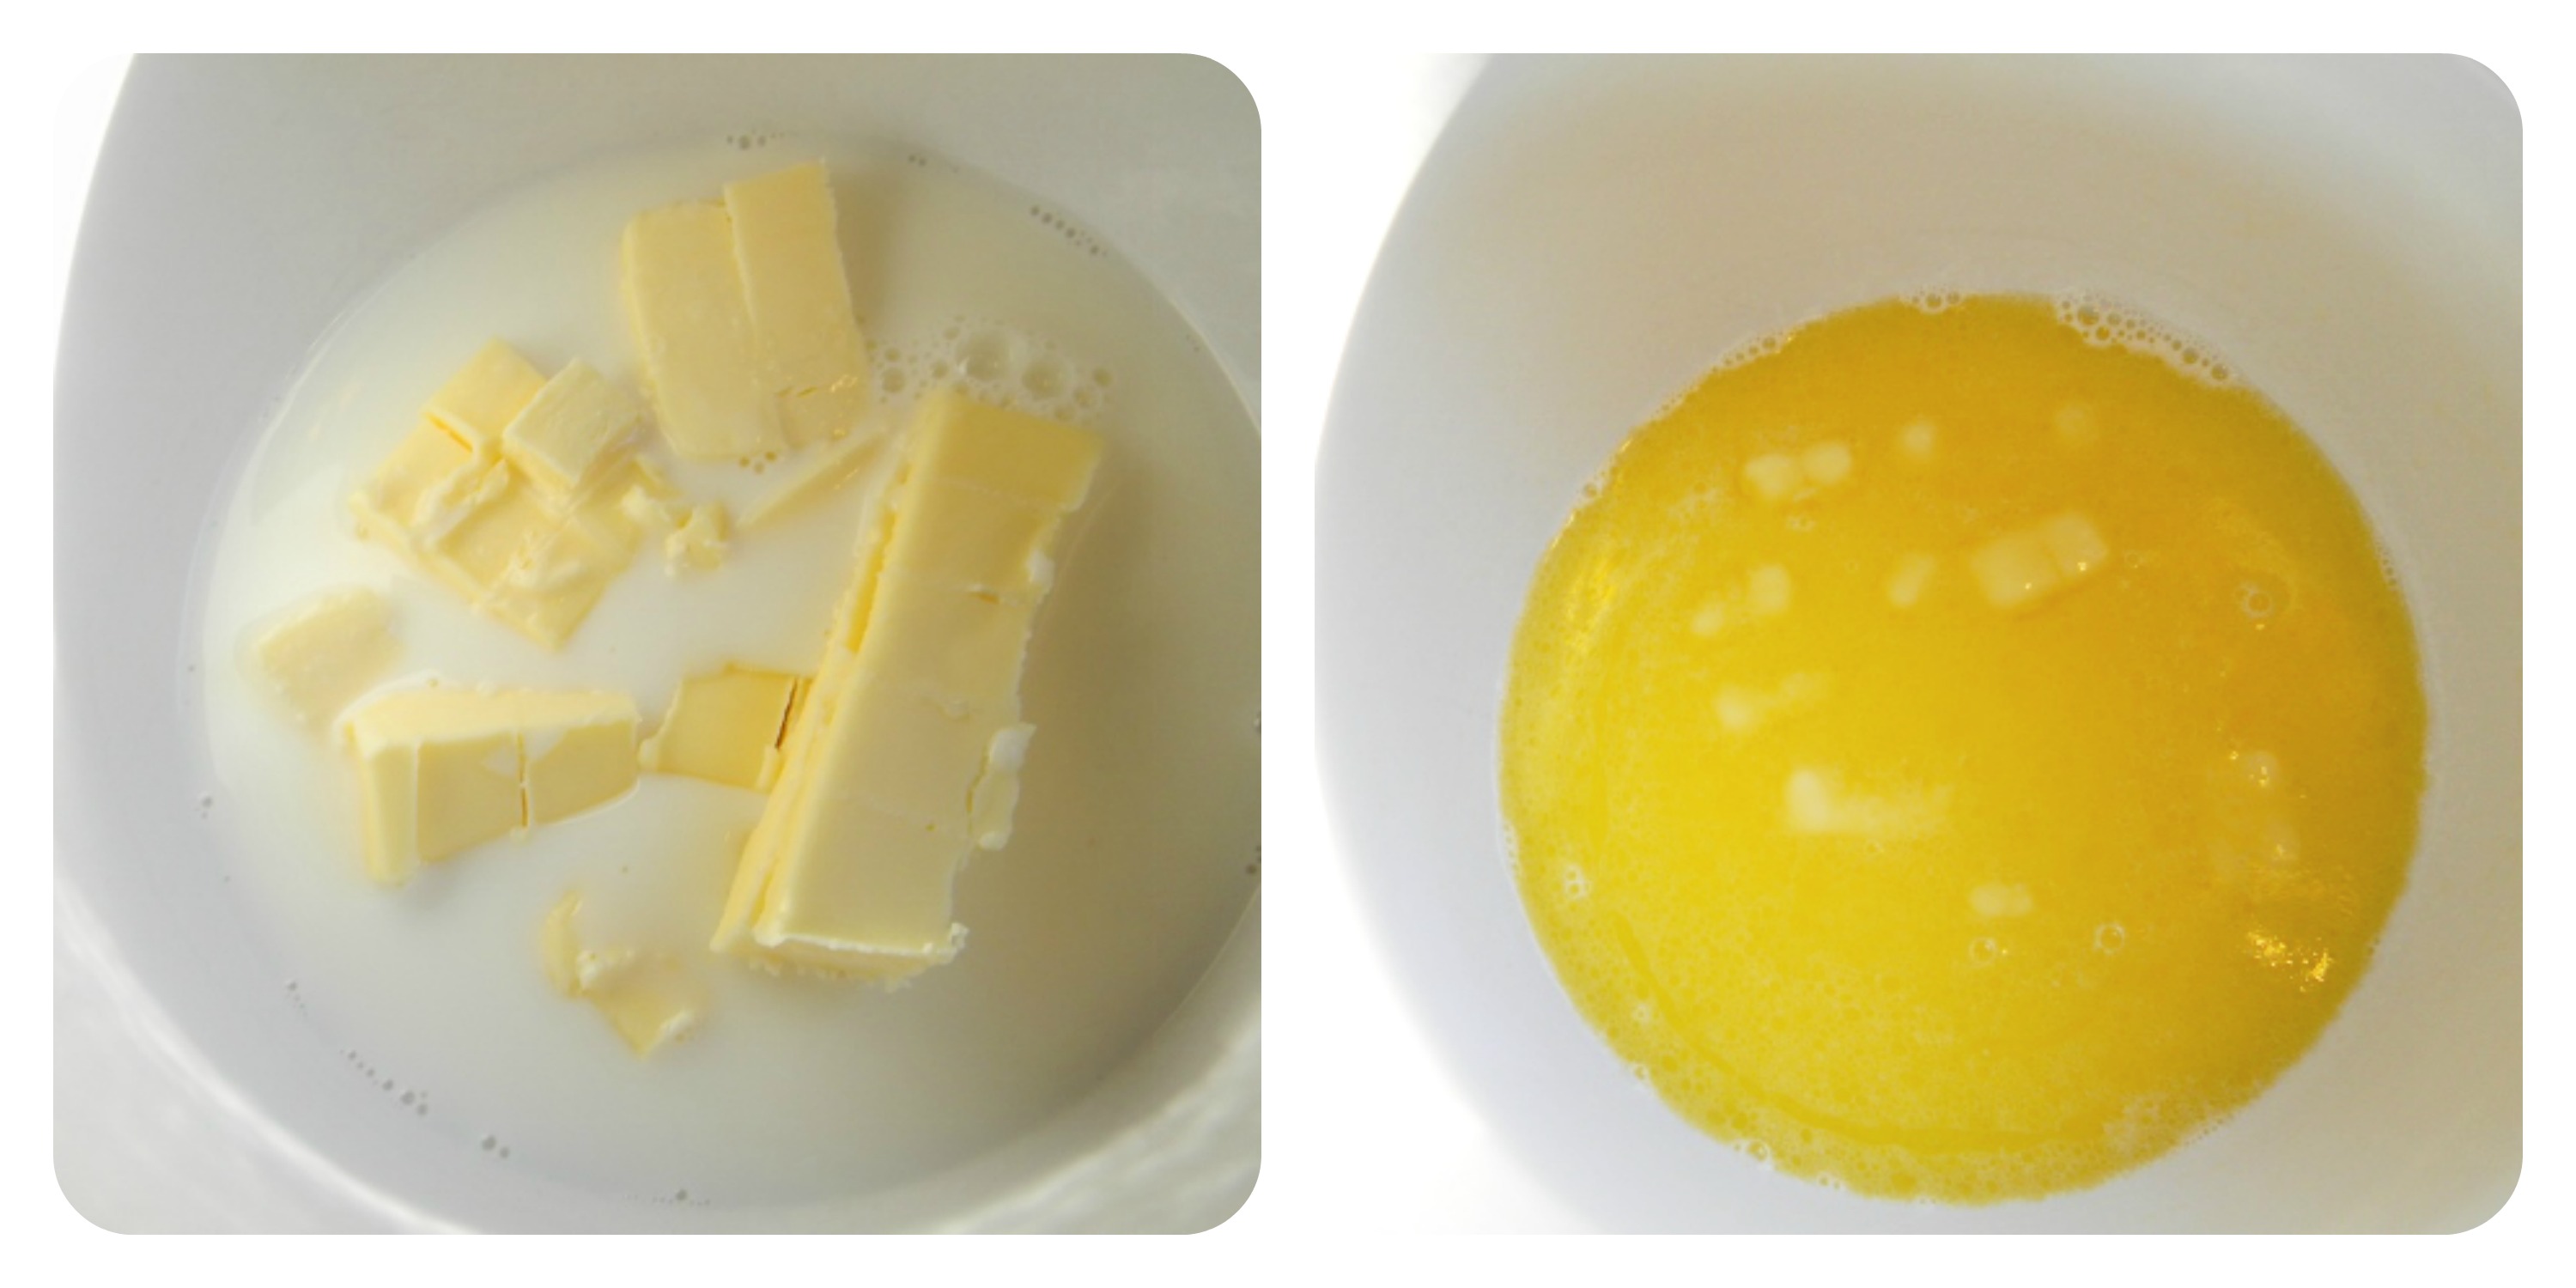
Step 2: In a microwave safe bowl put 1/4 cup of butter (cut into small pieces) 1/4 cup of sugar and 3/4 cup of milk and microwave for 1 to 2 minutes. The butter should be mostly melted.
Step 3: Place the melted butter, sugar and milk mixture in a mixing blow. Add salt, 1 cup of whole wheat flour, the egg and stir well.
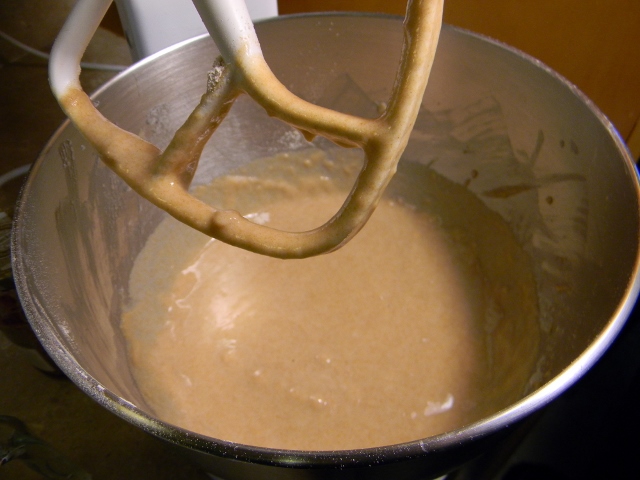
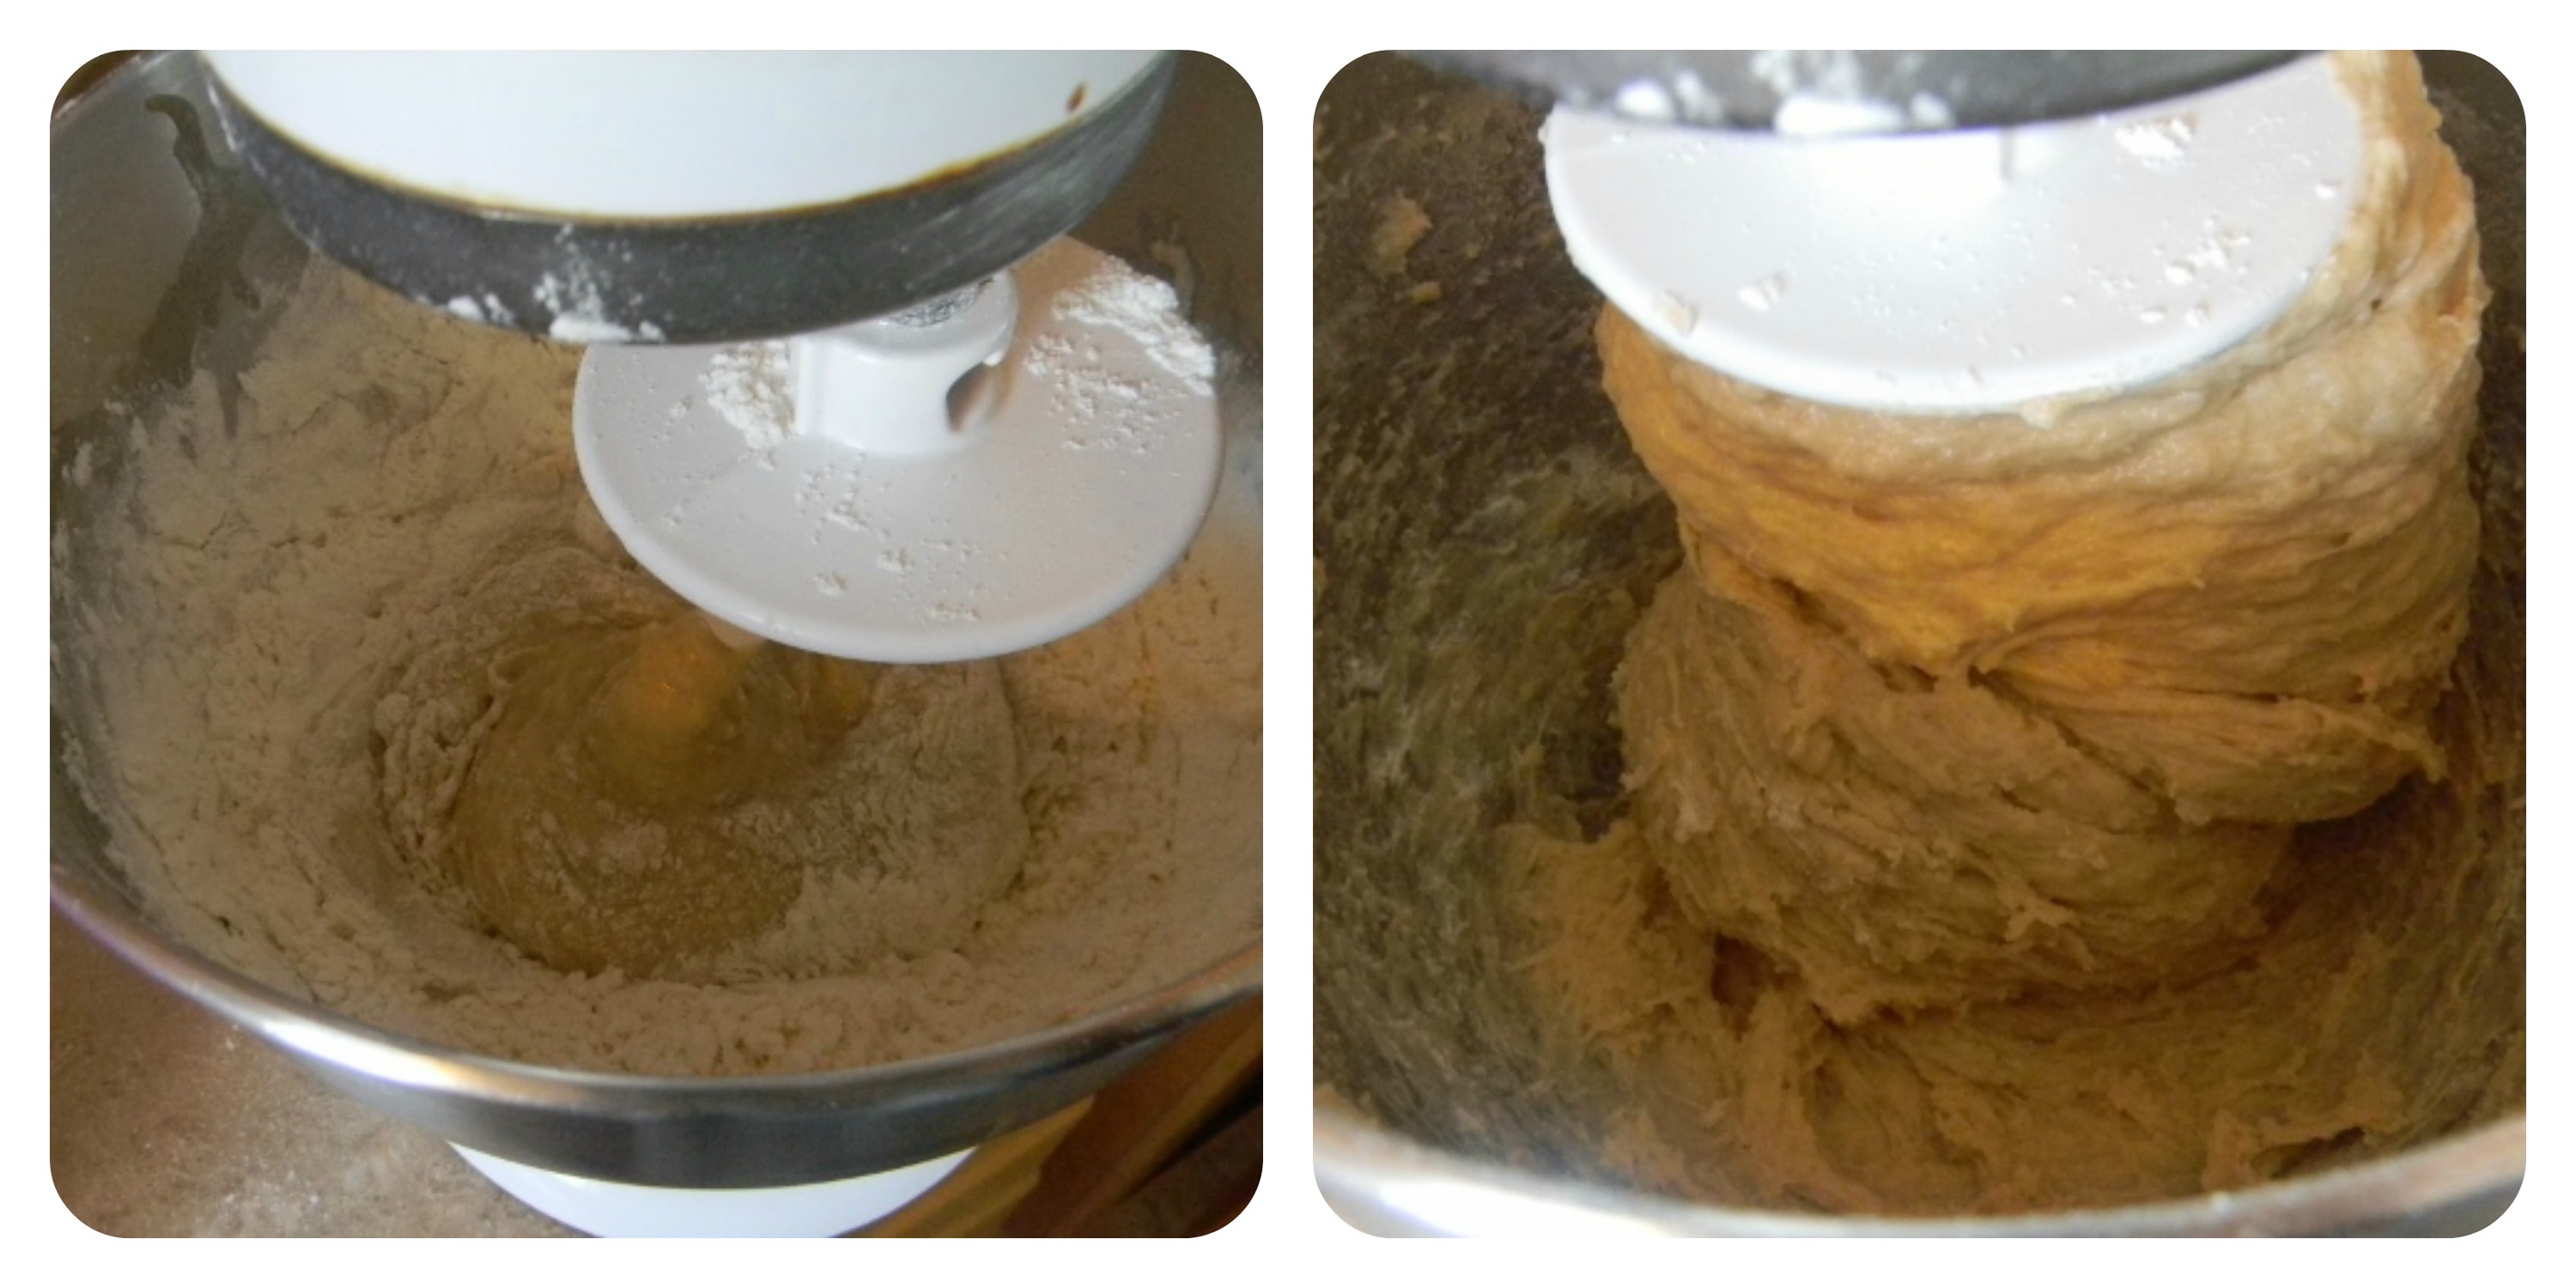
Step 4: Add the yeast to the mixing bowl and stir well. Keep stirring and add a couple more cups of flour. This is were I change the paddle to the dough hook on my mixer. Keep mixing while you add the last two cups of flour. Let the dough hook knead the dough until it comes together and pulls away from the sides of the bowl.
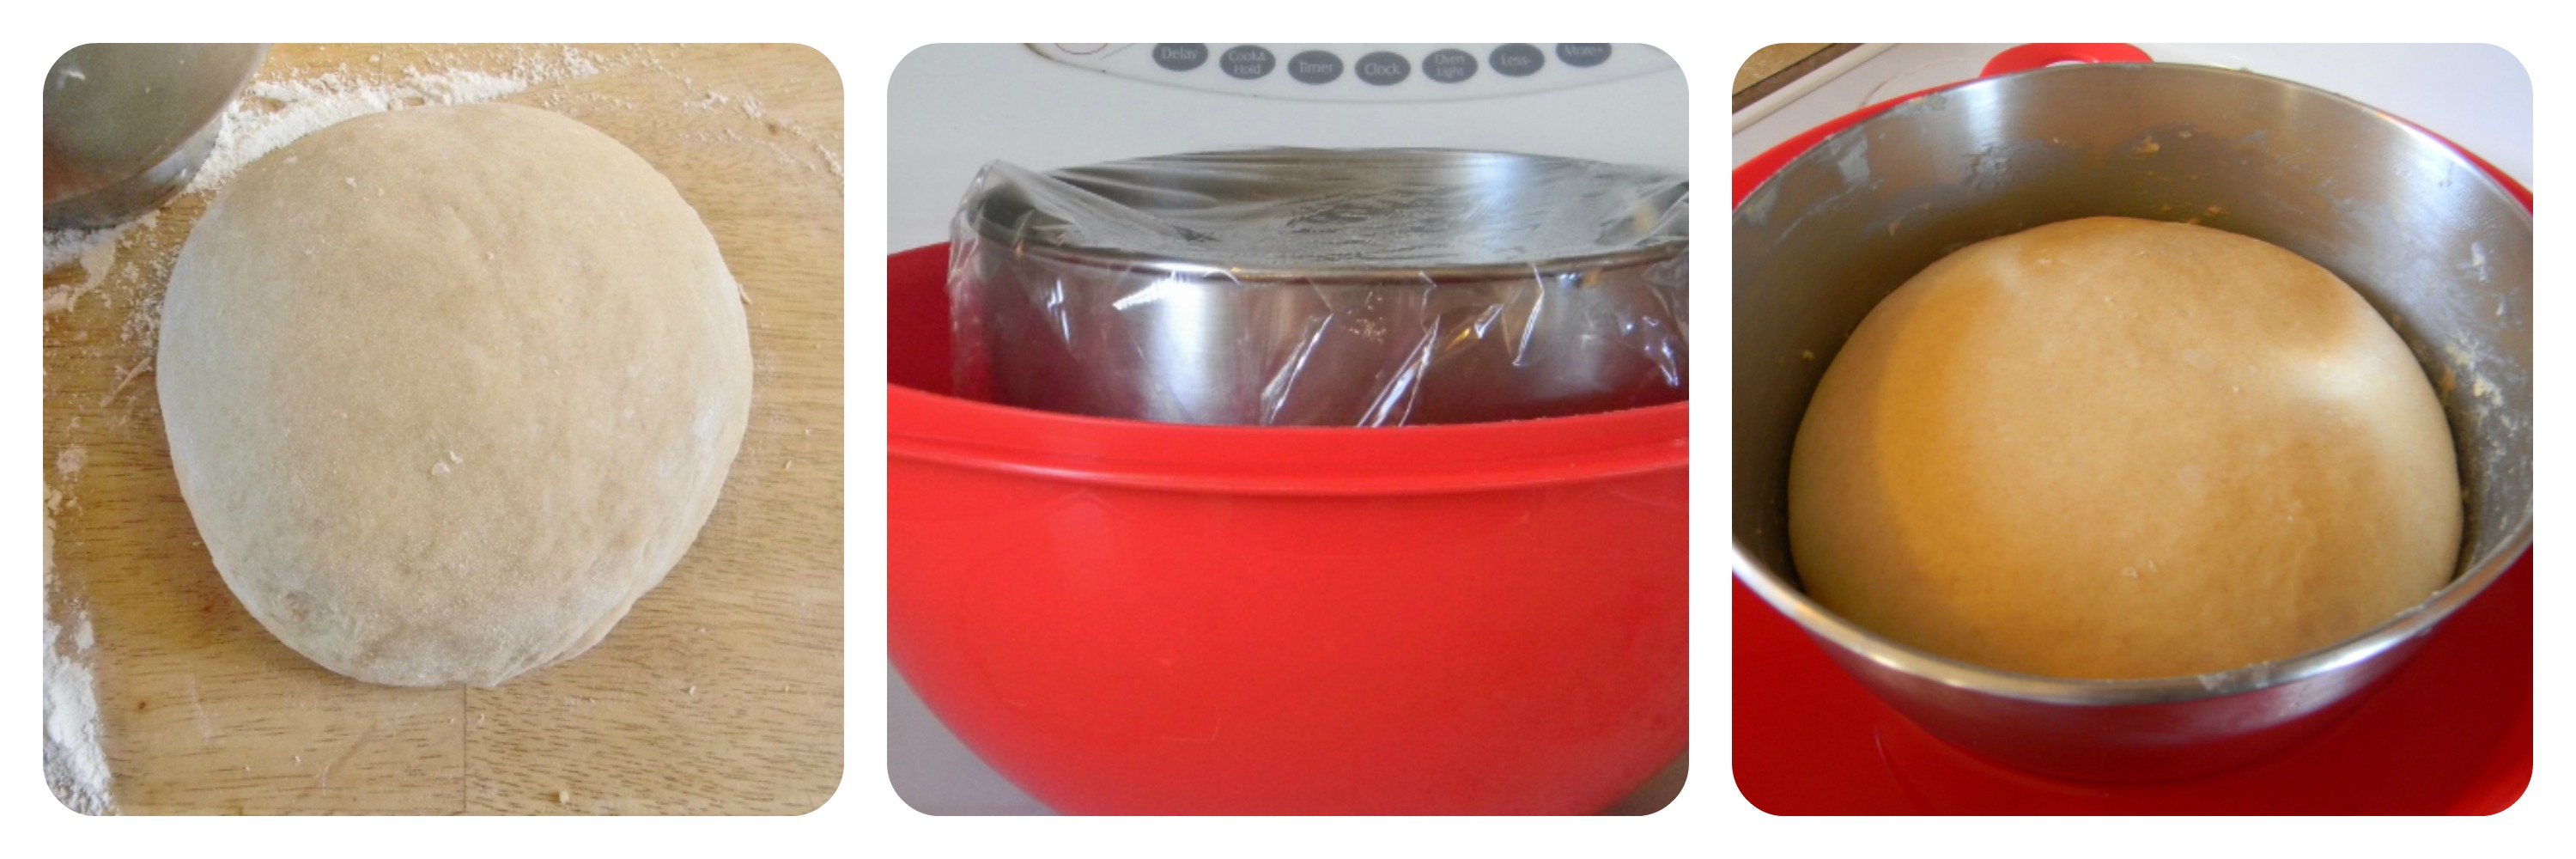
Step 5: Scrape the dough off the dough hook and plop the dough out on a floured surface. Knead it just a few times to bring it all together and form a nice ball. Place the dough back in the mixing bowl. Cover the bowl with plastic wrap and leave it in a warm place to rise. I put mine in a warm bowl of water to speed up the rising. It took about a half hour. If I don’t put it in the water it takes about an hour.
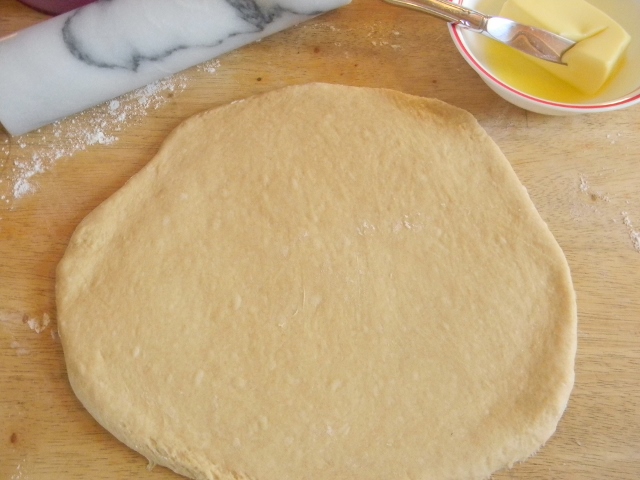
Step 6: Punch the dough down and put it on a well floured surface, knead it a few times to push out all the air bubbles. Then divide the dough in half. Take the first half and roll it out into a circle.
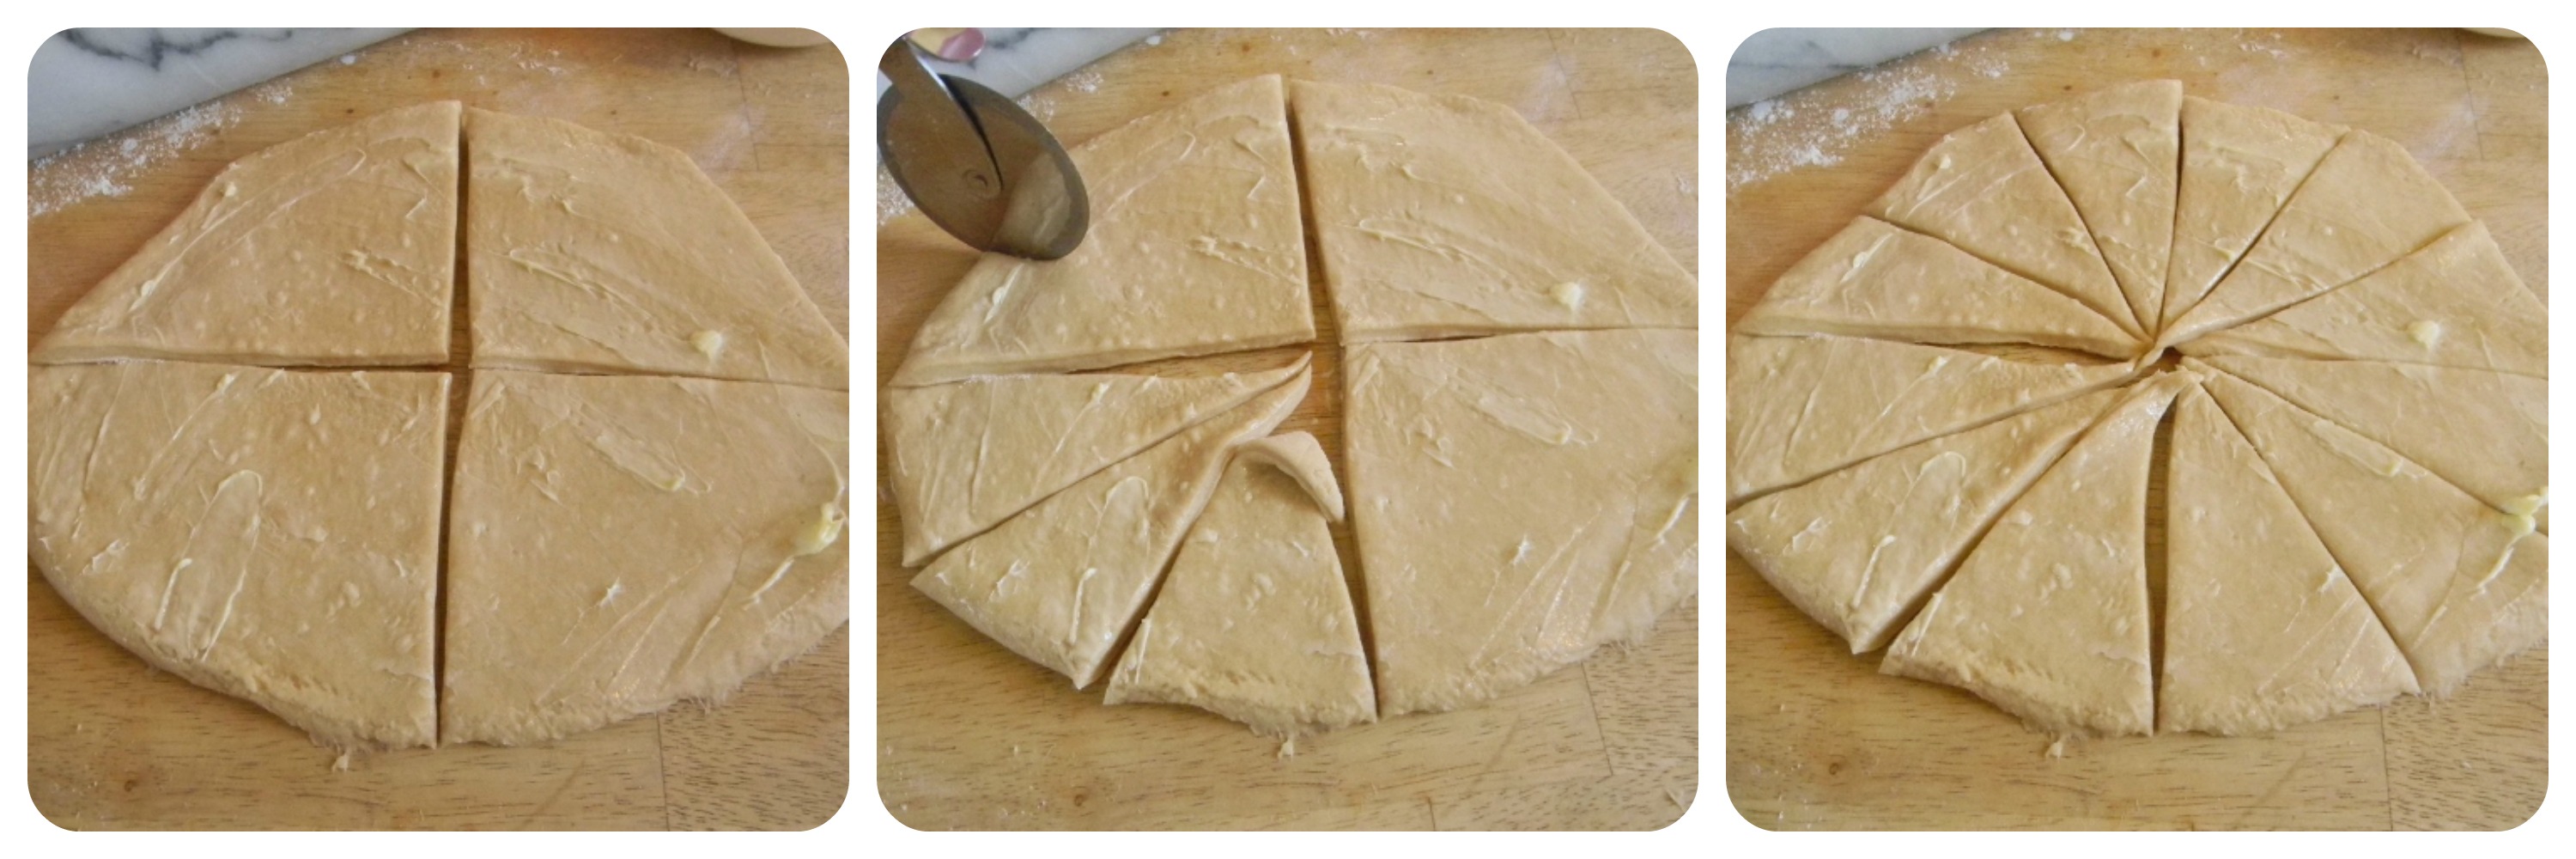
Spread butter (about 2 tablespoons) over your dough circle then use a pizza cutter to cut the dough into four equal pieces, then cut those pieces into 3 slices each. You will then have 12 triangles.
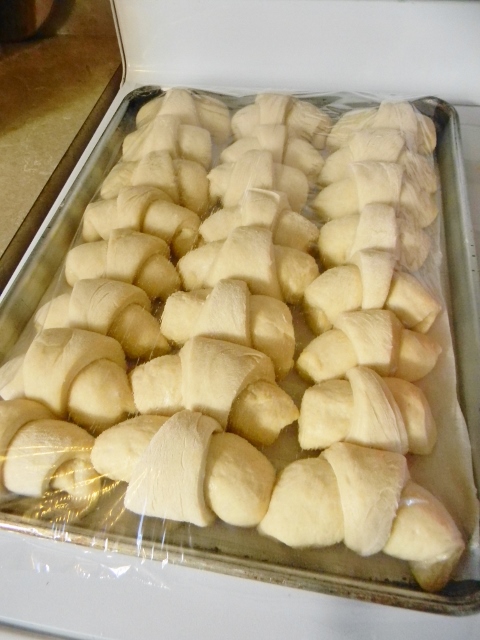
Take each triangle and roll them up starting with the wide end. Place them on a greased jelly roll pan. Repeat the process with the other half of the dough. You will end up with 24 crescent shaped rolls.
Step 7: Cover the pan of rolls with plastic wrap and set in a warm place to rise (about 1 hour).
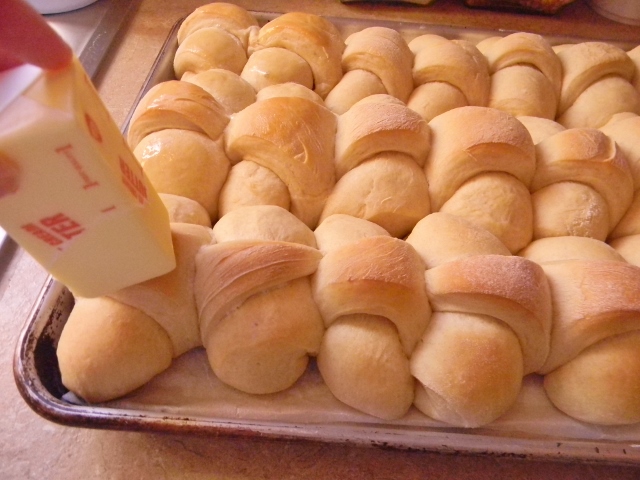
Step 8: Bake in a 350 degree oven for 10 to 15 minutes. When they are golden brown take them out of the oven and run a stick of butter over the top……yummm.
½ cup of butter divided in half (plus some for brushing on your finished warm rolls)
¾ cup of milk
1 egg
½ tablespoon salt
1 cup whole wheat flour
4 to 4½ cups all purpose flour
Instructions
Step 1: Dissolve 1 tablespoon of yeast in 1 cup of warm tap water (105 to 110 degrees) with 2 tablespoons of sugar. Let it sit for about 10 minutes.
Step 2: In a microwave safe bowl put ¼ cup of butter (cut into small pieces) ¼ cup of sugar and ¾ cups of milk. Microwave for 1 to 2 minutes until the butter is mostly melted.
Step 3: Place the melted butter, sugar and milk mixture into a mixing bowl and add the salt, egg and cup of whole wheat flour. Stir well.
Step 4: Add the yeast mixture to the mixing bowl and stir well. (change to a dough hook on the mixer) Now add the flour stirring will between each cup until the dough pulls away from the edges of the mixer and sticks to the dough hook. This will happen somewhere around 4 cups of flour.
Step 5: Scrape the dough off the dough hook and plop it onto a well floured surface. Knead it just a couple times to make a nice, smooth ball. Place it back into the mixing bowl and cover with plastic wrap. Place it in a warm place to let it rise.
Step 6: After your ball of dough has doubled in size, (30 to 60 min) punch it down and place it on a well floured surface. Knead a few time to push out all the air bubbles. Divide the dough in half and roll 1 half out into a circle. Spread about 2 tablespoons of butter over your circle. Using a pizza cutter cut your circle into 4 equal pieces then cut each piece into three triangles. You will have 12 triangles. Roll each triangle up starting at the wide end and place them on a greased jelly roll pan. Repeat with the other half of your dough. You will end up with 24 rolls.
Step 7: Cover your pan of rolls with plastic wrap and set in a warm place to rise. (about 1 hour)
Step 8: When they have about doubled in size bake them in a 350 degree oven for 10 to 15 minutes. When they are golden brown, take them out of the oven and run a stick of butter over the top.
3.2.2885
Note: You don’t have to use a mixer they can be mixed up by hand. I use the mixer to save time, and lets face it, I’m not that buff.
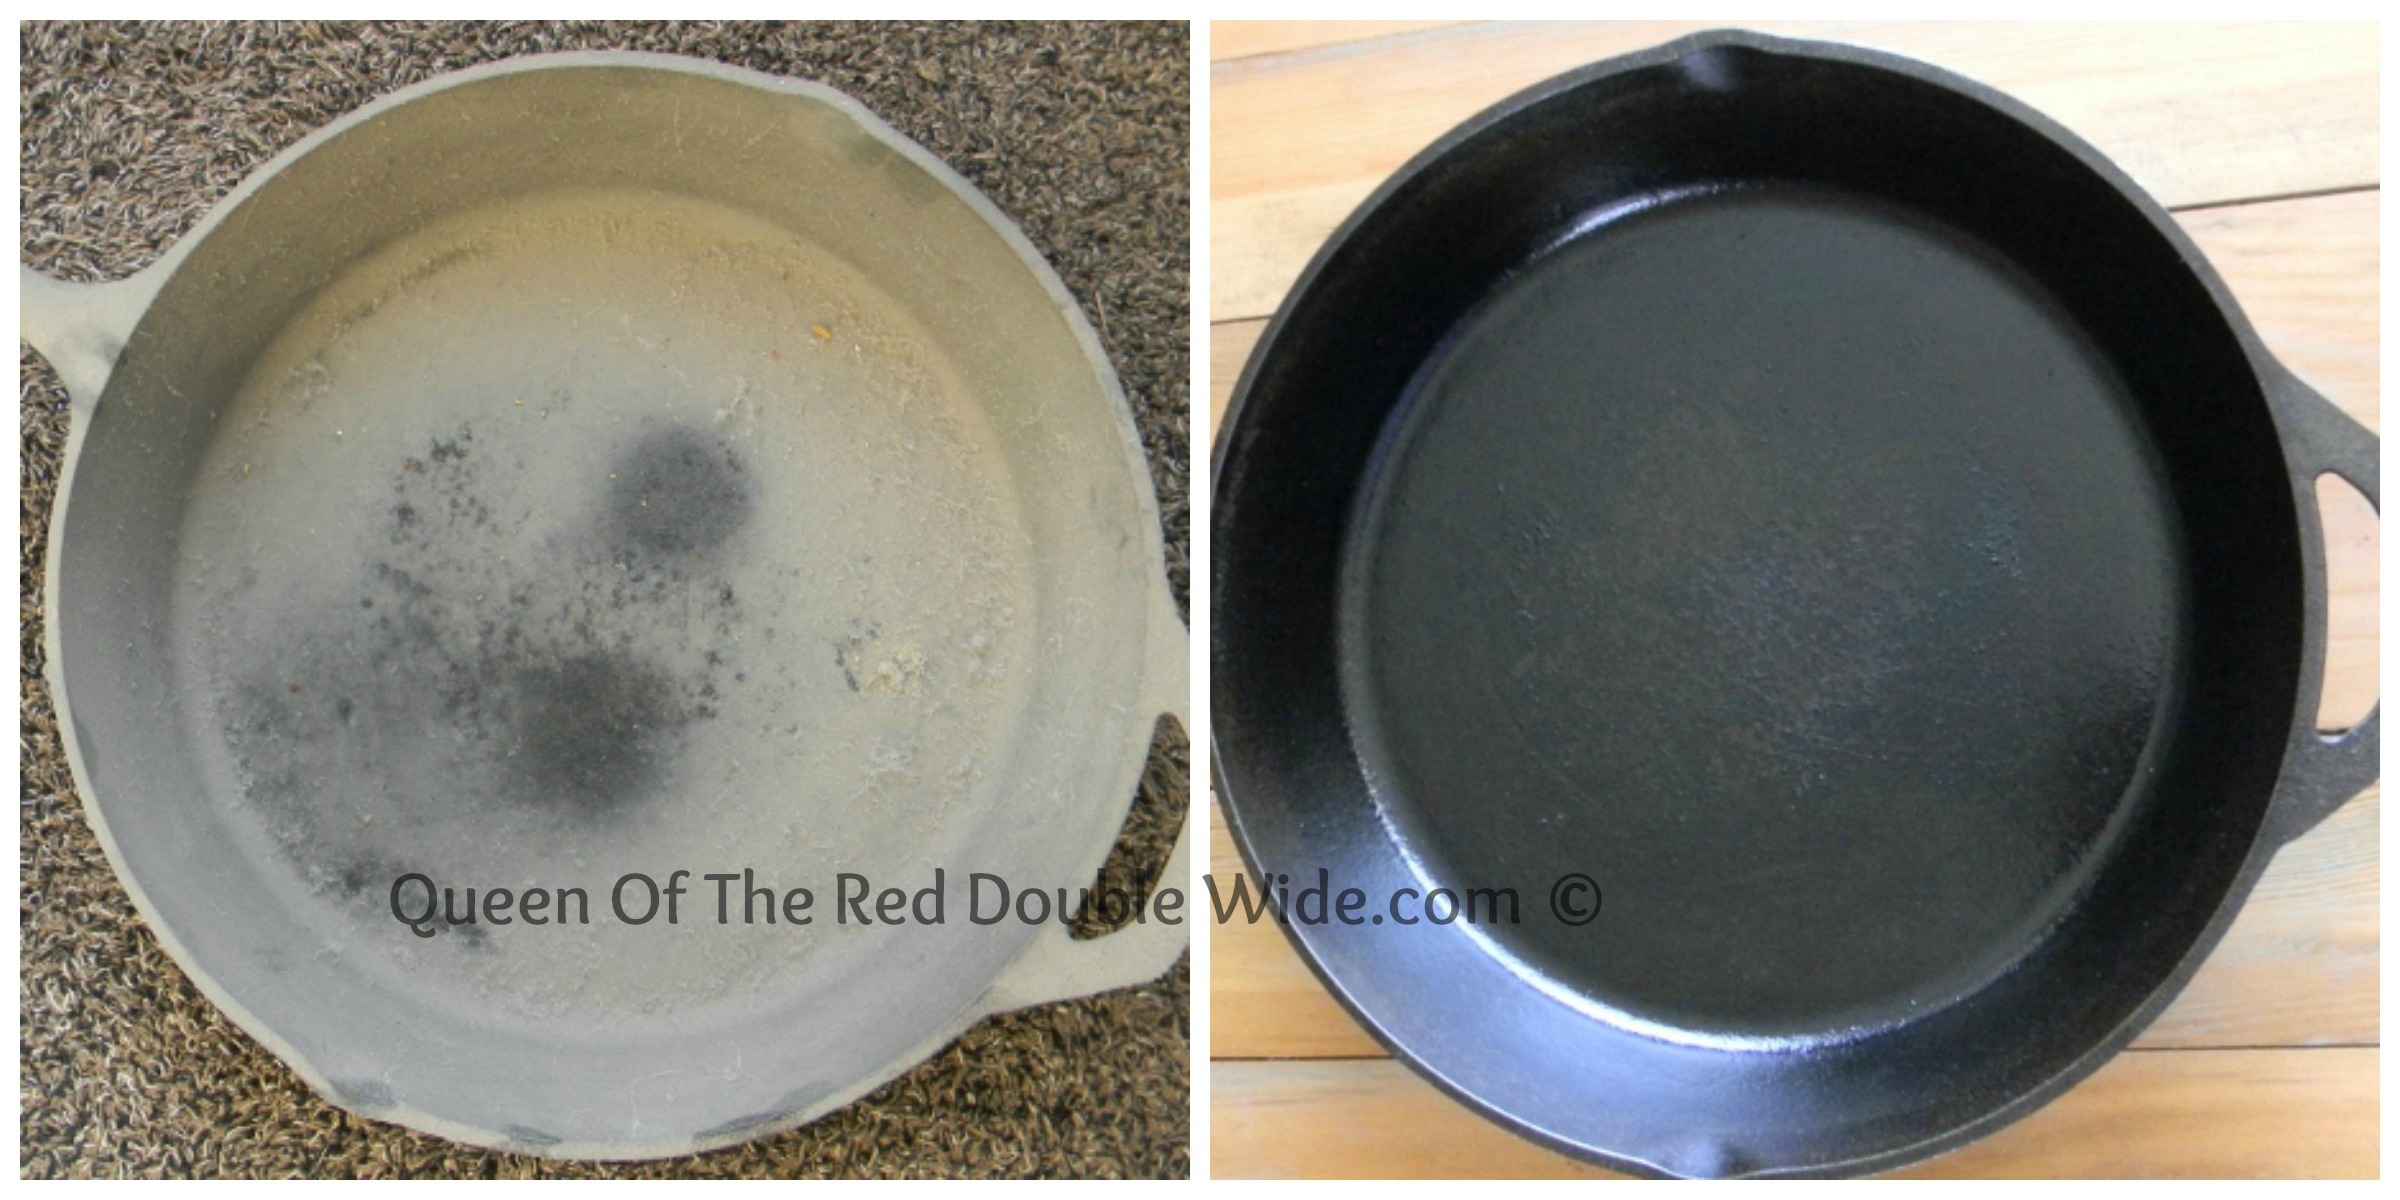
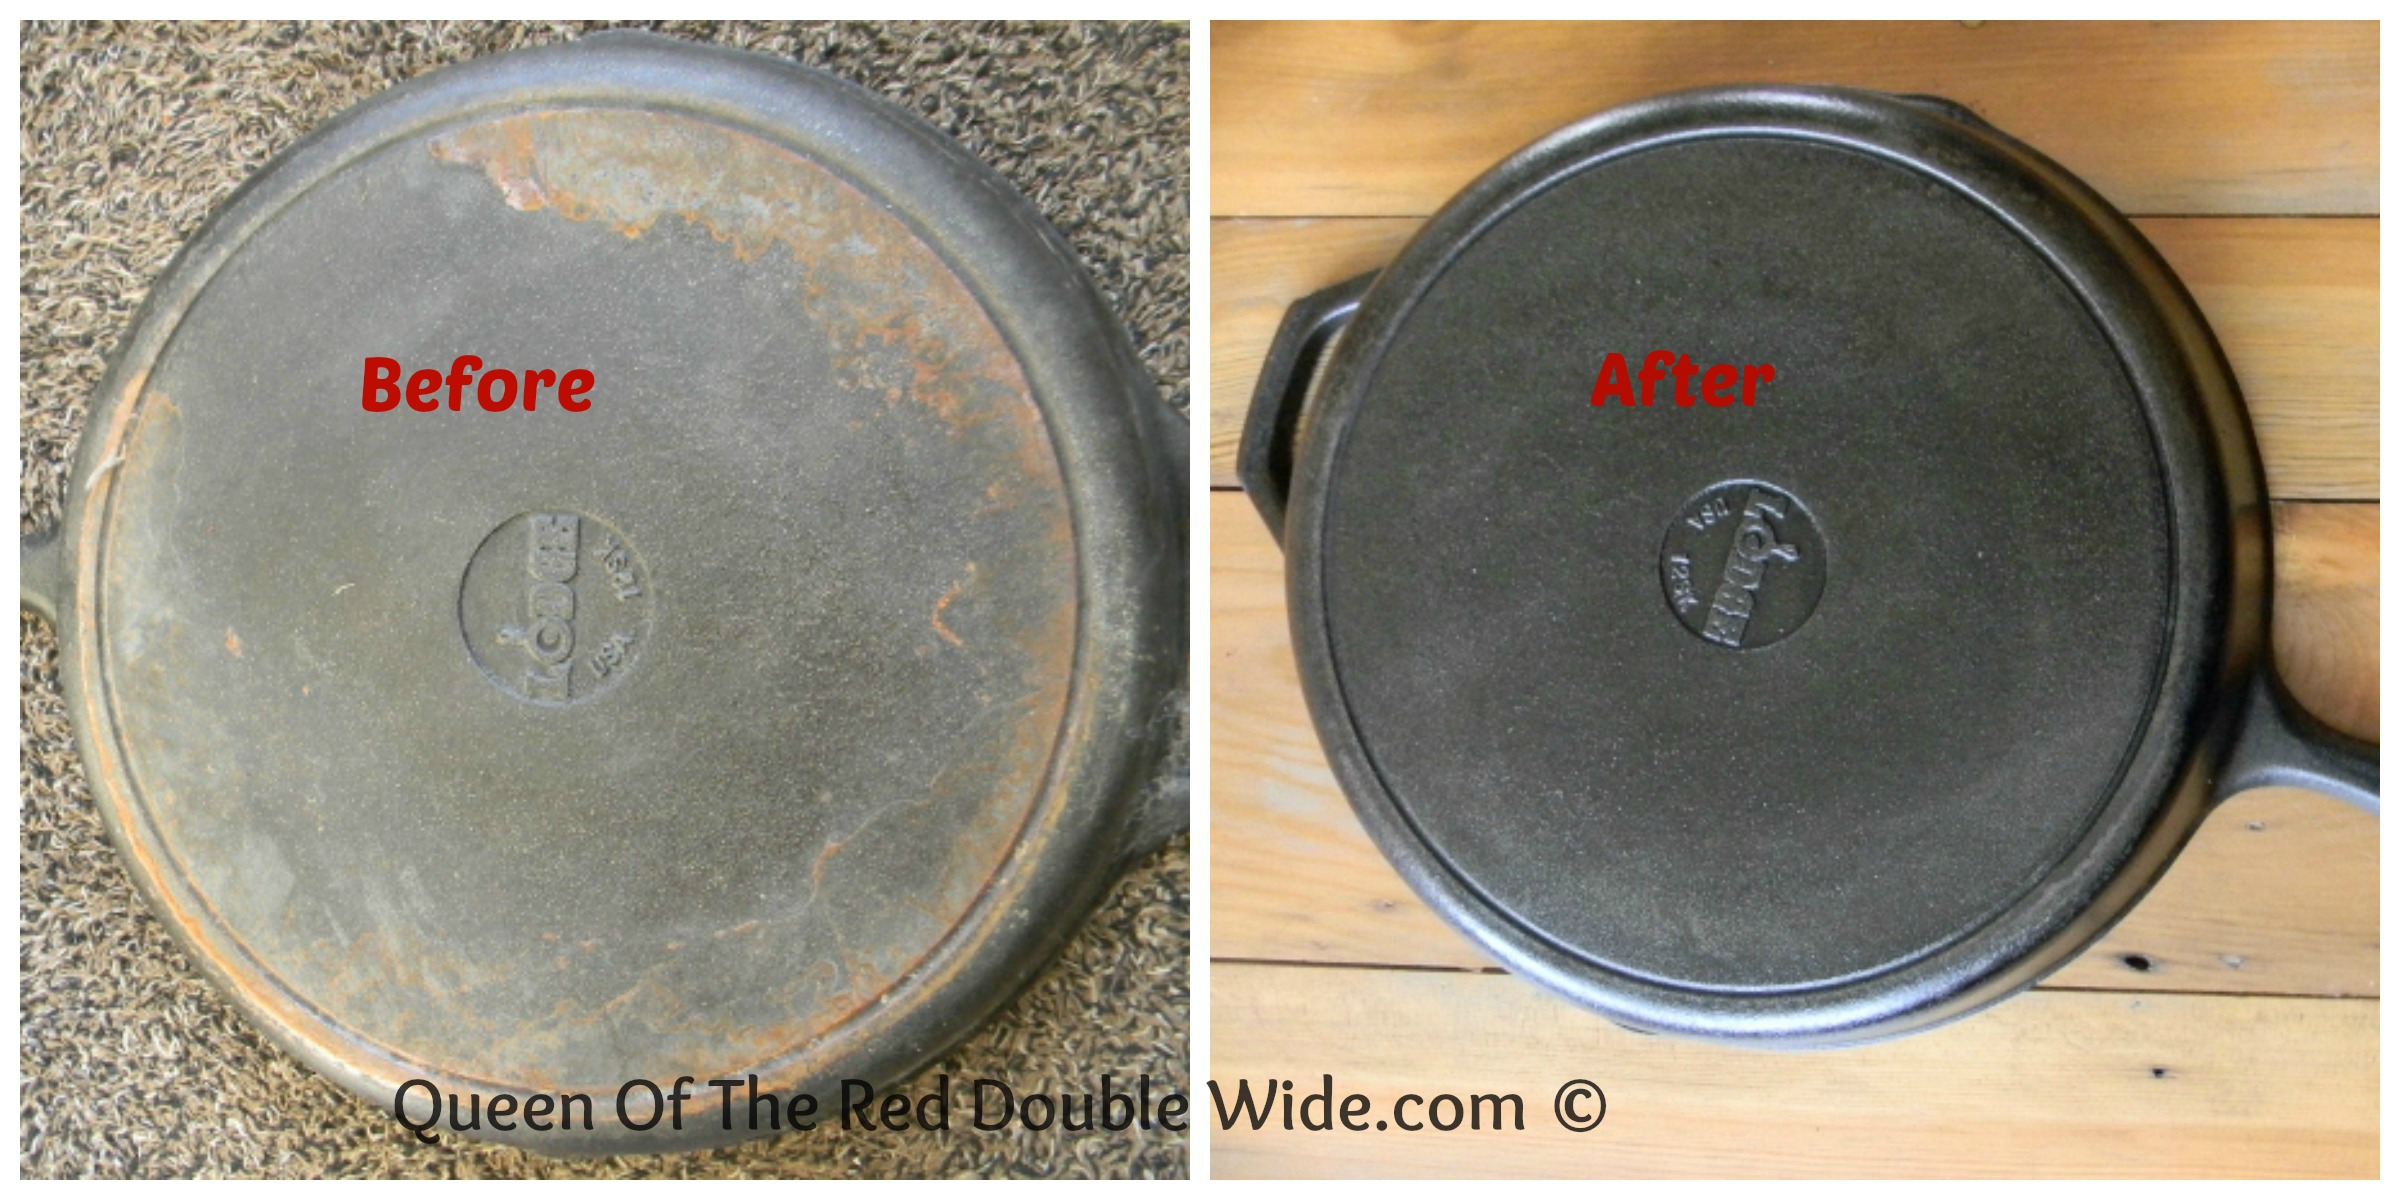
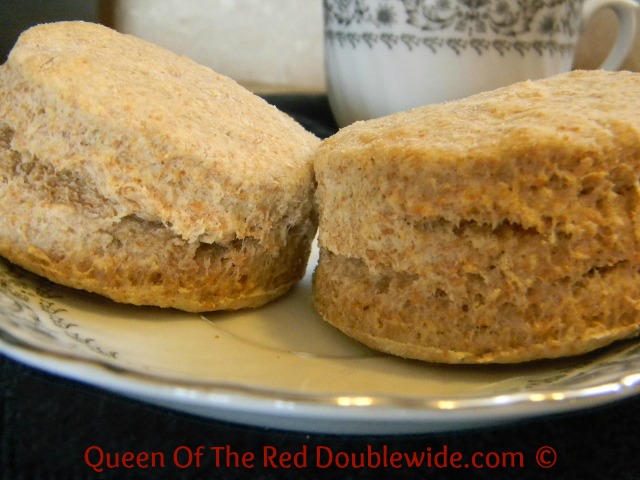
Over Christmas break I had time to do some long over due deep cleaning in the red double wide. I also did some purging and lots of STUFF went out the door, but when I came across my cast iron skillet I decided it was time to re-season it and put it to work. It was a lot dusty and a little rusty. Here are a couple before and after pics.
I had put this poor skillet in hiding shortly after my mom gave it to me….Why, you ask? Well I knew nothing about cast iron and the whole seasoning thing kind of intimidated me. Then, the first thing I attempted to cook was eggs……ya, they didn’t turn out so great!! By not so great, I mean a smoking, smelly, skillet with bits of crunchy black eggs. After that the top shelf in the laundry room seemed like a good home for the cast iron skillet. Recently I have come across some blogging posts about caring for your cast iron and some recipes that work well with it. They made it sound easy enough, so I thought I would give it a try. It made me feel a little better to read that though it’s not impossible, eggs are not the easiest thing to cook in cast iron. 🙂 I have decided to stay away from eggs until I am a more seasoned (haha) cast iron cook!
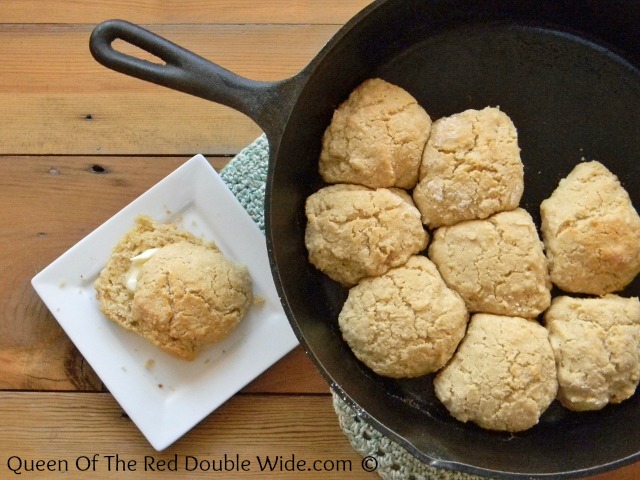
These biscuits are the first thing I made in my skillet. They turned out GREAT. They are light, flavorful, quick, and my favorite EASY!
Author: Queen Of The Red Double Wide adapted this recipe from crunchyrock.com
Serves: 10
Ingredients
2 cups whole wheat pastry flour
1 tablespoon sugar
3 teaspoons baking powder
½ teaspoon salt
⅛ teaspoon baking soda
¼ cup butter
1¼ cup buttermilk
2 tablespoons melted butter
1 cup flour
Instructions
Preheat the oven to 475 degrees
Stir together the flour, sugar, baking powder, salt, and baking soda in a mixing bowl.
With a pastry blender, or your hands, cut the butter into the flour mixture until the butter is about the size of peas.
Add the buttermilk to the mixture and stir just until combined, then let it sit for a few minutes.
In a separate bowl place the additional 1 cup of flour.
Scoop about ¼ cup of biscuit mixture out and gently toss it in the flour. Lightly shake off excess flour and place it in a greased 10 inch cast iron skillet.
Continue with the other biscuits, you will end up with about 10 biscuits.
Pour the additional 2 tablespoons of melted butter over the biscuits.
Bake for 16-18 minutes.
3.2.1255
Note: This recipe is for a 10 inch skillet and mine is a 12 inch. That’s why the biscuits look so small in the pan. 🙂 If you don’t have a cast iron skillet you can use a cake pan.
This recipe also works using 1 cup of all purpose flour and 1 cup whole wheat flour instead of 2 cups whole wheat pastry flour.
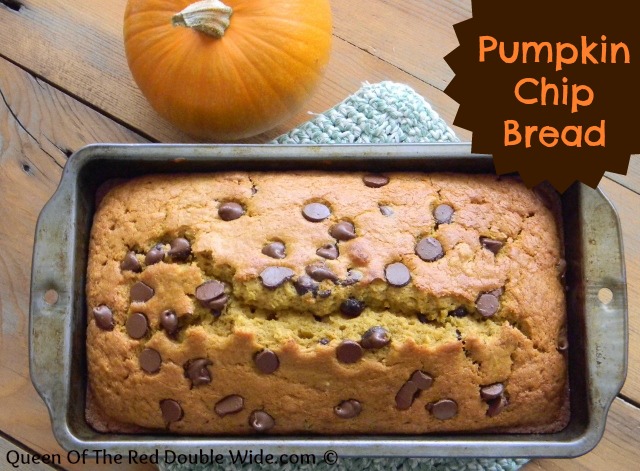
Here is the first recipe I’m sharing that uses my homemade pumpkin pie spice mix. This is so perfect for a cool fall day, and as a bonus it will make your house smell like fall too!
1 cup chocolate chips plus ¼ cup for sprinkling on top
Instructions
In a mixer or large bowl combine the pumpkin, vanilla, eggs, butter and yogurt. In a separate bowl stir together flours, sugar, salt, baking powder & soda, and Pumpkin Pie Spice mix. Pour dry ingredients into the mixer and blend well. Fold in the 1 cup of chocolate chips. Grease a loaf pan, pour batter in and sprinkle remaining chocolate chips on top. Bake at 350 degrees for 60 to 75 minutes.
3.2.1230
Note: If you don’t have plain yogurt you could substitute sour cream and you could also substitute apple sauce for the butter. I used organic sugar but sucanat would also work. I also used a little less sugar and chocolate chips and it was still yummy, yummy!
Instead of bread you can make muffins. These are the jumbo muffins and they took about 30 minutes to get done. The smaller regular size muffins take about 20 minutes. Be sure to grease your muffin tins and fill them about 2/3 full…..yummm!
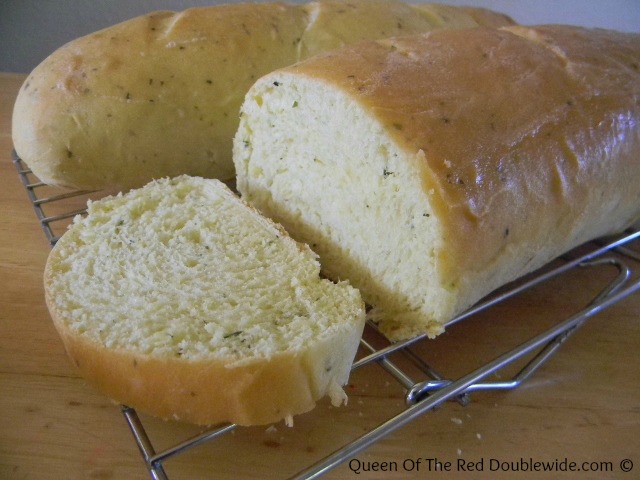
I found this recipe in one of my Taste Of Home cookbooks. I’ve been looking for recipes to use my homemade ranch packets in, so I thought I’d give it a try.
It was a hit!! The first time I made it I sliced it up and made BLT’s with fried eggs and avocado slices. I wish I had taken a picture. They were delicious!
This bread is very tender and has a wonderful ranchy flavor.
Step 1 – Start by mixing the yeast, warm water, and a pinch of sugar in a small bowl. Let it sit for 10 minutes.
Step 2 – Put the buttermilk, butter, sugar, eggs, ranch salad dressing mix, and salt in a mixer, blend well. Stir in the yeast and water mixture.
Step 3 – Add 2 cups of flour to the mixer and stir until smooth. While the mixer is still mixing add enough of the remaining flour to form a soft dough that pulls away from the bowl. That will be about 2.5 more cups.
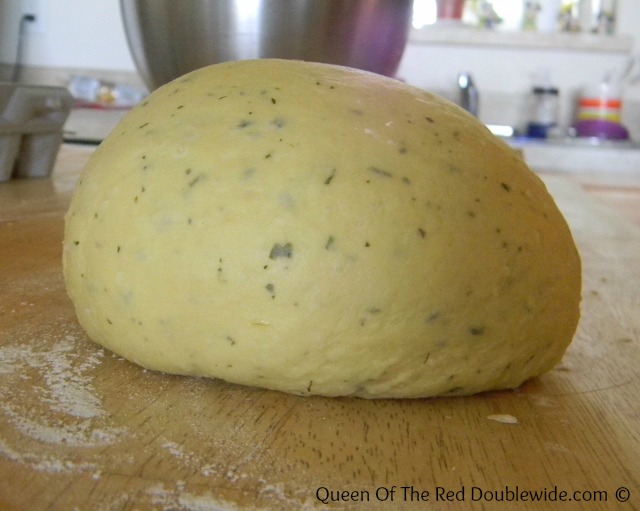
Step 4 -Turn the dough onto a floured surface and knead until smooth and elastic – about 6 to 8 minutes.
Step 5 – Place in a greased bowl, turning once to grease the top. Cover and let rise until doubled – (about 1 hour).
Step 6 – Punch the dough down and divide into 2 pieces. Roll each piece into a 14″ x12″ rectangle.
Roll up each piece starting with the long side. Pinch the seam to seal and tuck the ends under. Place seam side down on a greased baking sheet and let rise until doubled – about 30 minutes.
Step 7 – Bake at 350 degrees for 20-25 minutes or until golden brown. Brush with melted butter.
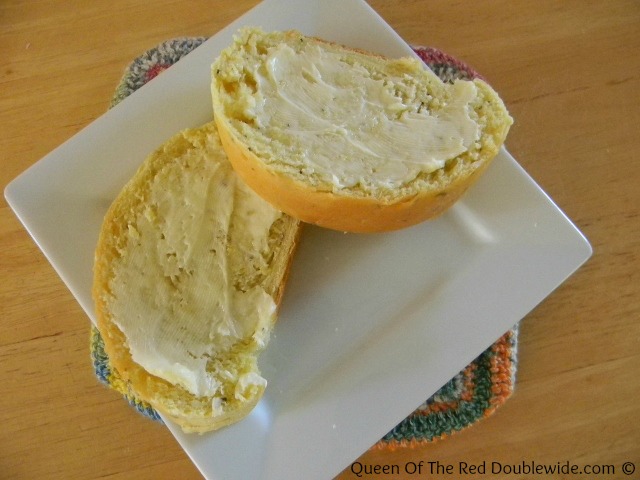
I used this bread to make egg salad sandwiches last night for our Care Group meeting and they were yummy, yummy!
This recipe makes 2 loaves - about 14 slices per loaf
Author: Adapted from Taste of Home by The Queen Of The Red Doublewide
Ingredients
1 packet of active dry yeast - 1 packet equals 2¼ teaspoons
¼ cup warm water 110 - 115 degrees
1 cup buttermilk warmed to 110-115 degrees
¼ cup butter softened
¼ cup sugar
2 eggs
1 packet ranch seasoning mix (try my homemade one it works great!)
1 teaspoon salt
4 to 4½ cups unbleached all purpose flour
Instructions
In a small bowl, dissolve yeast in warm water with a pinch of sugar and let it sit for ten minutes.
Put buttermilk, butter, sugar, eggs, salt and ranch seasoning into a mixer and stir well. Add the yeast and water mixture and stir.
Add 2 cups of flour and mix until nice and smooth, add the next two cups of flour and then add a little at a time until the dough pulls away from the bowl.
Turn onto a floured surface and knead until smooth, about 6-8 minutes.
Place in a greased bowl, cover, and let rise until doubled.
Punch down and divide into two pieces. Roll each piece into a 14"X12" rectangle, then roll up starting with the long side. Pinch the seams to seal and tuck the ends under. Place seam side down on a greased baking sheet, cover and let rise until doubled.
Bake at 350 degrees for 20 to 25 minutes or until golden brown. Brush with melted butter.
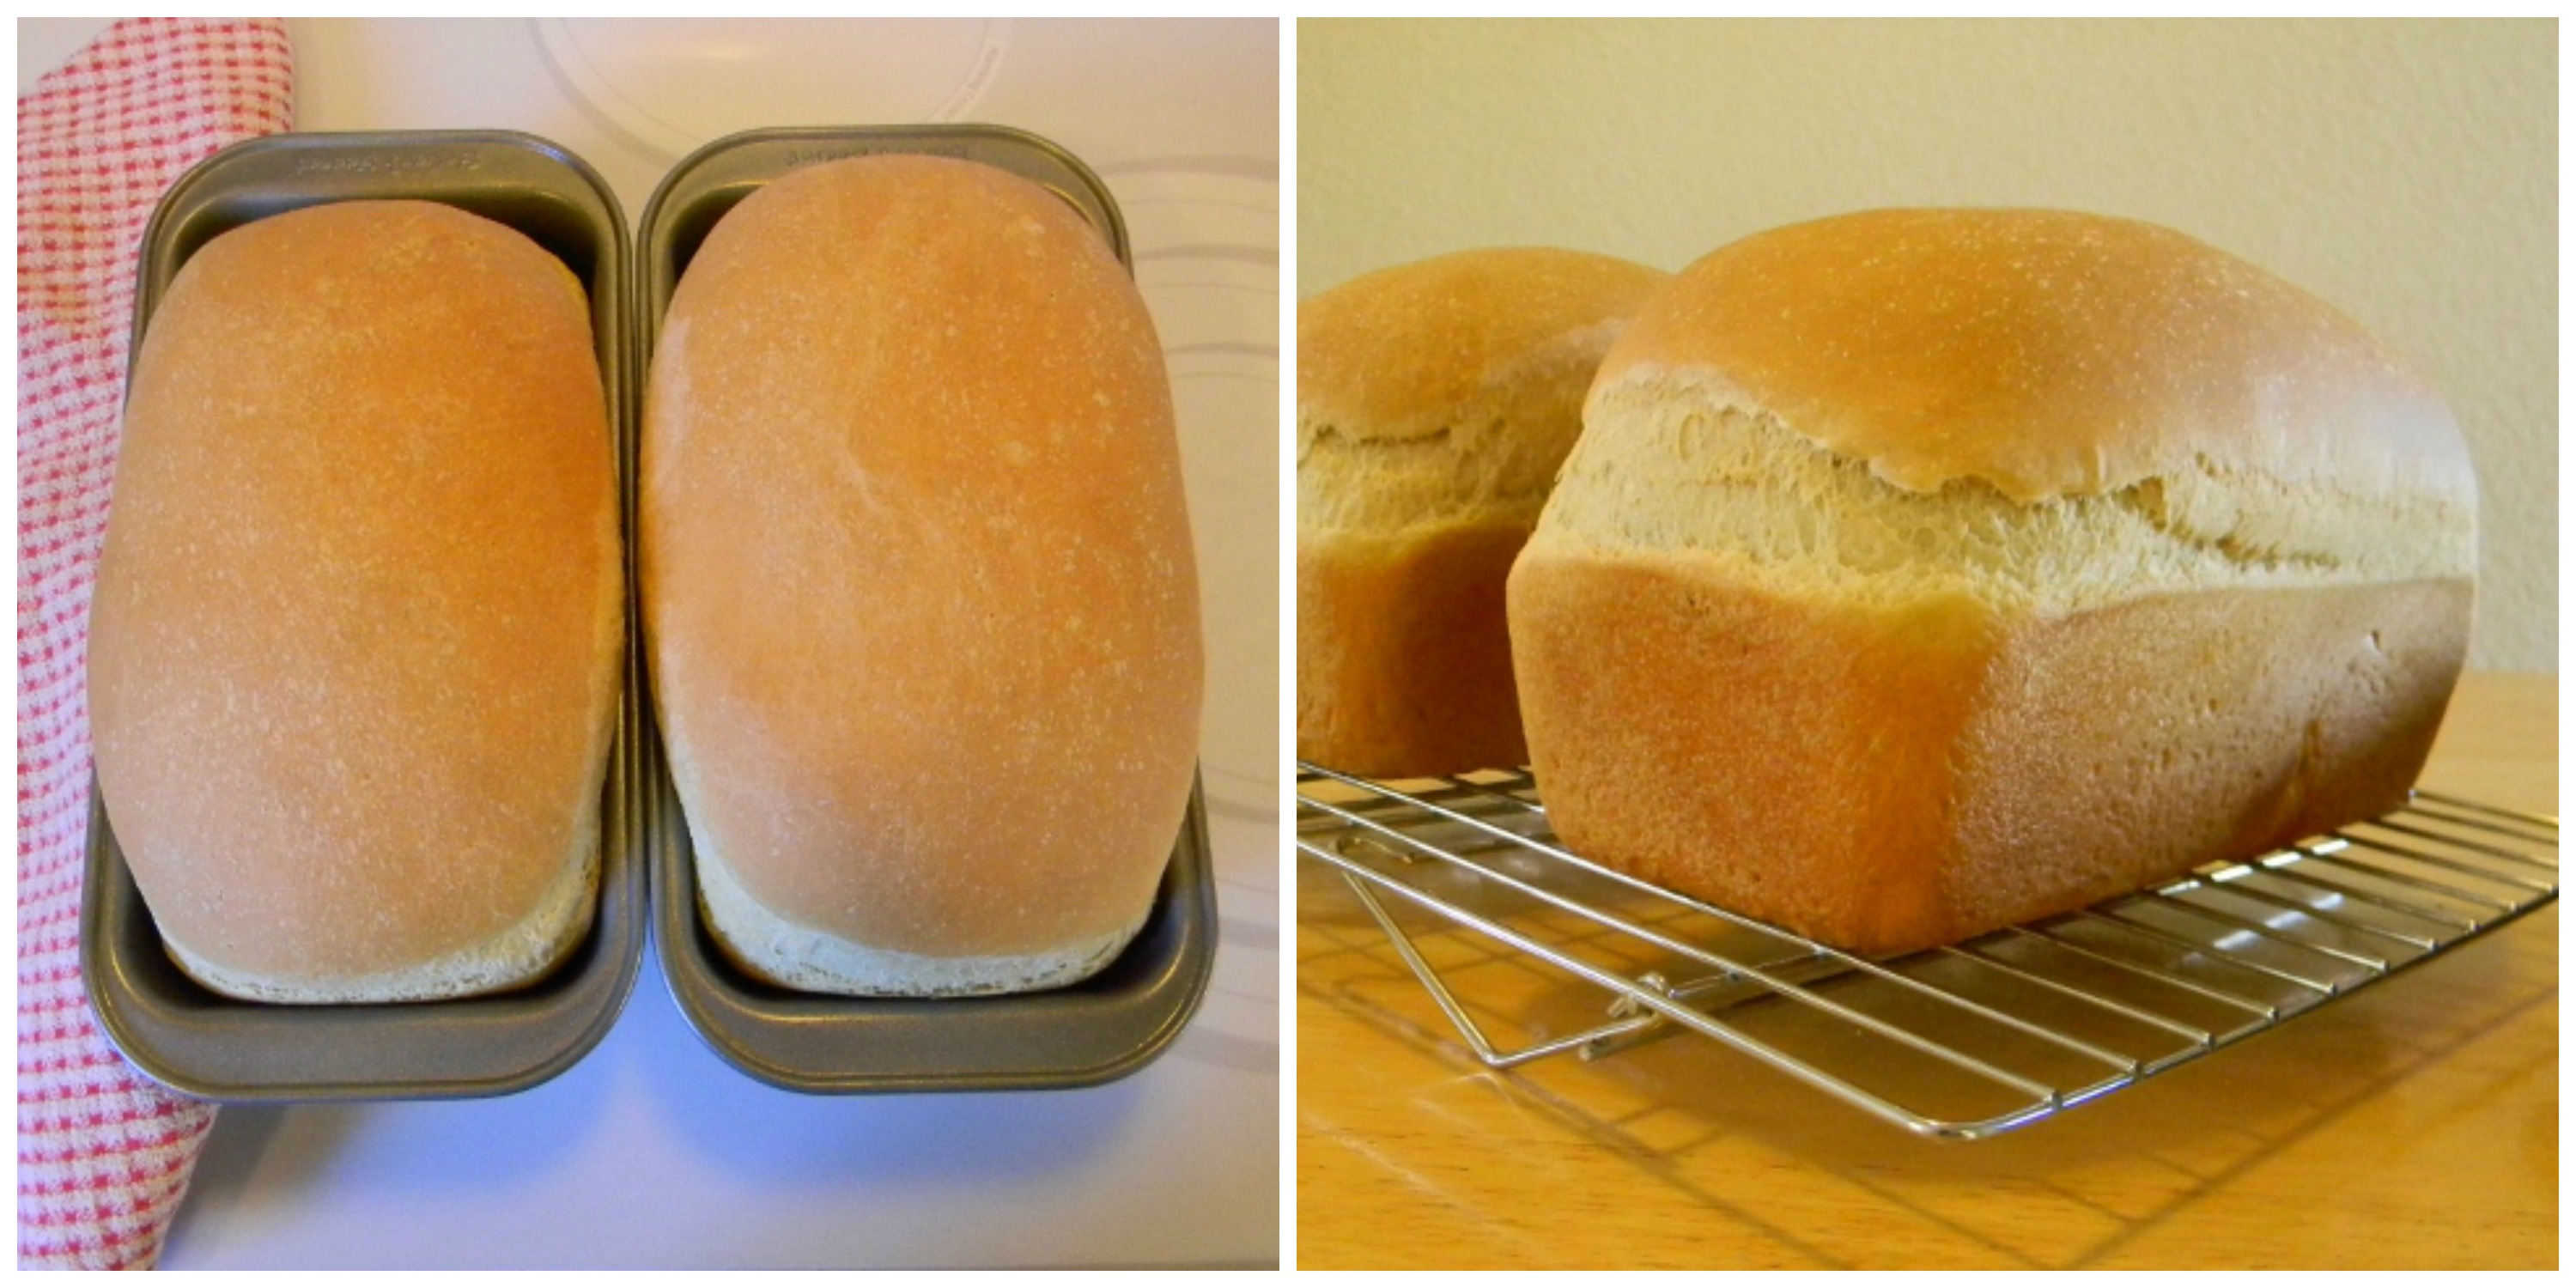
Baking bread is a very new adventure for me. It was one of those things on my “I need to learn how to do that” list, but I kept putting it off (and off and off). You would think that on a journey toward frugality and self sufficiency that baking your own bread would be one of the first things to learn. It should be, BUT patience is one of those fruits of the spirit that I’m lacking. The whole kneading and rising thing sounded heavy in the patience area. I guess I’m afraid of yeast, or rather WAS afraid of yeast… Well ok, I was afraid of KILLING yeast. It just sounded so violent. Every time I looked at a bread recipe or any recipe that had yeast, I would think….WOW that’s a lot of instructions and that will take all day long, and I will probably kill the yeast ending up with rocks after slaving in the kitchen all day!! I’m a banana bread and biscuit kinda girl. Mix it up and throw it in the oven, (no patience required) that’s how I roll. 😀
So lets just say that making my first loaf of bread was a big step for me, (okay it was a HUGE step for me). I set aside a whole day to make two loaves of bread because I really believed it would take all day. I took a deep breath, put on my “patience hat” (sorry, I used to be a preschool teacher) and got out my yeast and flour!
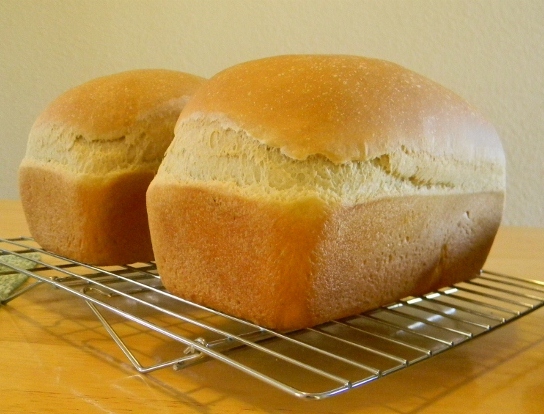
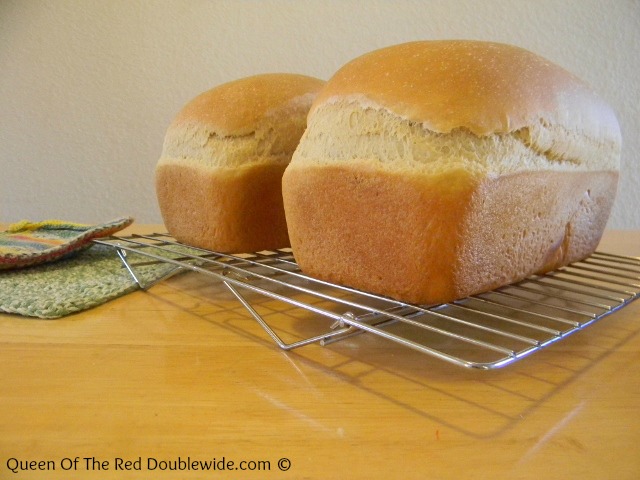
I’m happy to report that my first two loaves of bread were a success, and it didn’t even take all day!! In fact I can’t believe I put this off for so long. It was way easier and less time consuming than I thought. The baking bread made my house smell heavenly and what a sense of accomplishment to pull two plump, golden brown loaves of bread out of the oven just in time for lunch. 😀
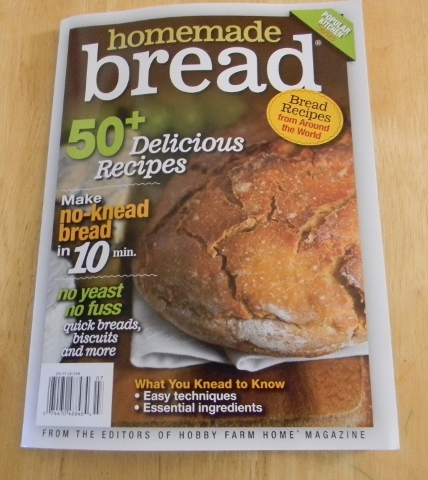
My mother in law gave me this wonderful magazine that’s full of awesome bread recipes with very detailed instructions. I highly recommend it, especially for first time bread makers (you can find it on Amazon). The first recipe in the book is white sandwich bread. It’s a pretty basic recipe and,… well,… my husband eats LOTS of white sandwich bread (I can’t convince him that whole wheat tastes better and is better for him). It’s the recipe I started with, and it turned out so well I thought I would share it with you. I’ve made it several times now and we all like it!
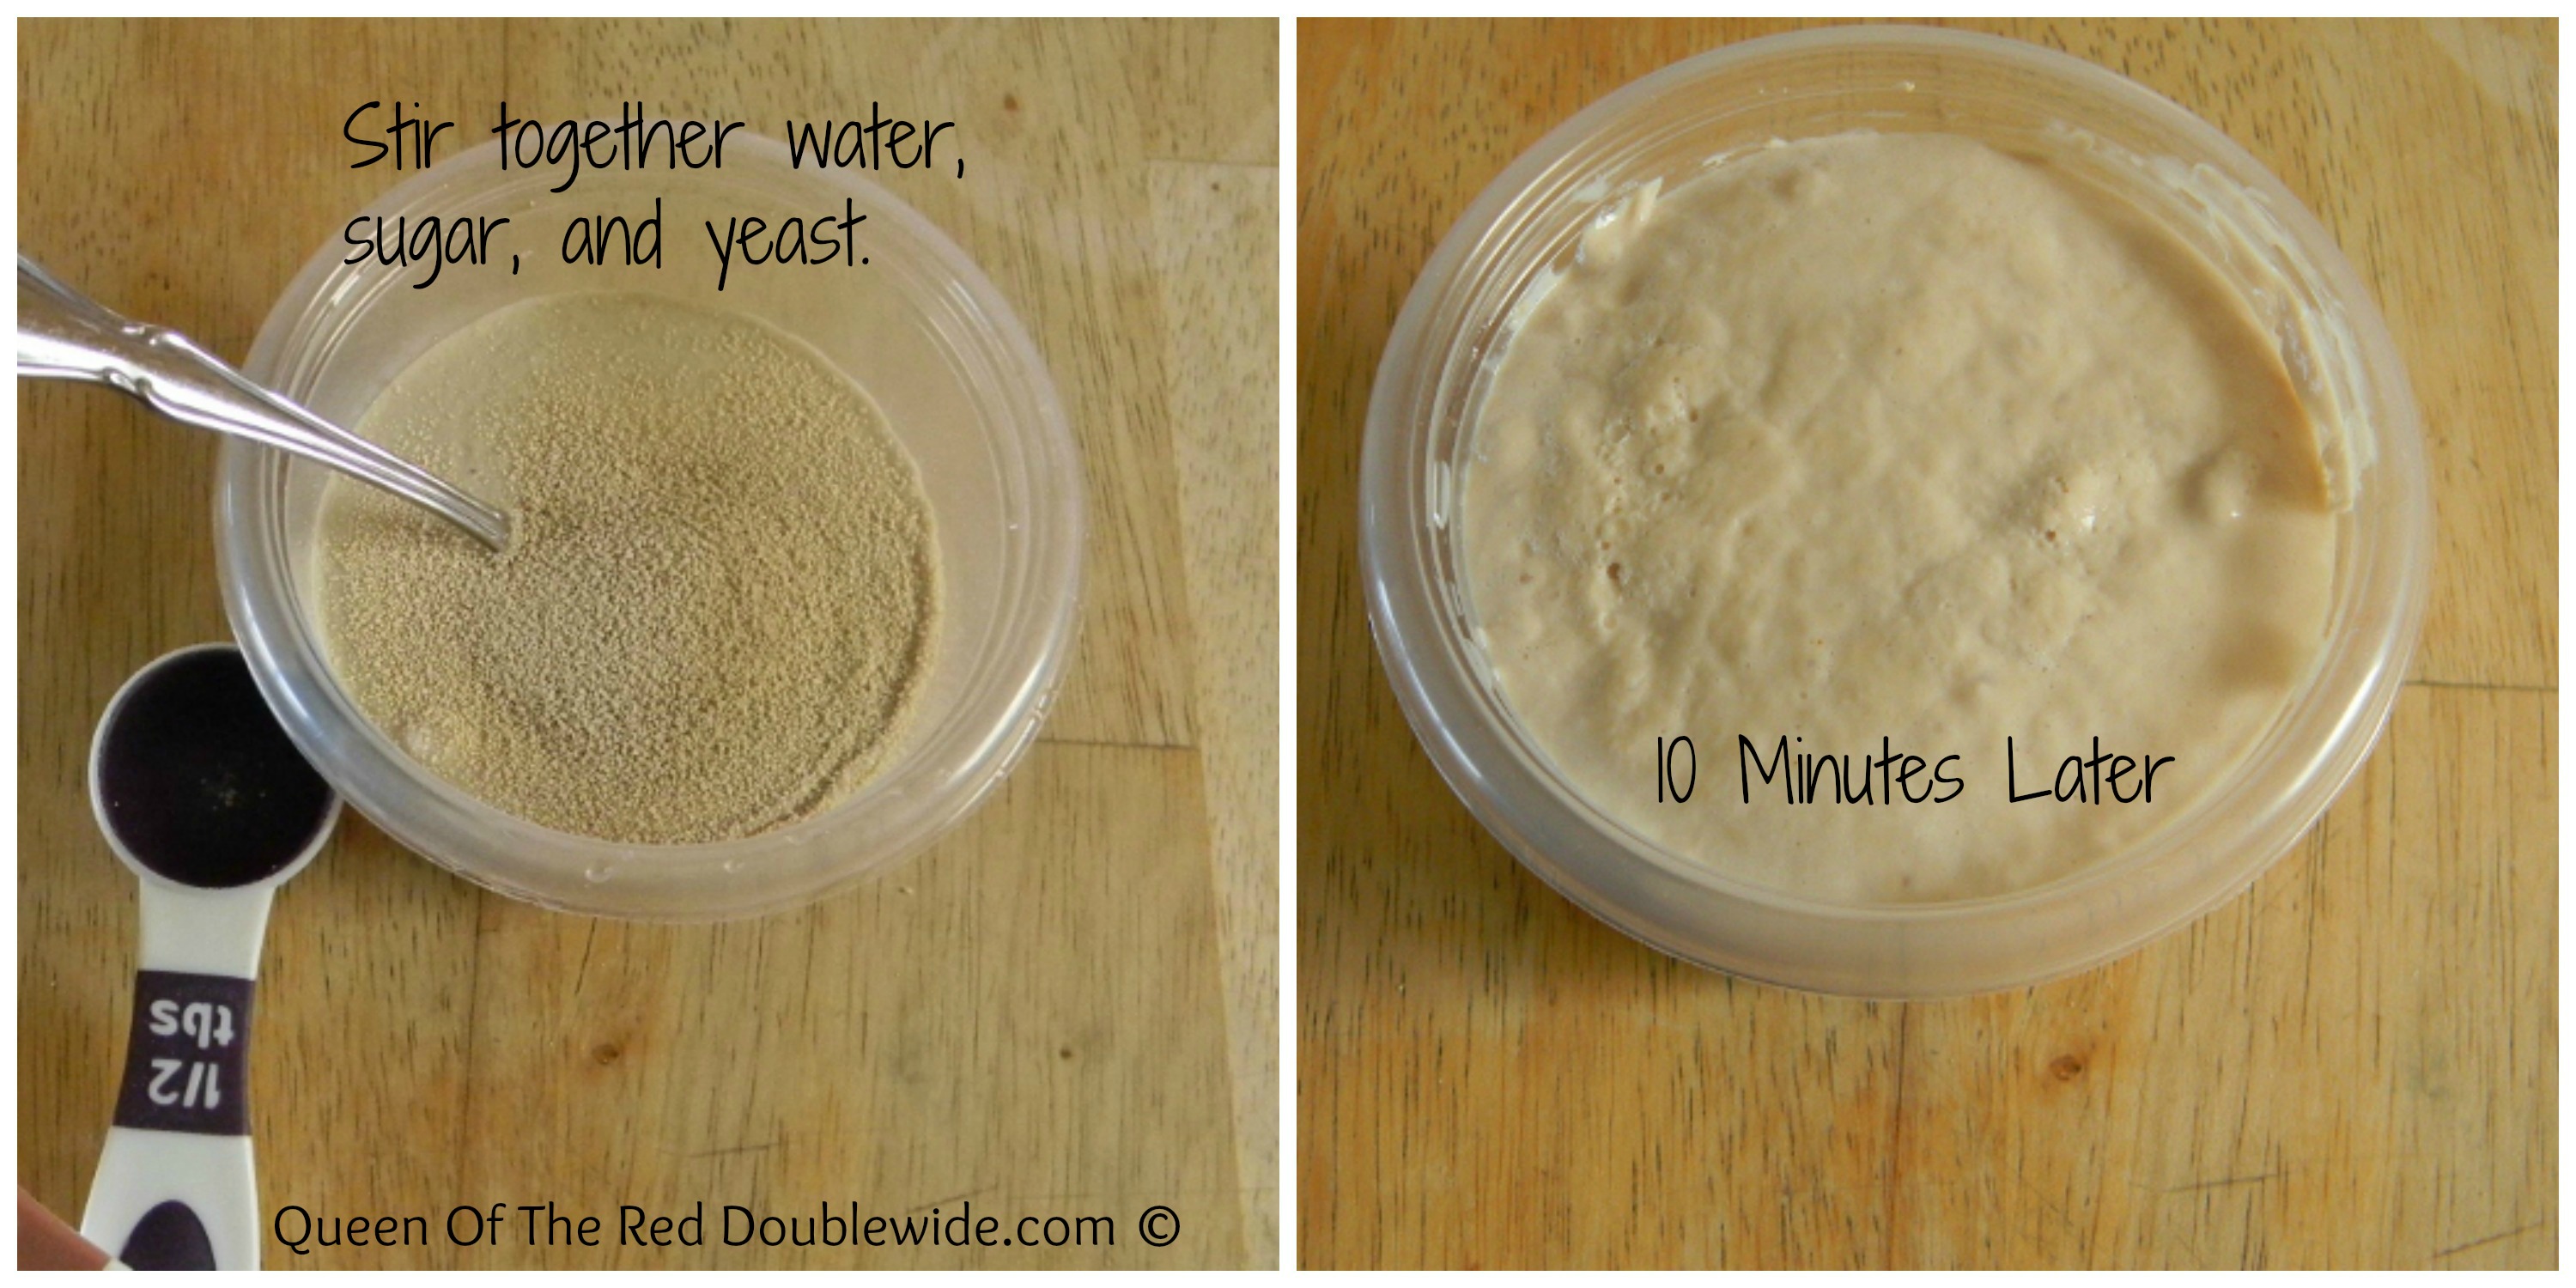
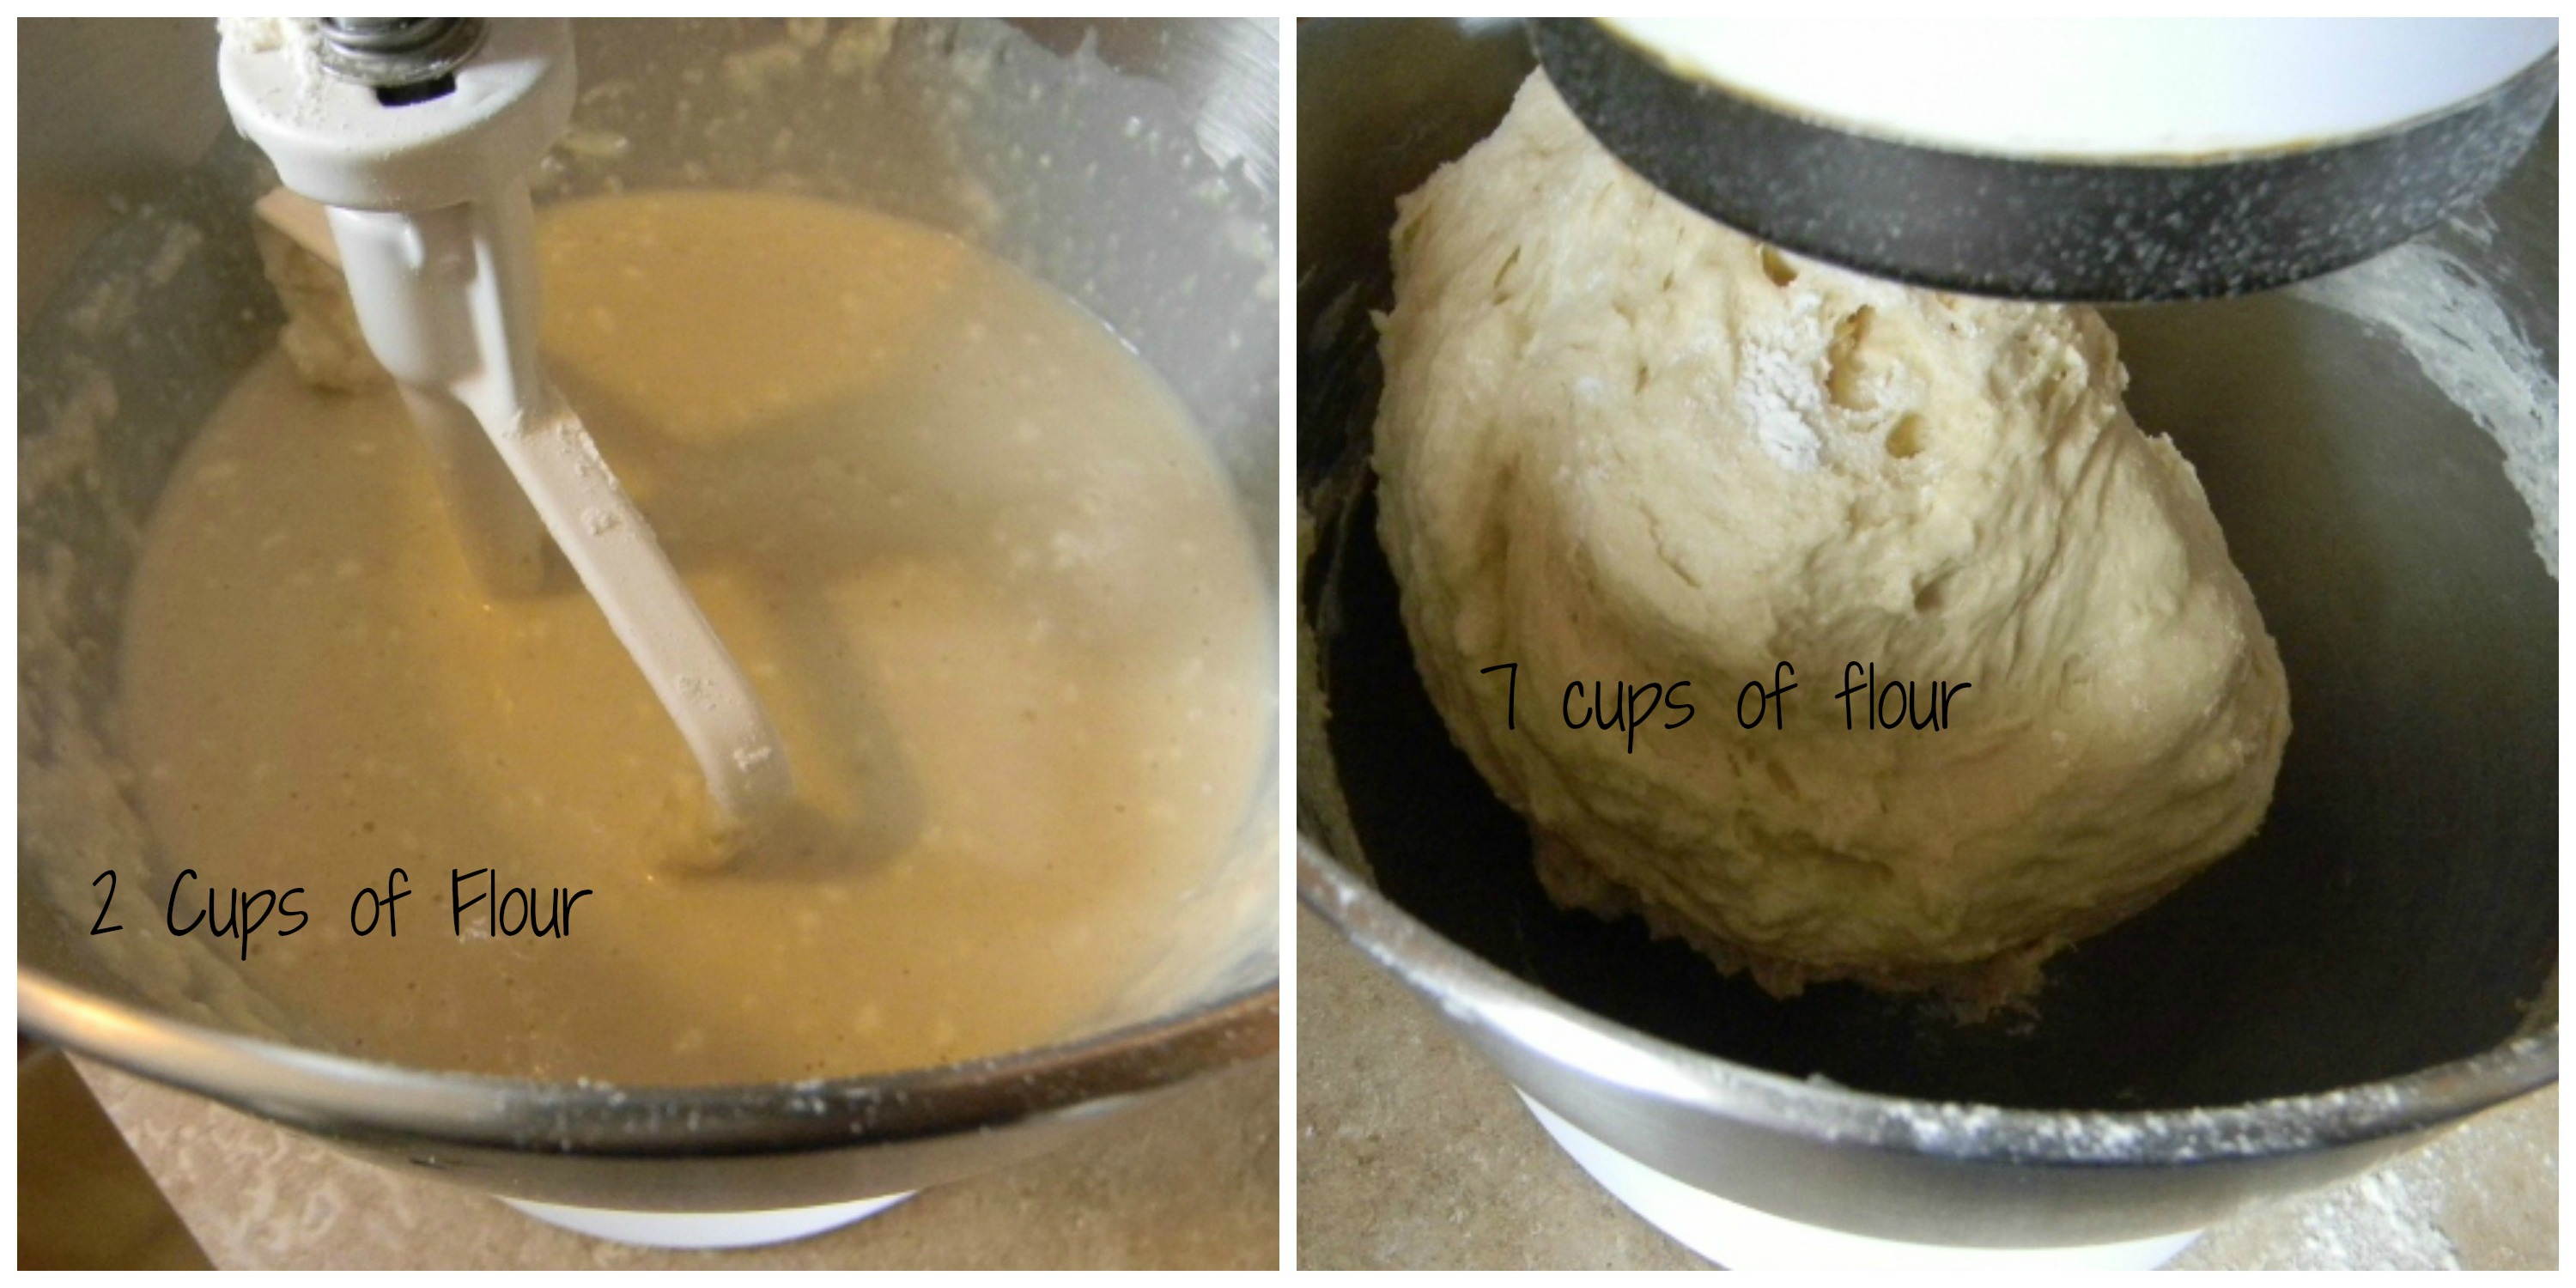
Step 1 – Put 1/2 cup of warm water, yeast and a pinch of sugar to a small bowl. Stir to dissolve the yeast then let the mixture sit for about 10 minutes until foamy.
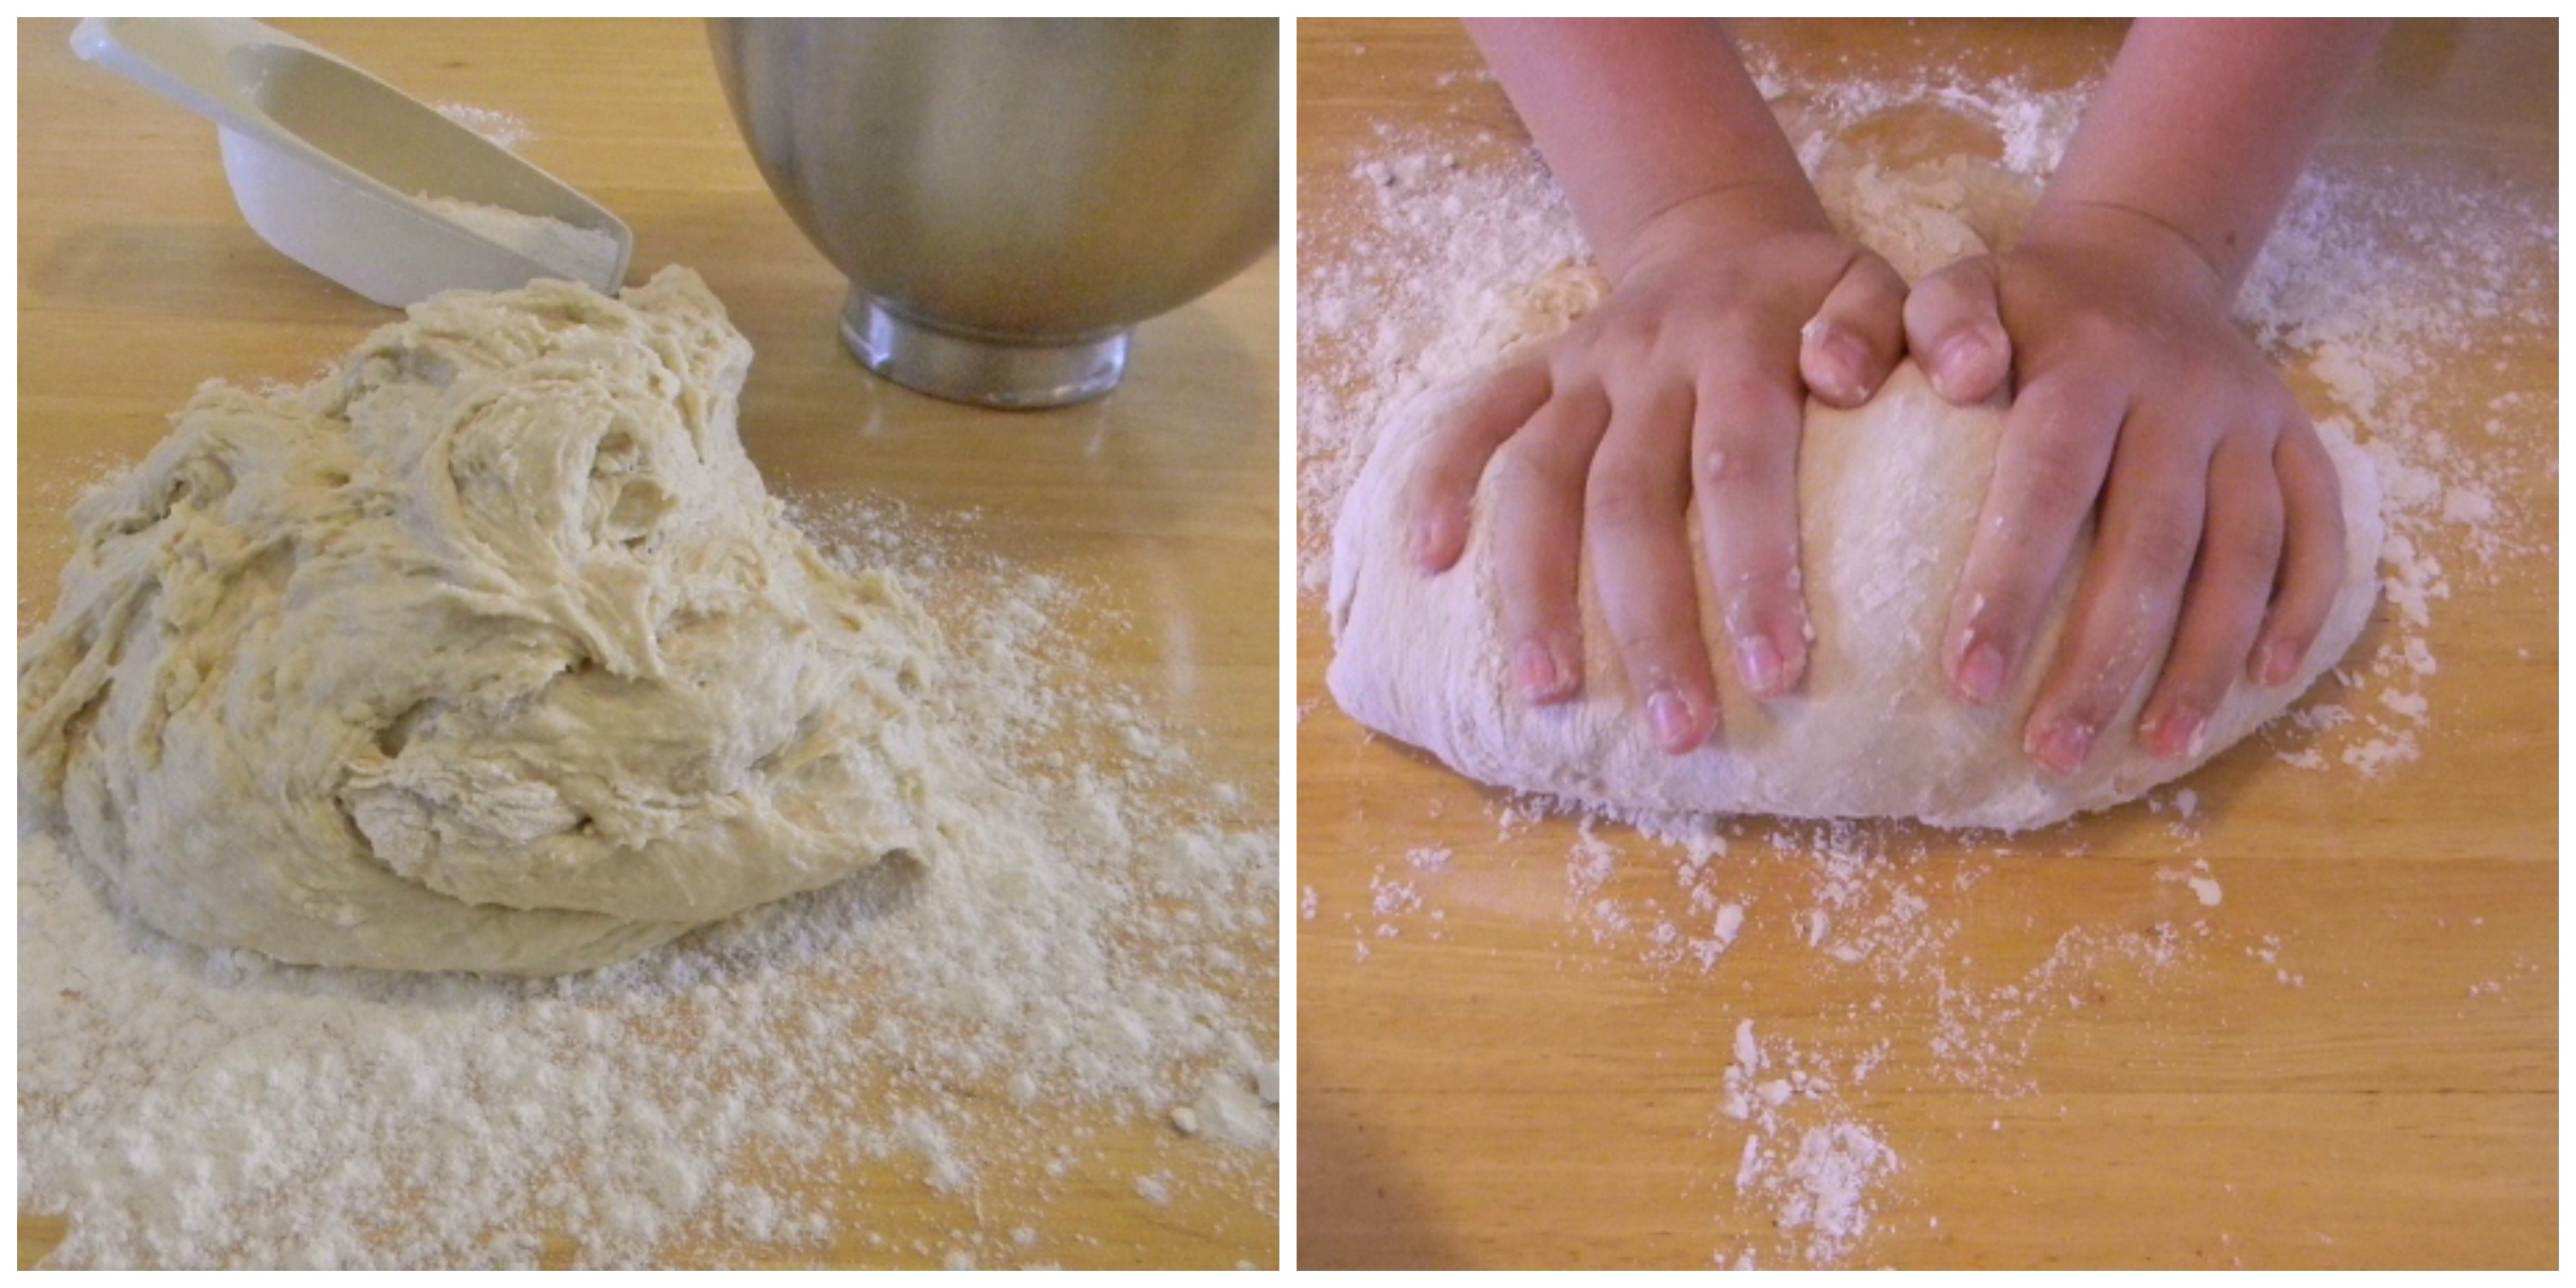
Step 2 – In an electric stand mixer or a large bowl, combine the remaining water, milk, butter, sugar and salt. Add the yeast mixture, and stir until combined. Add 2 cups of the flour, and mix well. Continue to stir the mixture for one or two minutes until smooth and creamy. Add additional flour in 1/2 cup increments, stirring well after each addition until the dough holds together and starts to pull away from the sides of the bowl. Step 3 – Put the dough on a well floured surface, or if you have a dough hook for your stand up mixer you can use that to knead the dough. I think the best part of making dough is kneading with my hands. Knead in the remaining flour, adding a tablespoon or two at a time, until the smooth dough no longer sticks to your hands. It will take about 5 minutes by hand, less if you use the mixer.
My girls love kneading the dough and I’m taking advantage of that while it lasts!
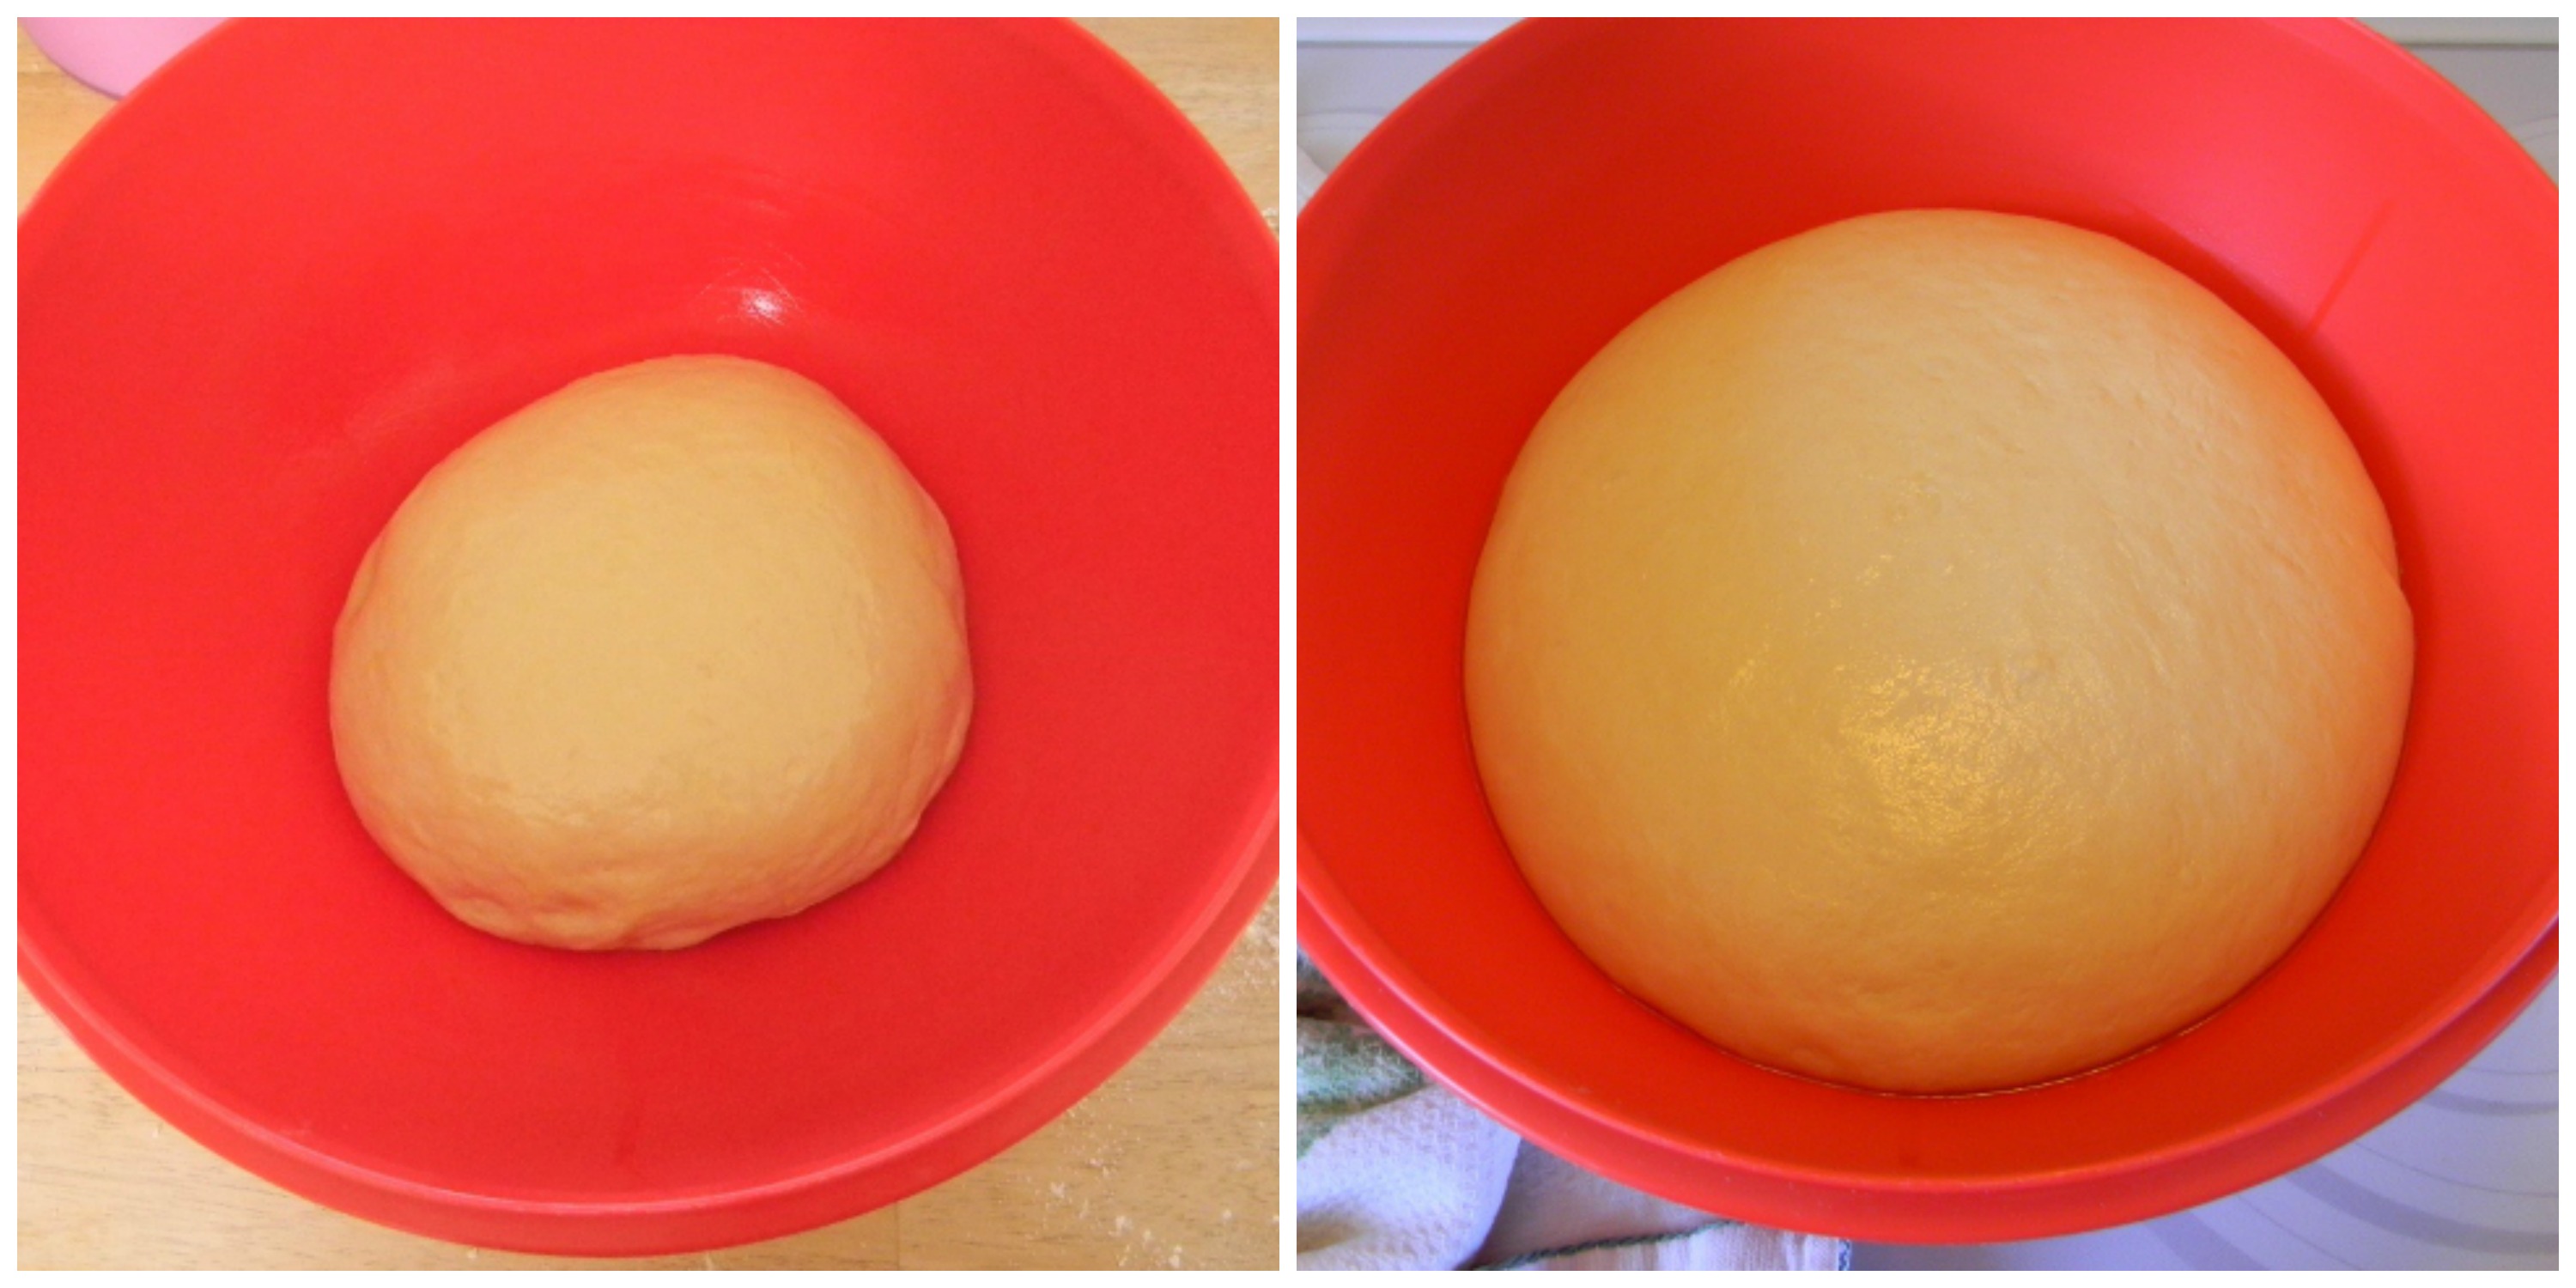
Step 4 – Place the dough into a large greased bowl (I used a little olive oil) turning it over so the dough is coated with oil. Cover the bowl loosely with plastic wrap and let it sit at room temperature until it has doubled in size. It will take about 1 to 1 1/2 hours.
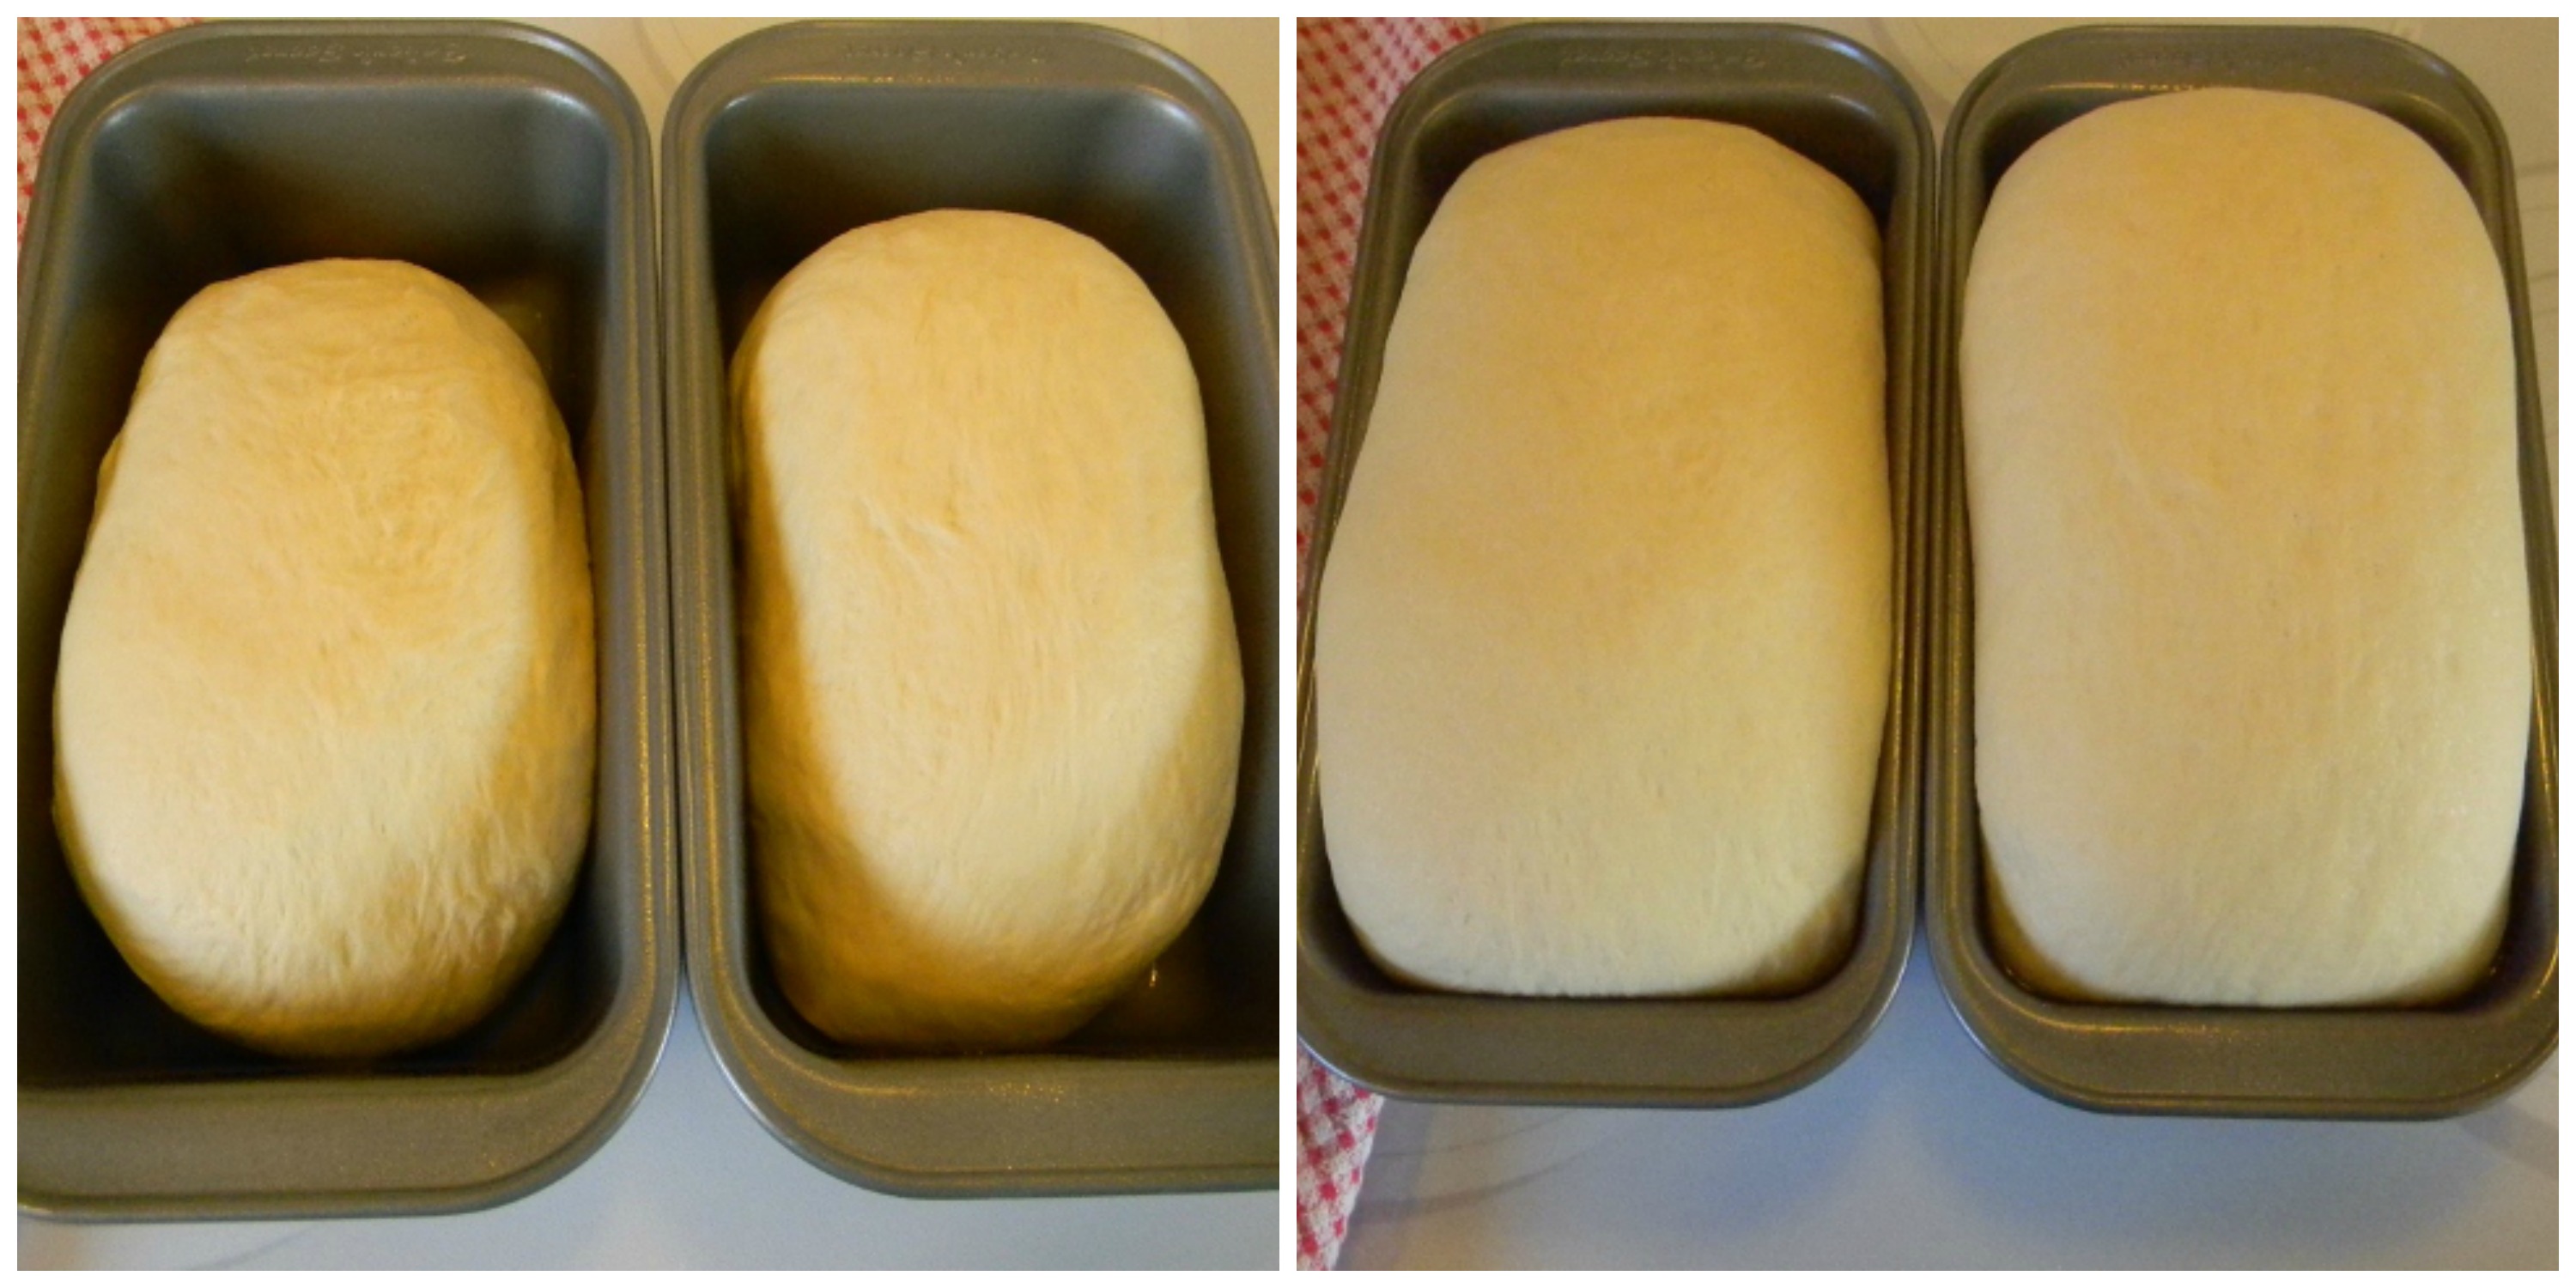
Step 5 – Grease two 9X5 inch loaf pans. Divide the dough equally and shape each piece to fit in the loaf pans, place in the greased loaf pans and cover loosely with plastic wrap. Allow the loaves to rise at room temperature until doubled again. It will take about 30 minutes this time.
Step 6 – Preheat the oven to 350 degrees while the loaves rise. Bake for 40 to 45 minutes or until golden brown. The loaves should sound hollow when tapped. Allow loaves to cool completely before slicing.
This bread works great for sandwiches, toast and french toast. It is a little crumbly and it goes bad faster than store bought bread, but it tastes better, it’s less expensive and I know exactly whats in it!
This is week six of baking our own bread and I have to admit I’m enjoying it very much! I think it’s time to start experimenting….Hamburger and hotdog buns are next on the list. 😀
Our family has been a “biscuit from a can” kinda family for 11 years. They are pretty good….well, If you don’t think about what a home made biscuit tastes like, and if you don’t read the ingredients on the can. Yep, I looked…..then, I said “yuck!” Then I started experimenting.
This is what I came up with:
Light, Fluffy, Healthy, Yumminess!!
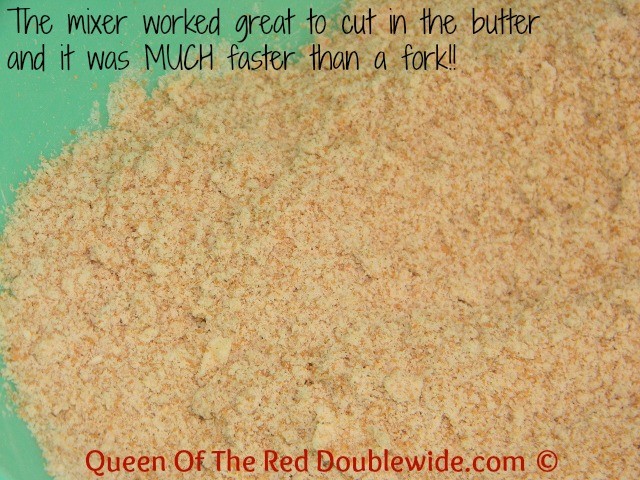
Start by stirring together the flour, baking powder, cream of tarter, and salt.
Then cut in the butter until crumbly. Here’s a little tip…instead of standing at the counter (forever) with a fork to cut in the butter. I put mine in my kitchen aid and let it mix for a minute (I cubed the butter first). It worked l great, but be careful not to over mix! Over mixing equals tough biscuits.
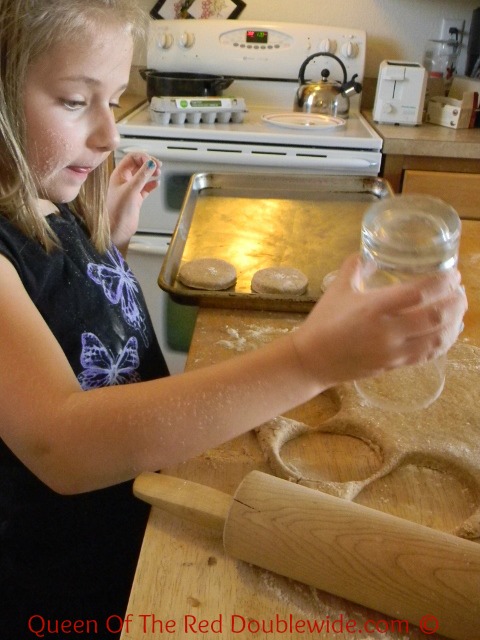
Combine the egg and milk; stir it into crumb mixture until moist. Turn onto a floured surface and knead about 10 times. Then roll out to 1/2 inch thickness and cut biscuits out with a cup or cookie cutter.